Our master bathroom renovation seems to be the project that just won't end. Days have turned into weeks, weeks into months, and months into years. As far as I'm concerned, a relaxing and hot bubble bath in our salvaged claw foot tub is a faint light so far off in the distant end of the DIY tunnel we're in that it might as well be an unreachable star. While it's overwhelming (and a bit depressing) to think about how much work we still have ahead of us, I'm thrilled to report that we've started moving into some of the "fun" stages of the project, for example, paint selection.
Much to Alex's dismay, I often jump ahead (he likes to say "out of order") to the fun stuff in order to keep myself excited and energized about a project. My quest for curtain fabric some six months ago was just that. After settling on the "imitation crewel" Ladbroke Peacock fabric and scoring a great sale online (only $18.00 per yard), I've been occasionally pulling it out of the bag to admire it and dream about things like paint colors, accessories, and art we'll ultimately place in the space.
I've had a pretty clean design plan all along for this space, knowing I wanted a shade of gray on the top half of the walls to pick up on a color from the fabric. This will be offset by a subtle antique white on the lower half (the same custom color we've used on the trim throughout our home), with pops of turquoise accessories.
Alex and I went back and forth, and after poring over probably fifty paint chips, I narrowed it down to two options: Benjamin Moore's Smoke Embers and San Antonio Gray.
There have been countless times when I've jumped ahead, skipping past the important step of sampling paint on the walls of the space. That's why our family room was once painted in a shade that resembled melted mint chocolate chip ice cream in the evening...
...or why our bedroom was once such a garish shade of yellow that we didn't need alarm clocks to rouse us from our sleep in the morning.
I've since learned the error of my ways, and with the cost of a gallon of Benjamin Moore hovering around $70 from our local Ace Hardware, I wanted to make sure we got it right on the first try. I picked up two of their pint sized testers, and with a foam brush applied two sample areas of each color, on opposite sides of the room. Each test area received two coats of paint. I made sure to choose one area next to the window and the other next to the door so I could see how the color played out in different lights and during different times of the day.
I made sure to give it time to dry before I started passing judgement, then we lived with it for several weeks. We admired it at different times of day, in different moods, and let time pass so we didn't feel like we were rushing into the decision. The problem though? Alex and I were in split camps on our top pick.
I liked Smoke Embers because of the slightly warmer undertones (the top color in the photo above). I thought it played nicely with some of the colors in the curtain fabric, and liked how it was a bit more subtle. Alex, on the other hand, wanted something a bit more dark and moody. His point being that there's such a small wall area in the space due to the wainscoting, and he wanted something a bit more dramatic. He also pointed out that "We're doing gray, so if we're doing gray, why not actually make it GRAY, and not just gray. I mean, everyone's doing gray this and gray that, so let's at least make it GRAY."
This likely won't come as a shock to any of my friends or family, but I like to be the one to make decisions. My bull-headed and stubborn personality likes to rear its ugly head in terms of which colors to paint our home, where we'll go to dinner on a Friday night, or even as ridiculous as the path we choose when we take Lulu for a walk. Is it completely obnoxious? You betcha. But luckily, my patient husband doesn't typically care and is happy to let me choose. Until it came to paint colors for our bathroom.
I have to admit I struggled with this a bit. I'm used to getting my way, and I'm used to Alex voicing an opinion about paint but he's not typically ready to put up a fight to get his color of choice. So in an effort to be mature, I delayed making the decision while I had time to get used to the idea of San Antonio Gray. After a couple weeks of deliberation, I came to the slow conclusion that I didn't mind the darker color, and choosing a darker shade would free up a lighter shade when we repaint the upstairs hallway. The deciding factor though, as much as I'm embarrassed to admit, was the name of the color. That's right, this seasoned veteran DIYer, chooser of our home's general decor and aesthetic, decided on a paint color simply by its given marketing name. You see, our last name is Santantonio (the Italian version of "Saint Anthony" for anyone wondering), and we happen to love the city of San Antonio, after visiting and enjoying the river walk and historic district years ago.
With all of this in mind, I was able to acquiesce to Alex's preference and accept San Antonio Gray as our bathroom color of choice. Given many of the beautiful homes we encountered in San Antonio with shades very similar to this one, we both feel good about our selection.
With our paint color decided, we hopped to it. Last week we spent two evenings after work tacking the painting project. The color went on easily, and we assumed our normal roles of Alex cutting in around the crown molding and trim...
...while I rolled the walls and brush painted the corners of the room.
In case you're curious, we used their Aura Spa paint finish. It's our hope that it will stand up to the humid environment of a bathroom while maintaining that more typically eggshell finish we prefer.
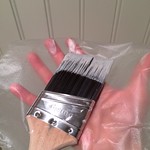
We split the work into two nights, applying one coat each night. Overnight, in order to save time, money, and paint, we wrap both the paint roller as well as the brush in the self adhesive cling wrap (we like the Press & Seal style), and stow the supplies in the refrigerator. (Here's more information on our tips and tricks to picking the right supplies for a great finish.)
Before using the roller and brush the next day, simply let them warm up for about 10 minutes, unwrap, and get back to painting.
I have to say we're really happy with how the color turned out. The room is starting to look like a room, and no longer a storage area or all white mental institution. It's still pretty sterile, but once we introduce softer elements like the curtains and accessories, it should really pull it together.
Now that there's paint on the walls and all of the trim is its final color, I can't help but feel very excited for what is to come. I've been waiting a very, very, very, very long time for that elusive bubble bath, and this step makes it that much more attainable of a goal. Sure, we still have to restore the window, put down the floor, get shower doors, figure out what to do to refinish the tub, finish the vanity, finish the transom, build cabinets, have curtains made, finish the closet, strip the closet door, paint the closet door, find marble for the vanity top, hang the mirror, get the speaker in the ceiling working, install the sconces, finish the storm window...oh gosh, I feel a panic attack coming on. Wow, doesn't that paint look great?