I think we're all familiar with the saying, "Waste not, want not." It doesn't matter if I'm working on a whole room renovation or a tiny little task, I hate throwing out things that I can classify as "perfectly good." Sure, construction tends to have its fair share of destruction associated with it, and any level of true construction will ultimately generate a good amount of waste, but I'd say we've been pretty good about not throwing things out that still have a useful life beyond our immediate plans.
Sure, Wendy may sometimes lovingly refer to my penchant for protecting the things others may discard as "hoarding," but I'm sure she's not at all serious...right? I mean, our house may be small-ish, and our storage scarce-ish, but she understands that sometimes it's best to hold onto things that might be useful in the future. (Ahem, scrap wood.)
A perfect example of the benefits of holding onto something that many others might have thrown out actually came up on Sunday evening, but it all started several months ago. Back when we were working to replace our old and broken down counter tops with IKEA butcher block counters, we purchased three lengths of butcher block. After completing the project, we still had two short lengths of butcher block left over. These lengths were trimmed from the shorter counter top areas where the excess simply wasn't needed.
Rather than do what most normal people might do and throw the remnants out, I stashed the thick oak boards in the basement and hoped we'd eventually be able to use them for something else. Fast forward to this past weekend when Wendy suggested we might want to use the excess pieces as, well, butcher blocks. More specifically, butcher block cheese boards or cutting boards. This sounded perfect to me. I knew I'd be able to cut them to size without issue, they'd no longer take up room in the basement, and the pieces would have no problem doing their job as butcher block, since that's what they were born to do.
I started the task by assessing the sizes of the leftover pieces to determining the best possible dimensions for the block I was cutting. We had two remnant pieces of butcher block, the first was 25" x 11" and the second 25" x 20". After much debate, Wendy and I decided to keep the 25" x 11" as is, to use as a long cutting board/serving tray. The second we planned to cut in half, giving us two 20" x 12-1/2" boards.
With our measurements determined, I squared up the first piece of block using the table saw. The work I had done over the summer left a badly burned and poorly cut edge on two of the pieces. I squared up and removed the burned areas simply by making a pass to shave off about 1/8" of material. Here's the nasty edge before...
...and here it is after. A slight improvement, I'd say.
After a few cuts to square the material, and a single pass to slice the board in half, we were looking at the sizes of butcher block we'd end up with. It was perfect for a few pieces of remnant wood that many would have tossed into the trash.
To enhance the look and make the boards look more finished, we turned our attention to the edges of the wood. We didn't want to do anything decorative or ornate as we had done to the butcher block in the kitchen. Instead, we wanted a standard and classic edge for these items, which is just a gentle rounded corner.
I setup our 1/4" round over router bit on the router table and zipped off the corners of the sharp edge material.
I first tried it out on a piece of scrap to be sure it was the profile I wanted.
Once I was happy with the look, I went ahead and routed the top and bottoms of all three pieces.
After removing the edges I had a small issue with one of the pieces. As I mentioned in our butcher block review, the IKEA butcher block is not made up of solid pieces of wood, but rather several pieces laminated. While cutting the edges one of the small pieces of material came loose.
To correct this, I simply glued the back of the piece and clamped it to its original location. I just had to let the glue set up for about an our before trimming the piece again and completing the job.
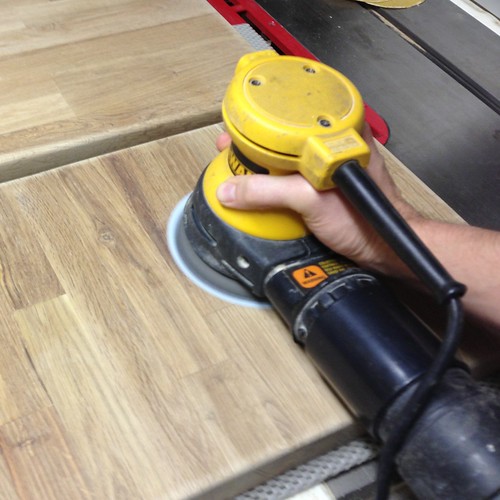
With all of the routing done, I grabbed my random orbital sander to begin the whole finishing process. Much like our counters, I began the sanding with an 80 grit paper. With this paper I thoroughly sanded every flat surface, edge, and corner.
The main thing about the sanding was to make the edges and corners look naturally worn and not machined. Using the orbital sander in a bit of a gentle manner, I worked my way around the edges of the whole thing. What started out as this...
...ended up looking like this.
After sanding everything with the 80 grit paper, I dampened a rag and wiped down each of the pieces. This both clears the dust from the boards, and it also raises the grain of the wood.
It's amazing what the difference in color is after wiping it down with just water.
Once the slightly damp wood dries, it feels a bit fuzzy and is ready for the next sanding. The second sanding was done with a 120 grit paper. I made sure to really go over the whole thing with the 120 in a thorough manner. This step removed the last of any hard edges or lines. Once finished, I simply repeat the damp rag process, then sand a final time with a 220 grit paper.
What started as several remnant pieces of counter were effectively transformed into usable pieces of cutting board. To finish them off I decided to try a slight modification to our standard mineral oil approach. I figured I could try an alternate finishing method here, and if we liked it, we could use it on our counters as well.
I've heard good things about the Howard mineral oil and beeswax compound. It uses the mineral oil approach to nourish the butcher block, followed by the beeswax to fill gaps or voids on the surface and polish out to a smooth finish.
We'll have to do a more thorough write-up on this once we have more experience with it.
I began applying the mixture and could immediately see a difference in the added wax.
Look at the comparison from one coat of oil/wax applied to the back board, with nothing applied to the front board.
After spreading the mixture over all surfaces and sides if the cutting boards, I allowed it to sit overnight before using a rag to polish the excess away.
I applied three coats, since this is new unfinished butcher block, and was left with a smooth and shiny surface. This was absolutely perfect for what we were trying to achieve.
After an hour or two of effort and a few days of oiling, our excess wood--and what some might consider trash--had been transformed into a few perfectly sized cutting boards or cheese boards, just what you'd want for entertaining.
If you've ever installed butcher block anywhere and have excess laying around, this is a perfect use for it. And if you know someone installing butcher block, it might not hurt to ask them if they have any cut pieces they aren't planning on using. It might be the perfect way to turn someone else's trash into your treasure.
Do you have any great uses for items that most would typically just throw away? Or have you ever tossed an item in the garbage only to think at a later time "you know, that thing I trashed would have made a perfect..."? We'd love to hear.
Seen on...