We have a somewhat major bathroom progress update for you, and it involves some serious steps forward on the floor and how hot it will be.
Quite some time ago we mentioned the debate we'd been having about our master bathroom's radiant floor heat. It wasn't a debate about whether we'd install in-floor heating or not, but rather a debate about what kind/brand to install. Today I'm happy to report that not only is that debate finished, but we're actually in the mid stages of install. I know! Can you believe it? Me either!
But let's take a step back for a moment so I can fill you in on the whos and whats of this phase of our ultra marathon bathroom renovation.
In-Floor Heating Selection
As much as I would love to put in hydronic radiant with PEX, our lack of a boiler and accompanying mixing valves, expansion tank, flow check valves, outdoor reset, and every other thing we'd need for water driven radiant heat made that dream slightly cost prohibitive for our bathroom. However, recent technology improvements and a number of companies specializing in electric in-floor radiant heat, especially those geared toward the DIYer, mean that our toes have the possibility of wintertime comfort on our typically cold stone bathroom floor without the need for a budget breaking boiler and all else that entails.
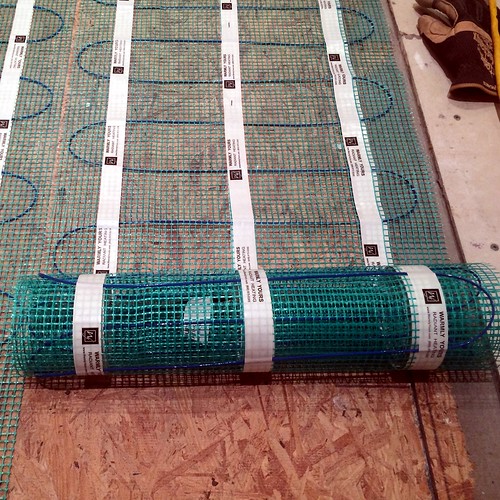
After careful consideration, much flip flopping, a tremendous amount of research, and hours spent reading pro comments, DIY reviews, and blog posts on both the install process and the resulting quality and performance of the products, we decided to purchase a WarmlyYours heating mat.
There were a few important items that factored largely into this decision, and none of them had anything to do with getting something free (because we didn't, this is 100% not a sponsored post).
- The online help and documentation for the mat was great. It had the information we needed, warnings where necessary, and omitted the doom and gloom suggesting imminent death when it came to attempting the install yourself.
- I really liked the fact that the mat was simple fiberglass mesh with heating wire already attached, as this approach limited the additional height the mat would add. Other approaches are sometimes twice as thick.
- The sizing of the mat was perfect for our space. We have a straight shot of 13-1/2' by 3' with almost no obstacles (toilet front only), so the 27' by 1-1/2' mat would essentially be a perfect fit, and I didn't have to worry about a difficult and time consuming free form install that can more easily damage the wires and cause me to go insane.
- And finally, I got all of the warm and fuzzies I wanted from the product reviews. From everything we've looked at, it seems like the size we need will not only warm the floor, but will do a more than adequate job of acting as a secondary, or even primary heat source for the whole room in the winter.
Ordering
We pulled the trigger and ordered our heating mat several months ago. As I said, after carefully measuring the area of the bathroom that would be largely free of obstructions, we ended up with 40.5 square feet of area where we would want under floor heat. This includes the area directly in front of the tub, toilet, shower, and vanity. The space is a 13.5' by 3' rectangle, which happened to work out perfectly with their mat selections. After a few email exchanges and filling out a few forms on the WarmlyYours website, we had our radiant heat mat cut to our specifications just for our install.
To say the ordering process was simple is an understatement. They have support staff on call and ready to assist with specific difficulties within your room. And the support manuals, instructions, and warnings that come with the product do a great job of spelling the whole thing out, including the supplies you'll likely need.
In addition to the heat mat itself, we also ordered one of their "SmartStat" programmable thermostats and a circuit tester to monitor for any breaks or problems during install.
Our install was so simple that I didn't even take advantage of their free room layout plan.
In a matter of about seven days we had what we needed, now we just had to get the bathroom to a point where it was ready to lay the mat.
Install
Fast forward days, weeks, months, and we arrive at today. After what felt like an eternity of staring at the box of radiant goodies on the floor, our bathroom was ready for the radiant mat. Oh the joy! Some of us (I'm looking at you, Wendy) thought this day would never come. But alas, it is here, now let's see if I can avoid screwing it up.
Over the last long while we prepared the sub floor, laying a layer of 3/8" HardiBacker in the non-heated sections of the room. This HardiBacker border left the 13.5' by 3' channel we'd need for the heating mat right down the center of the room.
My plan is simple. HardiBacker border, heating mat in the center, then a layer of self leveling concrete (SLC) over the heating mat to bring it up almost to the level of the HardiBacker, followed by isolation membrane, and ultimately, the tile floor. If you're reading that and thinking, "That sure sounds like overkill...", I must simply respond in saying, "Welcome to my world."
Simple or not, this will be my first time working with a radiant heat mat and SLC, so I've been a little preoccupied in my head, almost entirely consumed by the paranoia of ruining not only the heating mat but also the SLC pour.
But in reality, and outside of the dark corners of my mind, install of the heating mat turned out to be very straight forward. I began by simply rolling out the fiberglass mesh mat with the start near the closet where the thermostat will reside. But before I started I took an OHM reading to ensure the wire's resistance was within 15% of expected then hooked up our circuit tester to be sure I knew if I damaged the wire at any point. Glad that I had paid attention in physics class to know what I was actually measuring. I crossed my fingers and soldiered ahead.
Once I reached the end of the 13.5' run, I just cut the green mesh with scissors and made a U-turn back towards the door.
As I mentioned, I had to do a bit of free form in front of the toilet at the far end of the room, but it didn't take a tremendous level of effort. It simply required I free some of the wire from the mesh mat and come up with a creative little pattern that maintained the two inch required spacing while staying away from going under the lip of the toilet. (Okay, so this was the part I was most worried about and obsessed over endlessly. Well, it really was easy, which made me worried it was too easy, but those are my own issues.)
Once the mat was in place, I shifted my focus to tacking down the mat. Since I'm planning on using SLC over the mat I need to make sure we don't have any floaters in the wire. This means stapling down the mesh every six or so inches and then hot gluing the wire where necessary.
It took me about an hour to glue and staple the mat into place, all the while I was listening for the alarm to be sure I didn't damage the wire. Though I was certain I would end up doing something stupid, that alarm that sounds like a swarm of angry bees never once sounded during this phase. I breathed a sigh of relief and went to the next step.
Once everything was secured I took another OHM reading to be sure it was still within 15% of the expected range. It was.
Everything was going smoothly and all of my readings were normal, so I pushed on to the next step. In order to ensure proper function of the thermostat I needed to place a supplied temperature sensor in midst of the mat where it could get an accurate reading of the floor's temperature, then glue it into place. I had become a pro with the glue gun over the past several minutes, only burning myself several dozen times, so this was a piece of cake.
One more OHM reading for sanity and we were able to mark "Install Radiant Mat" with a big old check in our master bathroom win column. My paranoia was largely unfounded and the whole process went very smoothly overall, which once again made Wendy say, "I really don't know what your problem is." I agree, neither do I.
Hopefully one of our upcoming posts will sing of our success in using self leveling concrete pour. Can I tell you just how nuts I'm making myself about that step in the process? Let me assure you, it's not pretty. I can't wait to tell you all about it in a few days, largely because that will mean that either I'm done, or I've made a horrible mistake and have to confess my DIY sins to the Internet. I hope you'll enjoy either way.
In somewhat related news, Domino Magazine published their list of the Top 17 DIY Blogs for 2014 on their website today, and they've placed us in their list! We're very happy to be included among so many other talented bloggers, and are also very happy that Domino is making such a great resurgence. So if you're new to our blog via Domino, welcome, we're so glad you've found us.