Old windows are glorious things of beauty, and the wavy glass they possess are no small part of their classic winning looks.
If you've ever had a chance to see the undulations of light cast by a ray of sun through imperfect included glass, or enjoyed the subtle dance of fractured and warped reflections caused by true divided light windows with subtly bubbled and wrinkled glass, you know exactly what I'm talking about.
In our window restoration we've gone to great lengths to build a steam box in order to remove and protect the unbroken original glass from our window sash. We consider ourselves extremely fortunate to have many panes of our original 130 plus year old glass. Even though many of the pieces are scratched from years of use, we will certainly protect, restore, and reinstall these original panes whenever possible. However, some of the panes of glass are cracked or have been replaced with modern glass over the years.
Of the four panes of glass I had removed from the first set of two over two window sash we're restoring, one was a more modern replacement, one was broken in the corner, and two were still usable and in good shape.
We planned to replace the broken and modern pieces of glass, so the hunt for the replacement began. I set the two that I was going to use off to the side to glaze them, and set out to find my replacement glass for the other two pieces.
Where Do You Find Wavy Glass?
For replacement wavy glass we really have three options.
1. Buy New Wavy Glass - We can source the glass from a vendor the reproduces "handmade" glass using modern techniques to create the historic look. There are a few popular places that sell new old style wavy glass, Artisan Glass Works (AGW), Hollander Historic Glass, and Bendheim Glass. Of these two, Bendheim tends to be pretty expensive, and their glass is intended for cabinets. AGW produces wavy safety and energy efficient glass, and they are actually less than an hour from us, so that may be a good option for us in the future.
2. Order Old Wavy Glass - We can order salvaged wavy glass from a variety of locations, such as salvage yards. There used to be a guy that would advertise in Old House Journal, and he was located in Frederick, Maryland, so we ordered some old wavy glass from him about 14 years ago. In these cases we specify the exact size and style (level of imperfections) we're looking for, and the service will find glass that meets our needs and cut to our specifications. This certainly takes a fair amount of the guess work out of getting old glass, and the glass you're getting is truly antique, not a reproduction. However, the service comes at a premium and you'll likely pay double or more than what you'll pay if you do it yourself.
3. Salvage Wavy Glass Yourself - We can go to the salvage yard and find ourselves an old sash that has glass with the look and size we need, buy the whole sash, and then take it home to pull the glass and cut to size ourselves. This certainly takes the most time, and is also the most risk as you can run into issues whenever you're cutting old glass, but you get to pick exactly what you want. This is often a very important aspect of selecting the glass that's right for you. Iron levels in old glass impact how green they tend to look, and if you're trying to match the glass you select to some existing glass, getting the right tint can be critical.
Can you guess which approach we decided to go with? Don't worry, we won't keep you in any suspense.
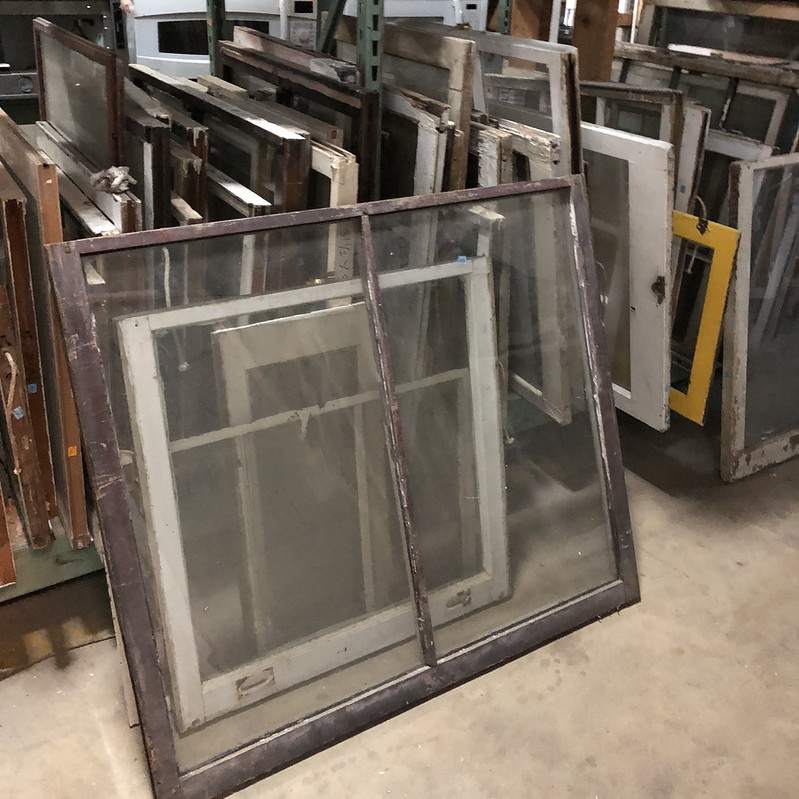
We decided on option #3, "Salvage Wavy Glass Yourself." Our search took me to one or our favorite local salvage and re-use yards, Community Forklift.
Aside from finding a whole ton of amazing stuff that I really wanted to take home, including this whole door in jamb assembly with intact transom, rim lock, knobs, rosettes, escutcheon, and hinges for just $90!!!!...
I also found a great window for our purpose. The trick here is finding sash that has large enough pieces of wavy glass that it will be easy to trim it to the the correct size after freeing it from its existing sash.
If the glass is only a little larger than what we need, it will be near impossible to cut it to the correct size due to the limited leverage we can establish for the cut. If you've ever cut glass, you know what I'm talking about. I always look for glass that is either exactly the right size or at least 4" or more larger than what we need.
The sash I found was fairly large, and had two really nice pieces of wavy glass in it. Total cost was $86, and I decided to live dangerously, tempting fate by only purchasing this single sash with just enough glass. This meant the window restoration gods had to look kindly upon me and not allow me to screw up the cuts.
Wavy Glass Shopping Pro Tip - Bring Glass Cleaner and Paper Towels to the Salvage Yard!
When shopping for salvaged glass it's important to remember that these old sash are usually very dirty! When the glass is extremely dirty, it's very hard to see whether the glass you're getting is actually wavy to the degree you need it to be or not. So if you have some cleaner on hand you can give it a quick rinse to check the adequacy of the imperfections.
After a tenuous trip home over what I swear are some of the roughest and most pothole filled roads in the DC metro area, I successfully transferred the sash into our basement without breaking any glass! A minor miracle, I assure you.
Beyond the size of the glass, one of the best parts about this sash is the fact that the glazing putty had been so poorly maintained that it almost fell out without effort. It simultaneously made me feel sad for the house it came from, and happy I had to do a little less work. Freeing the glass from the sash was only a matter of removing a few glazing point triangles and loving when a plan comes together.
With the glass free from the sash I could see just how much larger the pieces were than the sash it was destined to go into.
I gave both pieces a thorough cleaning with a foaming glass cleaner and a razor to get any residual gunk off. This is an important step to as it allows you to see any glaring imperfections you may want to avoid when cutting to size.
Things like scratches or scoring lines that could end in an easier fracture can often be eliminated from the final piece of glass with a little bit of careful planning.
Tools You Need For Cutting Wavy Glass
When it comes to cutting wavy glass, it's often an intimidating project that, in reality and execution, is actually very easy. First of all, it's extremely important that you have a handful of inexpensive tools and supplies.
Glass Cutting Tools (and a few glazing tools)
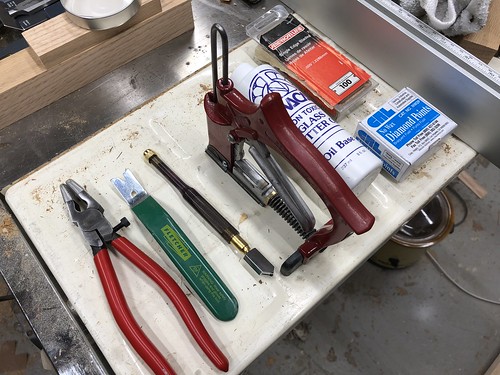
The following are the invaluable tools and supplies you'll want to pick up if you're looking to do a little glass cutting.
- Sharpie
- Straight Edge
- Oil Fed Glass Cutter
- Cutting Oil
- Glass Running Pliers
- Cut Resistent Gloves
Cutting glass is methodic and not particularly difficult endeavor, but certainly has a process. The key is to measure carefully, really carefully, and then just cut once. When I cut I measure the opening size of the glass needed and deduct 1/8" from the measurement. This will allow for a little wiggle room for movement and contraction that could occur, as well as a possibly imperfect opening where you're placing the glass.
I like to measure and mark the glass using a sharpie so I know right where I'm going to be cutting. The sharpie line is simply a point of reference than anything I'm really trying to follow on straight cuts, and it washes off easily after I'm all done. After marking with the sharpie I gently clamp the straight edge just off of the line so that my glass cutter can ride the straight edge the whole length of the cut.
If you're doing a curved cut you'll probably need to free hand things a little, but straight cuts almost always go easier if you're using a straight edge.
After the glass has been marked it's time to score using the glass cutter. A sharp cutting wheel is paramount to a successful cut. It's debatable whether cutting oil is useful or not, but I've always had better luck with cutters that incorporate auto fed oil as part of the cutting process.
Actually, calling this tool a "glass cutter" is a bit misleading. This is really a glass scorer. It's job is simply to score the glass on a line that will give the glass a predictable line where it wants to cut. The slight relief the score makes in the surface of the glass should be just enough encouragement the glass needs to break along the line you want it to break on. When scoring the glass the single most important tip is to make a single slow pass with even and not too hard of downward pressure on the scoring wheel. Remember, you're not trying to cut the glass with the wheel, you're just trying to score it enough to encourage it to break on that line.
Notice that I'm wearing the cut resistant gloves? This isn't just to protect me in the event I accidentally shatter the glass, it's also because freshly cut class is often very very sharp. It can slice your skin before you know it and it's a nasty type of cut that's painful and takes a long time to heal. So at the risk of sounding like a "The more you know" campaign, be sure to wear your safety gloves when cutting wavy glass.
Once you have your glass scored on its first line, grab your pair of running pliers. These pliers are mostly flat but have a very slight flair on either side of the center line. The pliers are also usually covered at the end with a rubber sleeve that will protect the glass. When you line the pliers up with your score line you apply subtle pressure that's just enough to start the glass breaking along the score line. When it works well you can see the glass snap and start to crack along the line.
After you start the break on one side of the glass move over and repeat it on the other side. Then use the back of your glass cutter tool to tap along the line to encourage the crack to continue. When all goes well, you can apply a little downward pressure on the glass and the piece will cleanly break off for you. Sometime, when that's not working, it works well to hang the glass over the side of your work surface, supporting it on either side with both hands. Then, with the line sitting right at the edge of your surface, let gravity do its thing and put a little pressure on the glass. It should crack right along the line.
Now, don't expect every single cut to be flawless. In fact, plan for it to not be particularly flawless! In my case the glass pieces were large enough that they allowed me to situate my cut lines to accommodate a little mistake. Lucky for me I was thinking ahead, because a mistake was certainly made.
As you can see from the photo, even though the entire rest of the cut was perfect, the last 8" or so of the cut unexpectedly skewed off to the side by about 1/2". Luckily the break didn't suddenly jump across the glass (which happens). I was able to setup my straight edge and score it over 3" to the left, which broke exactly where I wanted it to break. I breathed a sigh of relief after the last cut and thanked the wavy glass gods for their support.
At this point we had ourselves four pieces of wavy glass waiting for reinstall among the two repaired, prepared, and ready to be restored original window sash.
Next time I'll fill you all in on the tedious, sometimes frustrating, but often fulfilling process of glazing old window sash. When you have the right tools, materials, and a little experience, applying glazing putty can be an oddly relaxing process.
Do you have any experience cutting or sourcing wavy glass? Do you find cutting glass to be a soothing or intimidating proposition? Also, I think I'm going to be headed back to Community Forklift this month to pick up a bunch more glass that I'll need. I just saw on their website that all of their window sash are 40% off for the month of June! I love a good wavy glass bargain!