We're very excited to report real and discernible progress on our window restoration project.
Long at last! Yes, it's true! Can you believe it?
This project that we've been planning for and talking about taking on for a dozen years is finally underway. Not only is it in progress, the progress we're making is real and honest to goodness progress. I know we're not often known for this kind of news, but it's happening and it feels so good! Especially because the sash started out looking like this.
Today I want to fill you all in on part one of what will ultimately be a three part post on our sash restoration. I know it may be a little detailed (and boring) for some, but I hope it gives people looking to restore their windows an approach that may work for their purposes.
Also, it wouldn't be an “Old Town Home” project without interruptions from several other unexpected projects, like the need to completely pause to repaint and re-decorate the dining room, or another pause to strip and hang an antique door that's been in our basement for 8 years (because why not?). It's DIY ADD at its finest.
Anyhow, after we finished up the DIY steam box and built ourselves a temporary window, we launched into the paint removal and restoration of the first pair of sash we removed from their opening.
The first step in the process was to remove the glazing putty and glass after steaming the sash.
About 40 minutes of steam seemed to soften the glazing enough to let me scrape it out without much effort. It worked really well on the oldest glazing, but there was some newer stuff on one pane of glass and it was far more difficult. It still came out, but it was harder than I expected. Steaming didn't seem to impact the wood at all, as it never got spongy or absorbed any significant amount of water. This may be different for windows of different periods and material, but this was our experience on our windows.
I also removed as much of the paint as I could after steaming. The steam seemed to really soften up some of the paint, but left other stuff completely intact. I expected this, so I wasn't too frustrated, but I have to admit, I sort of held out hope that the steam would just cause the paint the shriek and run away from the wood.
After I'd removed as much of the paint and putty as I could with the steam, I turned to using SmartStrip chemical stripper to get more of the paint off.
Once I let the stripper work for about 12 hours or so, I got to removing the paint sludge. It was all coming off of the flat areas really well, but was really sticking on the muntin details. Again, as much as I expected this, I'd hoped for better.
One thing that was very interesting about this paint stripping process is something I've seen on other moulding in the master bedroom (where these window sash come from). Just like the baseboard and window casings, the interior portion of the sash had an initial paint job from about 130 years ago that was a faux wood finish. Meant to make inexpensive pine look more exotic, like oak or mahogany, the faux paint application was all the rage back then. Very cool to uncover it repeatedly in this room through all of our paint stripping.
After removing the majority of the paint with the stripper I moved onto sanding. To sand these sash I used a new tool combo we’d recently purchased. Using a Dewalt 10 gallon HEPA dust extractor in combination with a Festool Rotex RO 90, with hard pad and 80 grit granat paper, I was able to rip right through the remaining layers of paint on the flat sections of the sash. What an awesome sander/vac combo this is. The dust collection is excellent and the smaller 90cm head on the sander is absolutely perfect for this sort of intricate detail. Additionally, the triangle sanding pad on the oscillating sanding setting allowed me to get right into the corners without doing any damage to the sash. I’ll certainly talk more about these tools in the future, but this is a real winning setup.
With initial sanding complete I turned to using the scraping tools and a heat gun where necessary on the remaining paint or glazing that was holding onto the crevices of the detail on the decorative profiles.
Once the entire sash were free of paint (or as close as I could get them) I turned my attention to repair and rebuild the sash that had begun to more or less fall apart at the joints.
First I wanted to glue up any broken or split pieces that hadn’t come completely free. Then I cut some filler strips from old salvaged pine I found in the attic.
I carefully cut them to size, but still needed to plane them a bit to get them to fit nice and snug.
These strips were meant to fill the channels cut in the sides and top or bottoms of the sash based on where the old zinc weather stripping was let into the sash.
We’re not using this old style weather stripping (we're using standard spring bronze), so filling these gaps will only make the windows more strong.
In order to get a good hold and allow the glue to cure, I clamped boards to the side of the sash to evenly force the strips into place.
After I glued the strips in place and clamped them to cure, I planed and sanded them flush with the surrounding sash.
Finally I wanted to re-secure the wood pegs that were cut and installed to secure the mortise and tenon joins of the sash together. In most cases I was able to remove the old peg, clear away dirt, and re-glue them in place.
There were a few pegs that were just beyond saving, and for these I cut new pegs from old stock and inserted them into the window sash.
I cut these small pegs and then slightly tapered them with my hand plane to get them to be a nice tight fit.
After gluing them in place I used my oscillating cutter to trim the new pegs almost flush with the sash.
At this point everything that needed to be repaired by wood or glue was done. The sash no longer wobbled when stood on end and should last for many years to come. The next step was to fill all of the gaps, cracks, missing sections, or crevices with Abatron WoodEpox.
This allowed me to rebuild any structure that had been lost over the years, and also fill in anywhere my new filler strips weren’t perfect or where my pegs didn’t end up a perfect fit at the top.
Allowing for about a 24 hour cure time, I broke out the sander again to turn the lumpy overfilled epoxy into smooth and nicely proportioned repaired sections of window sash.
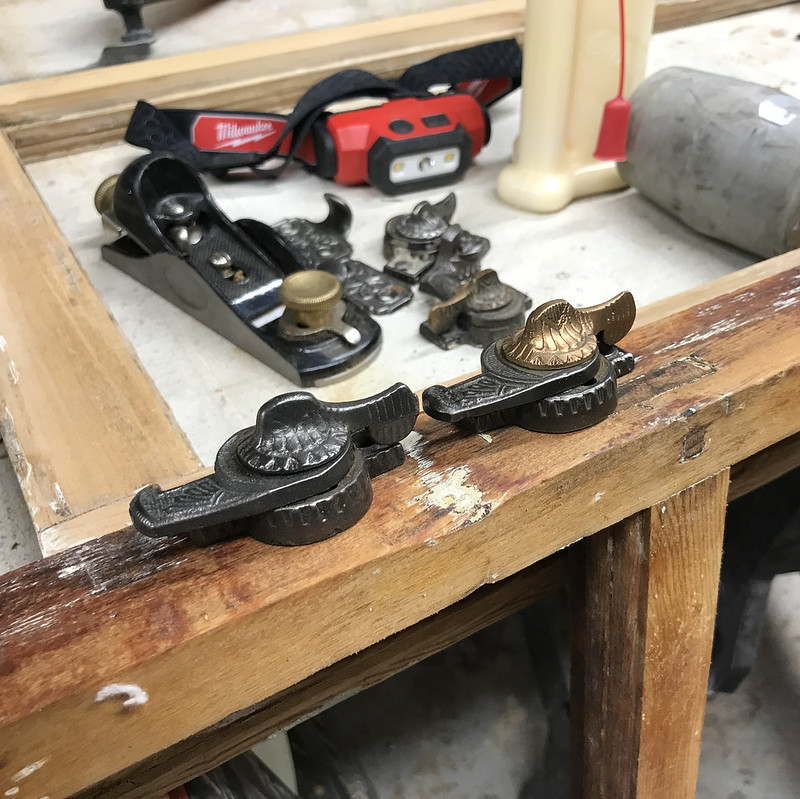
At the same time I also used steel wool and some elbow grease to really get into the detail areas of the sash, completely sanding everything nice and smooth. Anywhere that I saw a little paint left I was able to remove it and spot sand. I also took a few minutes to daydream about the future when we'll put some hardware back on these windows that have been long neglected. We're debating between the all cast iron look vs one of the sash locks with brass/bronze accents. Which would you choose (keeping in mind the sash will be painted white)?
We're only about 1/3 of the way done with the restoration of these sash at this point, but they were looking great. They had been beaten up over time, but with paint stripping, repair, and epoxy they had made them solid and sturdy once again and ready for their next step in restoration. I can't wait to share more with you and I really can't wait to get them reglazed and back in their home. It's not a fast process by any means, but the end result will almost certainly be worth the effort.
What do you think so far? Is this something you'd be willing to take on in your home?