My mom loves to tell a story about how "detail oriented" I was as a small child. I think I was about six years old and was apparently creating some sort of improvised 3D construction paper house using a pen, scissors, and scotch tape. She fondly remembers that I wanted the house to be brick, so I grabbed some red construction paper for the walls and began free hand drawing every little line for the mortar. I guess I spent hours drawing each little line, and if I got something wrong, I'd start over on a new sheet of paper. Little did I know, this was an early example of the tone that would be set for so many projects throughout my life.
Like the construction paper house, the concept of tiling with a small mosaic pattern in a large room all begins so simply. The desire is obviously to have a beautiful room where the floor is covered by tens of thousands of tiny little pieces of naturally occurring stone that have been chipped off a much larger stone and sculpted by machines into tiny semi-consistent shapes. What could go wrong?
The answer is even simpler than the perceived goal. A lot can go wrong! Mosaic tile and being a perfectionist in no way go together like peas and carrots. This is a difficult lesson we've learned during each of our tiling processes, and one that has several stages of tiling grief before reaching tiling acceptance.
However, we seem to keep choosing mosaic tile of some sort time and again. Like we're some sort of DIY gluttons for punishment. Our first piece of evidence, the guest bathroom:
We love the tile, yes, but getting that floor in place took every fiber of my being and I still see problems that no one else sees.
Evidence item number two...our vestibule. Teeny tiny as far as area, but a giant pain to lay since nearly even single sheet needed to be cut in some way.
After our last master bathroom update we had reached the 95% mark on laying our tile. But that 95% was more about volume than actual completion of work.
The idea in laying tile like this is to get the majority out of the way and save the hard stuff for last.
Come to think of it, tiling ends up being treated the same way a lot of people treat most things in life. Empty the bottom dishwasher rack first because the top is a pain. Wash the whites and towels first because folding the colors is a pain. Rip apart your whole house first...because putting it back together is a pain. You get my drift?
Anyhow, we had laid the majority of the field tile and left the more difficult areas that required measuring, lots of cuts, and a fair amount of patience for the last few steps.
Good plan! Until it came to doing all of the detail stuff. It's times like these where I wish we had a house elf of the Harry Potter variety that could assist with the tedious work.
Our final steps in laying tile required cuts at the door threshold and inside the closet (the one with the awesome panelled walls). We actually made pretty short work of it since the walls in the closet will ultimately have small shoe molding to mask any variability in the cut.
To be honest, I was dreading the door threshold. After we chose to lay the tile "on point" instead of "on side," there was the nagging voice in my head that kept saying, "Now you're going to have to make lots of cuts like all of those people on your blog said you will." To make matters worse, the wall is ever so slightly out of square to the lines of the tile and the rest of the room, so the threshold isn't a true 90 degrees to the pattern of the room. But when it comes to mosaic tile, this turns out to be not that big of a deal.
I laid the tile in place and made pencil marks on the tile where it met the edge of the threshold. Using a straight edge I connected those lines and took the sheet down to the tile saw (which is in the basement, my legs got a workout on this project). I then slowly cut the sheet to give myself that slightly askew line the threshold needed. Any cuts that were too small to make on the sheet, like the tiny little triangle points, I made by cutting individual tiles. It wasn't terribly difficult, but it was a bit time consuming. But the end result? We have a nearly perfect threshold that should look pretty good once grouted.
Now we just need the marble slab piece to fill in the transition.
One would think that laying this final critical element of mosaic marble tile would mark the completion of this major step in our bathroom journey. Perhaps we could now move onto sealing the stone and then grouting. However, if one would think that we logically move from one thing to the next, completing each task and then tidily moving onto the next step in the process with no significant steps backwards...well, I'd say one does not know us well.
No way, no how, could we leave well enough alone. After allowing our fully laid floor to cure for the prerequisite 24 hours, we began walking over the beautiful stone and discovering its glaring imperfections throughout. I know I may have said we are embracing the "consistent inconsistencies" of the stone, but this is so foreign to us that we were having a particularly difficult time letting some of the more egregious flaws fly.
For example, do you see the glaringly horrible space that's too large running along several of the tiles that clearly shows the demarkation line separating two sheets in the following photo?
It may be a little harder to see in the photo, but when we saw it in person we couldn't stand it. Look at the line three tiles south of the detached sheet.
So what do you do in this situation? How do you resolve your tile laying mistakes, or even previously unseen issues in the tiles themselves, beyond the 24 hour dry time of the thinset?
Well, you start by defining the tiles that are particularly offensive throughout the whole room. In our case we were looking for tiles spaced too far apart, tiles way too close together (especially those touching), tiles too tall or too low, significantly crooked tiles, and collections of tiles that were off from the pattern in too consistent of a manner. And once you find them all, you mark all of the problem tiles with tape.
This tape marking scheme makes it much easier to identify and move on, rather than attempting to fix every tile you need to adjust. Once you've gone over the whole room and have all of your biggest issues identified, it's time to get to work.
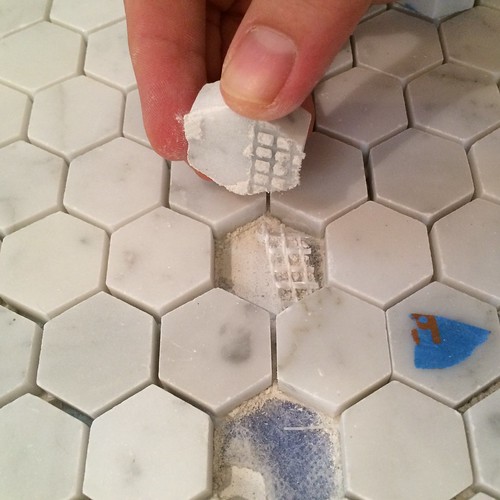
Since the thinset has already cured to some extent, you can't just pop tiles out without causing issues. This is especially true when the tiles are still adhered to the mats they were laid on. Chances are, if you pull up on one of the tiles in the mat, you'll end up ripping up far more than just the one or few problem tiles. In this case I grab my utility knife and begin tracing the perimeter of the tile to cut the mat and free the tile.
IMPORTANT!!! Don't ever do this if your tile is laid on a waterproofing membrane of any sort in a shower or other area that must remain waterproof. There's a pretty great chance you'll perforate your membrane and ruin your whole DIY life.
We didn't need to worry about this on our floor as our membrane is just there for isolation purposes, not waterproofing. So an incidental puncture wouldn't be catastrophic.
Once the tile's sheet is scored, use a pry bar, putty knife, or some other small edge you can use as a lever. I use our pry bar and really jam my thumb in behind it. I find using my thumb in this way protects the surrounding tile from getting chipped edges.
Applying gentle pressure to the stone you want to remove, you can usually pop it right out of its place. As a byproduct, you'll also get a pretty good sense of how well you did in getting the thinset coverage on the back of the tile. Then you just grab the loosened tile and pull it free.
When the tile, or group of tiles, is free from it's location, set them aside. Since they have thinset all over them, it's usually easier to grab some tile from your leftovers to replace the removed tiles.
Before we can replace the removed tiles, we need to clean out the old thinset, otherwise we'll almost certainly end up with new tiles that correct the spacing or orientation issues of the problem tile, but it will be far too high and always look out of place. And we all know, this is what we'll stare at while we're in the room, always wondering why we didn't fix it properly.
I like to scrape out the old thinset using some of our paint stripping pull scraper tools. The scraping heads are small enough to get into the small spaces, and the edges ensure I'm getting right down to the membrane fleece. Again, if you're doing this in a waterproofed space, make sure you're exercising tremendous caution to be sure you don't puncture the membrane.
This method works on single tile spaces or much larger area, so it's great no matter the issue.
After all is said and done with the scraper we had a clean space that was ready for our adjusted tiles.
Like I said, big or small.
Depending on the tiles removed we had to either select single tiles that would fit the space, or a collection of multiple tiles we could lay in as a mat. This process, due to the minor variances with each tile, required us to select the individual tiles and then lay them next to their intended location with a specific orientation. We couldn't just grab any tile and pop it in, it had to be a specific tile. You can see how I laid out the specific groups of tiles that would fill the space below the now vacant area. This is important whether it's one or 30 tiles.
This is also where that "detail oriented" nature I learned I had as a kid really came into play. It's a trait that grossly expands the timeline of a project, making it border on the unbearable, but it produces some tremendously improved results.
Incidentally, when working on hexagon tile without knee pads, it also leaves quite an impression...of sorts.
When we were happy with the selection of replacement tiles it was time to proceed with a little batch of thinset mixing. Since we're just laying a small number of tiles, we really didn't need much thinset at all. Maybe a cup or two at most.
After the the surface was clean of old thinset, and the tiles were specifically chosen for each area, putting the tile in place was actually the easiest part of the whole process. Using a technique aptly called "back buttering" it's simple. Just grab a bit of thinset and smear it on the back of the tile that's being placed.
With small or single tiles, it's best to overfill the back just a bit to ensure good coverage, usually with a peak right in the middle. When it's placed, this little peak smooshes out to the edges and allows the tile to sit at exactly the right height.
With larger mats of tiles I still like to apply the thinset and then scrape it off with my V-notch trowel. This ensures that there isn't too much thinset when I place the tiles, otherwise I might end up with some of the thinset coming up between the pattern.
After placing the tiles in their new home all that's left is a little adjustment here and there to get a good fit and even spacing...
...then to step back and admire the newly set tile. We always use a tape outline to either show the results of our tile crime scene efforts, or to ensure we don't step on any of our wet tile areas for another 24 hours.
As you can see, we ended up pulling up and putting back down quite a few areas where we weren't happy with the initial layout. In reality, this is just the first of what turned out to be two go-rounds with this pull up and put down process. In total, we ended up making these adjustments to about a dozen different places in the bathroom. We pulled up strips of tiles where the line was too apparent, sections where there had been problems in the sheets, and many different area where two tiles were touching.
And after all of those efforts, what happened?
We. Keep. Finding. More. Problems.
It's inevitable. No matter how many things you fix in a tile job like this, you're going to find more problems. At a certain point it becomes Pandora's box, and the more you fix the more you find. The cycle goes on endlessly and we could spend a solid week doing nothing but fixing problems only to find more.
So we decided that two rounds of fixes were enough for our room and we called our tile layout efforts complete. I'm sure after we finish grouting I'll find plenty of places that drive me crazy about the final floor, but I'll begrudgingly chalk it up to the character of an old house and using a stone mosaic floor.
We're anxiously looking forward to the next step in this flooring phase, but we're mulling over other decisions. More specifically, what color grout to use. It's a major debate, I assure you. We'll share the whole process we're going through for that next week. But I'll tell you one thing for sure, I'm both dreading and excited to start that step.
Do you have any experience laying mosaic tile on the floor and have any tips or tricks to share? Do you think we're going overboard with the corrections we're making? Or is it possible our exercise in futility will actually improve the floor enough that we won't just stare at all of the imperfections when, as our commenters all put it, we're sitting there on the toilet? Fingers crossed, we're on the positive side of that debate.