Wendy and I have been hard at work on our bathroom and we have a little bit of progress we'd like to share with you.
A significant project like our bathroom can be broken in many smaller projects. Actually, it almost must be broken into smaller parts, or we'd pretty much lose out mind while working on it.
From the overall shell of the room, to the vanity transformation, to the wainscoting, to selecting the right mirror and hanging it, everything becomes a project unto itself and must be tackled as an individual milestone to the ultimate goal.
One of these "little" projects we've been working on is almost a room within a room project. It's just a very tiny room. Yep, I'm talking about our bathroom closet.
This diminutive space within our generously sized bathroom measures just about 32"x27". And if you'll recall from our post last year, we decided to use some reclaimed and salvaged pine tongue and groove flooring as panelling for the walls of our little closet.
After successfully planing it down, mounting it in place, and sharing our plans to ultimately paint the panelling white, there was a bit of an outcry from many commenters that felt we should actually keep it its beautiful natural color and finish it like we would an old pine floor.
Let me just say, "I hear ya!"
After a lot of hemming and hawing, I got Wendy to agree to give the natural wood a shot. If I could clean it up enough and bring out the wood's luster, there was a chance it would look pretty darn great in its au-natural state, rather than covering it up with paint. But this was all based on a pretty big "if" of whether or not I could get this panelling into "good shape" for finishing.
As it turns out, getting it in "good shape" was much easier said than done.
I started by sanding...Well, actually, my father-in-law started by sanding the closet interior. He wanted to help out while I was at work and asked if there was anything he could do to help the work move along (even he wants this bathroom to finally get finished up). I went off to work knowing that a small part of the project might be done when I got home...and I have to say...it was a weird feeling.
He worked throughout the day and when I got home he took me up to show me what he had accomplished. However, it wasn't what either of us had hoped for. The salvaged wood likely sat below a tar covered and possibly wet surface for many years, which left it splintered and scaling. As my father-in-law sanded, the wood just kept splintering rather than becoming smooth. And I'm not talking about little splinters, I'm talking splinters that make popsicle sticks look small. It was even eating bits of the sandpaper discs in the folds between the wood!
I gave it a shot myself, hoping for some better results, but I experienced the same lackluster conclusion, the wood was "too far gone" to be finished in a beautiful manner. I had to throw in the towel, we'd have to paint.
After trying to come up with a better solution for some time, I bit the bullet and shed a single tear as I began to prime the wood. I hated it, but it had to be done.
I thinned both the primer and the top coat in the hopes of getting into more of the cracks and crevices and ensuring sufficient coverage.
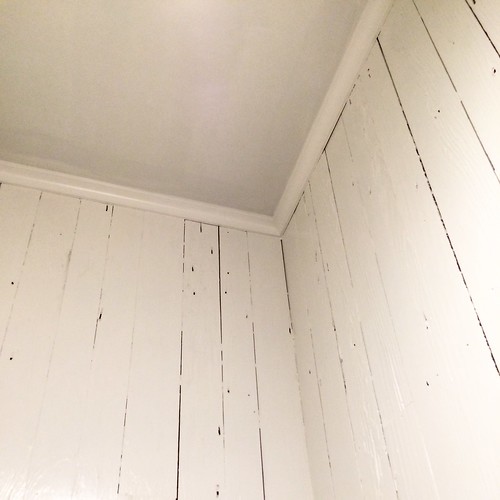
As I painted, my thoughts on the process underwent a magical transformation. Over the several coats my outlook on painting this beautiful but flawed wood only brought out its age and patina. The white paint highlighted the crustiness of the nail holes, gouges, and splinters. Some of the scale settled down under the adhesive qualities of the paint, while others stayed visible.
To finish off this little sub project, I had to take care of some of the rather large gaps we left at the top of the wall where the panelling met the ceiling. Given the simplicity of the space, and how odd the crown from the rest of the room would look in such a small space, we opted to use a simple and small cove molding as a crown detail.
This smaller than usual crown would be the perfect size to bridge the gaps we left while giving the very small area an appropriate decorative element. I didn't even caulk the lower gaps against the panelling, it was all part of the charm of the inconsistencies.
We decided to finish off this crown detail with the same white paint we'd use on the panelling and all of the trim in our house.
Because I had thinned the paint in the hopes of having fewer outright brush marks and better flow into the voids, I ended up needing to do a coat of primer and three top coats to get it where I wanted it to be. But once it was done, boy was it pretty.
On the opposite wall there's even a little light to illuminate the interior of the closet. It still needs a shade of some sort, but we're trying to figure out what will look best in the space. I mean, it may be a small room, but that's no reason to ignore its need for decorative elements.
Have any thoughts on the type of shade we should get for the light?
And what do you think about the end result of the paint? Are you offended, or do you think it's the right amount of crusty to give it a unique feel?