In the summer after my senior year of high school, when I scored a veritable windfall job that paid a king's salary of $9 an hour, I gave almost no thought to the way this job might shape me and my interests as a person. I was an 18 year old kid and the only thing I cared about was the fact I wouldn't be working at The Finish Line in the mall making $4.50 an hour while being forced to touch people's feet and tell them how "tight their new kicks look," as I had done for the prior two years. I had enough of being called Al Bundy by my friends and dealing with the general public.
As it turned out, the summer I spent sweating away the days on the floor of a window restoration shop along the banks of the twisting Cuyahoga River in "The Flats" of downtown Cleveland helped me learn several valuable lessons. First, $9.00 per hour felt like a lot more when I eagerly accepted the job than it did when I was sweltering in an unconditioned wood shop standing on my feet for eight hours a day and working on salvaged window sash. Second, old things from buildings are absolutely worth saving, no matter what kind of shape they're in. And third, sometimes even old things could use a little improvement or two to correct some of the problems those old things might have always had.
Which brings me to present day, and how the first major phase of our recent window restoration approach allowed us to establish a paint free and prepared surface where we can begin our true restoration/rehabilitation work. The sash weights had been removed, previous ineffective weather stripping discarded, sash pulleys taken out and cleaned up, and the sash were laying by the side of the opening. It's one of those renovation moments where you look at the giant hole in the side of your house and think, "What have I done?!?"
Fear not. Though a large and unprotected hole in the side of one's house can be worrisome (especially when it begins to rain), we (and possibly you if you're using this as reference) are on our way to a beautiful and functional window. We just need to follow a few more very important steps. Remember our list?
- Disassembly
- Frame Paint Removal
- Frame/Component Repair
- Weather Stripping
- Restring Sash Cord
- Storm Window Installation
- Sash Removal and Repair (this is a multi-step one on its own)
As I've mentioned previously, there is a somewhat significant design flaw in our windows. The weight pocket doors extend all of the way down the side of the unit and into the sill of the window. While this was easier to construct at the mill, it allows water that blows beneath the lower sash, or snow that accumulates and begins to melt, to creep into the weight pocket, seep into the wall, and ultimately bring destruction. The end result of this unwanted guest is typically damage or complete failure of the plaster. Water is, after all, public enemy #1 of old homes.
Since water damage on beautiful and smooth walls is not a fun thing to deal with, I decided to retrofit a few pieces to resolve this issue in our windows. I've already done this in our bedroom windows and it's worked quite well since I installed them.
I started with some old growth and tight grain 2x4 salvaged lumber. This stuff is 125 or more years since being cut down in the forest, and who knows how long it lived in the forest before it was felled by some 19th century axman, maybe 100-200 years? The fact is, we want to stop the infiltration of water, and using new wood might work at first, but that soft pine you can find at the lumber yard will only end up rotting away before you know it. Using this old, aged, tight grained, and hard wood will give our fix a good chance of lasting much, much longer.
Using our piece of salvaged 2x4, I ripped down the rough sawn edges to get to the beautiful and usable wood. I did my best on the table saw but it's moments like these where I see the void in my life that can only be filled by a bench jointer. Maybe some day I'll join the ranks of the real woodworkers that own this beautiful tool. I just need more room in the basement to make it a reality.
If you ever work with old lumber like this, be sure to smell it when you cut it. I'm serious, take some good sniffs. Don't worry, it's only weird to most people, but not everyone, I won't think less of you. You'll notice it has a completely unique and almost sweet smell to it. It's not the type of thing you normally get when you smell fresh cut lumber.
Once I had the pieces cut to a usable size that fits perfectly in the slot for the weight pockets, I began taking the necessary notches and grooves out of the piece to get it to fit properly in the opening and with the jamb doors. My first step was to make the jamb door and new blocking fit perfectly.
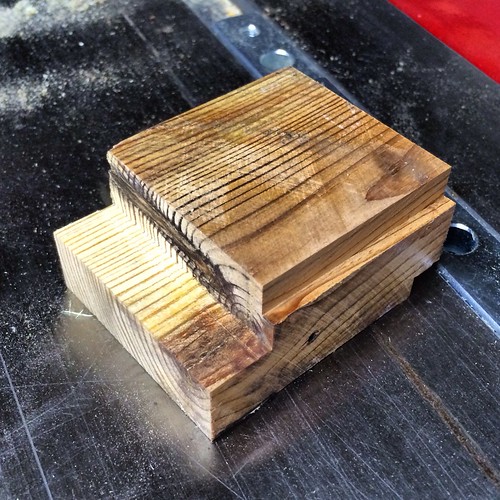
As you can see, I already rabetted the block, so I needed to cut a corresponding groove in the jamb door.
Once happy with the fit, I began taking the necessary notches and groovers to accommodate the parting bead groove, a ledge for the pocket "door", and a groove on the back to let it sit in its opening. Lots of little cuts on the dado blade to get this little piece of wood into the correct shape for a nice fit.
After countless cuts and checks for size, I finally had myself two little blocks that would ultimately act as our window's flood dam.
Installation of these two blocks must also promote a water tight seal, otherwise we'll be right back at square one. If I were doing this when the window were being built, I would probably make a strong joint using glue and possibly a tight dovetail. But since we're doing this as a retrofit, I'm going to cheat a bit and use a mixture of waterproof wood glue for the base, and my favorite Big Stretch caulk for the water tight joint.
One the caulk is in place and the piece of wood is securely where I want it to be, I use the nail gun to fix the wood securely in its place by nailing through from the interior side of the window. The primary purpose for the nails are simply to hold the blocks in place until the glue and caulk has a chance to cure.
With the block's glue and caulk setting up, my attention then turns to the deteriorated jamb doors. I've previously compared the tops of these doors to remnants of a beaver's snack, but this can be resolved at this point. The blocked I've installed add a few inches of height to the base, which means the jamb doors can be trimmed a bit.
Rather than cutting the bottoms off and calling it good, I take a little off the top by mimicking the original angle to make the chipped and splintered original tops into something a little more appropriate for a refurbished window.
Between the new cut at the top, and the rabbet at the bottom of the jamb door, it's now a perfect fit to it can sit against the new blocking without pushing right on into the weight pockets.
Finally, I drill a few pilot holes for the screws...
...so we can properly affix these "new" jamb doors into their openings at both the top and the bottom of the jamb doors.
The lower screw is just a much smaller screw that secures everything in place.
As you can see, during this whole process I was also progressively priming and painting the various elements of the window frame. I'll cover this in more detail in our next post, bit I always try to make my process more difficult by unnecessarily combining multiple difficult steps. It's how I roll.
This is one of those little things that take a rather large amount of time but set up a good shot at long term success for our project. It's my hope that this small alteration will help our home's original windows last for a few hundred more years before anyone even thinks about replacing them. Who knows, maybe by then we'll have some sort of force shield storm window that can invisibly go up and protect these original windows permanently. Hey, I need to patent this idea -- invisible force shield storm windows. That's our ticket to endless wealth. Now how do I go about actually implementing this idea...?