Are you ready!? We've got another absolutely thrilling post surrounding the tremendously suspenseful endeavor of plaster repair and a major skim coat undertaking. Woah, watch out, I hope that fall you just took out of your chair after I told you our post topic for the day didn't hurt too terribly. I know keeping your feet on the ground and rear end firmly planted in the chair is difficult when dealing with such a tremendously gripping subject matter.
In our long and enduring plaster journey—from cracked and failing to flat and smooth—that is represented in all of our many skim coating adventures, we reach a critical juncture where the walls begin to assume a "finished" look. Don't be deceived by the false notions of a completed project. In reality we are rapidly approaching one of those fateful DIY forks in the road where our efforts can culminate in either a beautifully finished result or a steaming pile of crap, all depending on our next critical steps.
At this all too important point of skim coat plaster repair there are still bumps, ridges, imperfections, and areas to be filled, but overall we've reached a milestone where our hopes begin to outweigh our doubts and we see the crisp and smooth plaster light at the end of the mud slinging and sanding tunnel.
With skim coating, as with many old house projects, the Devil is in the details. And while many have embraced the notion of "complete but not perfect" when DIYing, taking a lax approach at this stage of the game will so dramatically impact the finished product that you could barely even label it complete. Tedious? Yes. Important? Very. Doable? Absolutely. Just follow my easy steps :wink: :smile: :tooth sparkle bell ding: :thumbs up:
After allowing the material to cure from our last step involving the thin and truly skimmed layer of joint compound, we've got a rather tall task ahead of us before we're able to continue applying finish coats. We have to muster the patience, expertise, and desire to remove any and all imperfections before going onto the next several coats of finish. Rushing this phase of the project can only result in inferior results that are magnified by your first coat of paint, yet completely avoidable with just a little effort. Trust us, we know! We had this little issue with our own inexperience in our upstairs hallway, and I stare at it. Every. Single. Day.
While we could spend the next month giving a blow by blow of "skim coat, sand, skim coat, sand, etc," we'll save you from the truly boring and focus on the useful but moderately boring techniques and tricks that we've determined tend to work best to achieve that nearly perfect wall or ceiling. Or we could just show you photo after photo of white walls with giant sander heads in front of them.
We've already shared the large electric drywall sander we use, as well as our best approach for keeping dust to a very minimum while working, but once we reach the point where the corners and areas where the sander can't effectively reach need attention, what do we do? Let's take a look at each scenario, along with our solutions.
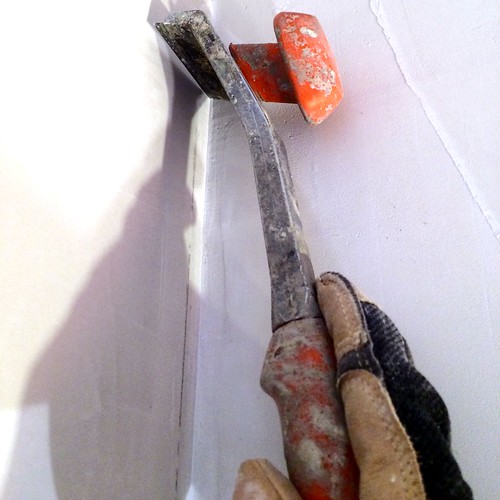
In the corners it's pretty difficult to get them perfectly smooth with the trowel, and you're inevitably faced with bumps and irregularities where joint compound has accumulated. While you'll need to sand with a corner sanding block, sanding alone would take forever and will still leave you with residual bumps. Before I grab my sanding sponges, I grab both my stiff joint knife and my large paint scraper.
First, using the joint knife, I begin scraping away somewhat large areas of joint compound that have dried as a bit of a blob. Some of it scrapes away in dust, some of it breaks off in large chunks, but the goal is to remove any major obstacles or bumps that will cause problems with sanding or the next skim coat.
It's okay if pieces break off that leave gaps or holes as we can fill those with the next coat, but our goal is to remove any high spots and reduce the overall bumps, both in the corners and across the surface of the wall.
Next I grab my paint scraper. I didn't use this tool in this way until recently, and when I finally did, I realized what a great solution I had been missing. The large, flat blade scraper offers a great way to ensure a square corner without material buildup by scraping the excess way. Unlike sanding, it doesn't remove the material you don't want it to. You just need to be very careful with the blade of the tool, scraping just enough to remove your desired excess material, but light and careful enough to ensure you're not gouging your walls.
It's a delicate balance, but one easily achieved with a little patience and a calm/steady hand. I like to work from the top to the bottom, pulling any chips or dust down into a small pile on the floor before vacuuming it right up.
The main reason you vacuum it all up is because your significant other may suspect you're doing something other than scraping joint compound if they happen to check out your work site.
It's about this point in the project where I begin to lose my often omnipresent patience. I don't know what it is about sanding in corners, but if the Devil is in fact in the details, sanding corners of walls is easily my own personal hell.
I think it's worth noting that we made a major decision years ago to do crown molding throughout the house. We made this choice for aesthetics, which a choice we're rather happy with, but I'm over the moon with the choice since it means I don't have to finish wall to ceiling transitions. This takes my fragile mental state at this stage of the project from "ready to lose it" back down to a more routine "just barely hanging on." This is all thanks to only really needing to focus on the vertical corners and leaving the ceiling corners looking more ragged.
After the corners have been scraped I grab my large corner sanding sponge and give them a major once over to smooth out any imperfections that may still exist. Using these steps in this order definitely gives the best and most consistent corners with minimal buildup of insanity producing rage. I call that a win-win.
The various corners in a skim coating project typically take up the largest percentage of time to get it looking good, but it's exceedingly critical. The areas I did very early on glare back at me today as an ugly reminder that I simply didn't take the time necessary to resolve all issues. But once your corners are done you can turn your attention back onto the expansive walls and ceiling.
Hopefully you've all gone out and bought yourself/rented the awesome Porter-Cable sander I mentioned last week as the most awesomesauce of wall sanding tools that every was. Short of a Harry Potter style wall smoothing spell, this sander does the job exactly as needed. "Plasterius Eventhium!"
However, last week I kicked the usefulness of this tool up a notch, and I didn't even know that was possible. I've been using old and tired sanding discs on my sander that have all seen better days. They are single unit pieces, sandpaper on foam, and when I need to change the disc, it's a giant pain.
I saw this great new set of sanding discs when I was looking around on Amazon and I had to order myself some. Think of them as a single giant hook and loop sanding pad like you'd see on an orbital sander.
Once the hook and loop base is on the sander you can affix the large sanding discs directly to the base. Perfect!
I bought discs in an 80, 150, and 220 grit, and within 30 seconds of sanding using the 80 grit I instantly fell in love with this tool all over again.
The surface it leaves was as smooth as I could have hoped for, and it truly put us on the right path to a complete and professional looking skim coating job. The only thing I noticed with these sanding discs is the fact the center of the disc really doesn't touch the wall. I think I'm going to cut a small piece of foam that I'll put in the center when I attach the disc that should force the center of the disc to actually get used.
And there you have it! Those are our top tips and tricks for achieving silky smooth and easy on the eyes corners in our skim coating process. I just hope that this and our other posts can give a whole host of people losing hope in their failing plaster the inspiration they need to repair it in a 100% DIY manner. We'll have one more follow up post when we reach our final steps so we can share our glasslike smooth walls and ceilings. I have to tell you that I'm particularly excited for the end result. Not only because our walls and ceilings will be complete, but because it will put us one step closer to a finished project. And honestly, there's nothing better than a finished project!
We have a whole series of plaster repair/skim coating posts you should check out if you like this or are trying to tackle the same thing. Here's the whole list for convenience:
- Plaster Repair for DIYers - No Need to Rip It Out
- Plaster Buttons to Fix Your Crumbling Ceiling
- Plaster Repair Part 2: Laying a New Brown Coat
- How To Fix Plaster Like a Boss: Sand Baby Sand
- DIY Plaster Repair: We Finally Put the Skim in Skim Coat
- My Skim Coating Nickname is Mr. Smooth - The Tricks I Use to Earn It - this post
- The Final Steps to Perfect Skim Coating