Up until this point in our plaster repair/skim coating series, the joint compound we've been applying to the walls has felt a whole lot thicker than the term "skim" implies. This is all normal since we've been building up the base and structure of the plaster with new material, but that's all about to change.

After you've completed those first base layers and your first sanding, you're ready to launch into the step that gives "skim" coating its name.

On a side note, if you missed our post on sanding, and the amazingly awesome sander we've been using for the last 10 years, be sure to check it out. I'm very happy to report that our post already helped Carrie over at Brick City Love. She rented the sander and use it over the weekend (and posted about it on Instagram). And Daniel, over at Manhattan Nest is coveting this same tool for his plentiful skim coating projects in their amazing house. I'll be talking a bit more about that tool next week, but how's that for some bloggity testimonials?

Anyhow, back to skim coating. Even though your first pass may be somewhat to very bumpy, even after you've finished sanding, no worries, you're still doing just fine. The goal of this coat of joint compound or plaster is to smooth those bumps out quite a bit with thinner coats of material.


Continue Reading Full Post
Comments 8

Oh, the love hate relationship I have with our master bathroom. I dream of the day I can soak in our salvaged claw foot tub, surrounded by freshly painted wainscoting, basking in the glory of the beautiful Carrara marble and sparkling polished nickel fixtures. But sadly, those days are still months and roughly 142 "to do" list items away from being even close to a reality.

While Alex has been toiling away on restoring the drafty and disgusting window in the room, I've been no slouch on my own. Rather than sitting idly by in the bullpen waiting for a construction task, I've been immersed in the world of tile and fabric, a world both exhilarating and overwhelming all at the same time. A world where color, pattern, and inspiration abound, but seeds of buyers remorse and indecision creep up like the tendrils of ivy on our courtyard wall. 

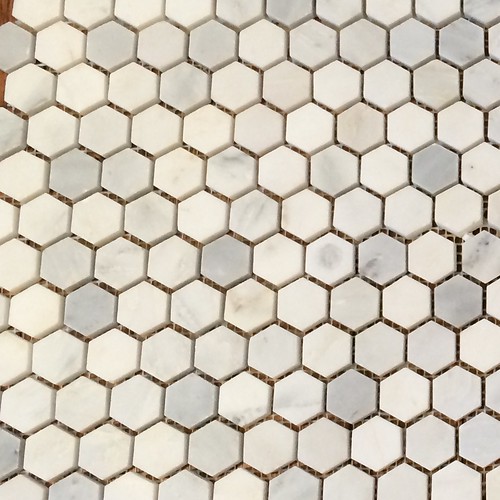
Truth be told, I've been hunting for a suitable tile (well, stone to be exact) option for this room for years, and though many potentially viable candidates have presented themselves along the way, I have never swayed from my desire for a Carrara marble hexagon tile. I've spent a fair amount of time poring over samples from various stores, and for a short time even debated a 1" vs. 2" mosaic, but I feel I've finally settled on a winner. Although larger format tiles would be more practical in a room of this size (from both an installation and grout maintenance perspective), I'm a purist at heart. I know our bathroom redo won't fool anyone into thinking it's an "original" bathroom in our 1880s victorian, but I'd like to pull in some elements that one might have found in a home of our age so it looks and feels more appropriate to the period. My desire for a somewhat historically accurate material selection helped me rule out the 2 inch hexagon. 

Primarily I've been researching various online companies in addition to visiting local stone showrooms, and I've purchased an array of 1" honed Carrara marble samples to choose from. From my experience, I can highly recommend ordering samples from different companies because you get a better feel of the product's color and shading, variation and prominence of veining within a sheet, and the thickness of the tiles themselves. In most cases, samples run approximately $5-$10 each with free shipping. If you ask me, I think that's a very reasonable price when making such an expensive purchase, especially for a large room. 

Ordering the samples has helped us to narrow down the company we'd like to use (I'll be sure to share the name once the order is placed and tiles arrive to our satisfaction), and I feel that's one big item we're able to mark complete on our design checklist.


Continue Reading Full Post
Comments 45

We left off on our in-depth "how to fix plaster and skim coat like a boss" series of blog posts after having applied the initial rough coat of joint compound over top of the screen/scratch coat we had applied in the previous steps. And while any wall or ceiling that had been previously cracked, sagging, full of holes, and generally near disaster is undoubtedly looking much better at this stage of the repairs, it's nowhere near finished. However, we're just a few arduous steps from turning that old plaster on its ear and creating a beautifully smooth surface on which to finish the remainder of the room.

I know, I know, I can barely contain my excitement too, I'm right there with you! But hold on just a second. Bottle that exuberance up for just a little longer. There are a few critical items left before we can declare victory over the plaster demons, and these steps can ruin the project if done wrong.

Before we can go on with skim coating we need to prepare the first and fully cured layer of skim coat we had applied. Unless you're a true pro, there's a good chance your first coat has its fair share of bumps and ridges. These can be large or small, but we need to knock them down before going forward.

How do we knock it all down? Sanding. Ugh!!

If you've ever sanded joint compound before you probably know the massive dust bowl it can create. I'm not kidding! The first time I sanded joint compound and wasn't properly prepared it looked like I should have been riding a tauntaun through a blizzard on Hoth looking for Luke Skywalker (and I thought they smelled bad...on the outside).


Continue Reading Full Post
Comments 24

Quite some time ago I wrote in a Toolbox Tuesday about the pliers I like to use to remove nails. This has been a great solution for my purposes, and something that I picked up when working for a contractor in college, but it hasn't been without its problems.

Occasional broken nails, nail heads too low to grab, and minor damage to the board's surface left me wondering if there was a better tool out there? Perhaps something more specifically created for pulling nails?

Way back when I wrote about my solution, a commenter from a company that makes a purpose built nail removing tool called the Nail Nippers left a comment. I looked into the tool and thought it looked interesting, but I didn't have an immediate need for it, so I just filed the idea away.

Well, I knew I'd need something better as I approached last weekend's window restoration, so a few weeks ago I went ahead and ordered an 11" Nail Jack nail puller from Amazon. You know, all in the name of research and good Toolbox Tuesday material.

Today, on this Bully Pulpit of Toolbox Tuesday, I stand before you, an absolutely and unequivocally converted man!


Continue Reading Full Post
Comments 4

Today I have a sense of triumphant exhaustion.

Such is the life of a DIYer. A weekend warrior who happens to also sacrifice many weekday evenings as well. Little to show for the efforts but a tremendous sense of victory having won a minor battle amidst the chaos of a full scale war.

This feeling has nothing to do with finishing a project. It's not caused by a major breakthrough or significant accomplishment. No legendary blog posts were penned. And it has no roots in the fact the Browns finally beat the Ravens yesterday afternoon (though that was really nice).

Though all of the above is very true, I woke up this morning with an aching back, beat up hands, tired eyes, and an odd feeling of anticipatory butterflies in my stomach. Why? Because this weekend I started a little project that I've been waiting to start since we moved into our house on January 17, 2003. How you like them apples?

This weekend we took a major step towards our dream of having functional and fully restored original and period appropriate windows. More importantly, I tackled the task on what is the single worst, loosest, most decrepit window of all of the windows in our house -- the master bathroom window.


Continue Reading Full Post
Comments 14
  • Search

  • Login
  • Follow
  • Advertising

If you're looking for information on advertising and sponsorships, head on over to our sponsorships page. You can purchase site sponsorships in a few easy clicks. 

Toolbox Tuesday
Open Housing
  • We're Featured!

Old Town Home has been featured in the following places and publications:

The Washington Post
 
Washingtonian Magazine
 
Domino
 
Old House Journal
 
 
Apartment Therapy House Tour
 
Washington Post Express Feature
 
Home & Garden Blogs
 
© 2025 OldTownHome.com. - Privacy Policy
Login Below
or
Sign in with Facebook
Connect

Unexpected Error

Your submission caused an unexpected error. You can try your request again, but if you continue to experience problems, please contact the administrator.

Working...

Working...