Over a year and a half ago, way back on September 1, 2015, we asked a question in a blog post. We had a mantel we'd need to build any day, and we needed to make a determination on just how that mantel in our living room should look.
Well, we've been slowly working on this living room project and have finally reached a point where that day has arrived.
Before we get into details, let's recap (in case you don't remember our blog post from a year and a half ago). The original mantel in the room was a poorly made pre-fab mantel from the early 90s. Too small for the room and fireplace, and just not all that attractive. It had an odd style, rounded corners, and just didn't fit with the style and age of the house.
While it looked just fine at first glance, that old mantel essentially fell off the wall because I looked at it sideways. In other words, it really wasn't installed very well, which made it rather easy to remove.
During our renovation of the room we opted to build out the area above the fireplace with a shiplap treatment to balance the same detail across the room, where the shiplap is disguising some structural supports.
When it came to a plan for the new mantel, the consensus in the comments section in our old post, in our discussions, and from consultation with friends was that simple would be better. While the house's moulding does feel very late Victorian, the age and exterior style as an early American Foursquare suggests the mantel should be simplified and should borrow details from the room.
As we continued researching styles and examples (we had a while to research, after all) we kept coming back to three primary examples.
The first is from a renovated Foursquare that was featured some time ago on Old House Dreams. It had a very similar look to our living room, but a fare more traditional Craftsman Foursquare feel throughout the house when compared with our home.
The next photo was one we repeatedly found on Pinterest when searching for shiplap fireplaces. A little more digging and we found the interior designers's blog post from where the photo originated.
And finally, the last photo we kept referring to for inspiration (or essentially idea theft) was from the pages of the Rejuvenation catalog.
Our minds were loaded with ideas and a rough plan, so we worked and worked to get to the point where we were ready to build our mantel.
Our mantel started life as a pile of pine lumber from a big box store. We bought an assortment of "one by" material to build the mantel surround, and some 5/4 stock (about an inch and a quarter thick) for the mantel shelf. In order to get a sense of the planned scale of our mantel, we started the process by holding boards in place and trying to imagine how it might look.
At this phase of most projects, just before we start the assembly or build, I get a little worried that we're going to make a mistake. Well, It's less worry and more paralysis. Without fail the crazy thought that I really can't make a mistake if I don't make any progress starts to crawl into my head. But Wendy likes to step in to right the ship and give me that little nudge necessary to get moving. In this case, it was the suggestion that we should go ahead and hang the television above the fireplace so that we'd be able to get a better idea of how it would look with the mantel in place. (I know, I know, the long debate about hanging TVs above the fireplace is real, and not something that either of us like all that much. But we don't have many options in this house, so we're going with it.)
Once we had the tv in place, we could better estimate where the mantel shelf should fall on the shiplap. This was exactly the nudge I needed to start rolling with the project. For our mantel we started by assembling the sides of the frame. The structure of the shiplap above defined the boundaries of the mantel width, and we knew we needed the edge of the mantel to be at least eight inches from the fire box. Given where the mortar lines all fall, we could assemble the sides without much issue.
Since the base of the mantel will be on both the floor and the brick of the hearth, we had to scribe and notch the base on either side.
As part of the process we built the sides and top to sit in front of the brick surround by about an inch to thicken the surround up a bit. Then we placed the top cross piece of the mantel surround to really get a sense of scale.
Then came our need to make a major decision on something we'd not yet come to a consensus on, the depth of the mantel shelf.
Looking at our test fit we could immediately tell the shelf depth was way too shallow. But the width of the boards we had meant we wouldn't be able to just pop a board in place. In order to make the mantel shelf deep enough, we needed to biscuit join two 5/4 x 8" boards together and then rip them to size.
With the shelf depth set we continued on the surround build by nailing then wood filling everything that could be attached.
The way we built the surround, up to this point in the process it remained almost completely independent of the fireplace, which meant we could remove it and take it outside when it came time to sand. This certainly helped us cut down on the typical mess associated with sanding.
And once sanding was complete we turned our attention to affixing the surround in place and installing the mantel shelf. Since it was all very sturdy, we just needed to tack the mantel surround in place with about four nails.
So, have you noticed the little "mouse house" door at the base of the mantel on the right side? If you noticed it, are you wondering why it's there? No, it's not where Jerry will hide when he's running from Tom. It's an access location with a cord tied in place that will allow us to run additional wiring up to the TV without needing to remove the mantel. Essentially, trying to future proof things a little. And don't worry, it will be hidden by the base cap of the mantel.
The next step in the build was the start of the various embellishments to add a little visual interest to the mantel and relate it to the rest of the room. This started with a bead trim piece under the shelf.
And that was following by a cove trim piece. The idea here is that the bead and cove borrows a detail from the two part crown we installed throughout this room.
Next we started to work on the "baseboard" area of the mantel. Here we were trying to determine the best height for the base and base cap.
The shorter certainly looked far better once we saw it all in place. We spent a good amount of time scribing the bottom of these sections to make it nice and tight to the floor and hearth. And as you can see, this element was borrowing the detail of the room's baseboards.
Finally we applied a flat band detail at the transition above the firebox. This detail was meant as a nod to the shiplap we have above the fireplace and on the opposite side of the room. So yes, there is certainly a method to our plans, though likely not very obvious if we're not completely spelling it all out.
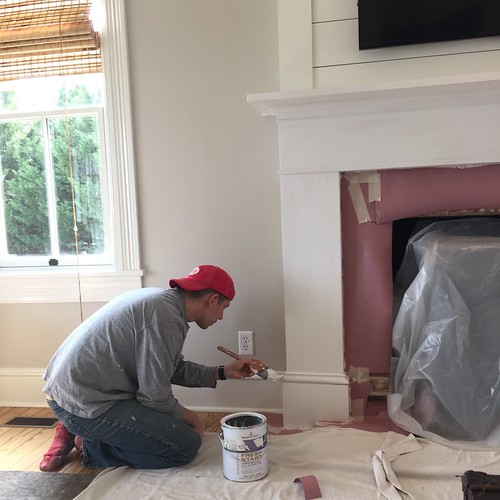
With the whole mantel built we were able to turn our attention to painting. Since this is against brick, and brick doesn't handle paint mistakes very well, we decided to invest some significant time and effort in masking and taping. This proved invaluable as drips and mistakes kept appearing on the plastic and paper.
Both priming and painting when quickly. Each coat took about 40 minutes.
And as we painted, we saw it transforming before our very eyes. The thing we'd been dreaming about, and worry about, for quite some time was becoming exactly what we'd hoped it would become.
As the paint cured we couldn't wait to remove the paper and plastic and light our first fire with a finished fireplace. It was everything we'd hoped!
We seem to finish most projects in the evening, so when we wake up the next morning and see it in the daylight, it's like we're getting our very own reveal all over again. We both really love how this turned out. The scale seems great for the room, it frames the brick nicely, and the depth of the shelf should work wonderfully for Wendy to decorate the mantel to her heart's content.
In fact, she really couldn't wait and went right out to the yard to clip some flowers to freshen and soften up the mantel.
The end result is pretty much exactly what we imagined, wanted, and hoped for. We both feel like we pretty much nailed our inspiration images and have now adorned this wonderful room with the mantel it was always supposed to have.
Now that the mantel is in place, room decor is underway and we can't wait to share the 100% finished product with you! It's been a long road to get to this point, and if you've been following along since the start, or just started reading today, we hope you're having fun following along with us. If there's one thing you can possibly gather about our personality based on this project, though something may take us longer than expected, when we set our minds to something we're going to get it done, and we're going to get it done right!
Interested in a recap of the work we've done to make over the living room to get to this point? Check out our posts on: