If you're a fan of the renovating and decorating television show genre you're likely well aware of the Waco, Texas husband and wife duo, Chip and Joanna Gaines, from HGTV's Fixer Upper.
There have been a handful of shows over the years that really speak to us via our love of renovating old homes, and Fixer Upper is just that. They're always looking for great ways to take something old and tired, and attempting to turn it into something that is old and beautiful by embracing the traditional elements of the buildings and embellishing them with modern and often reclaimed approaches. This isn't a "gut and rebuild new" show, it's one that tries to honor the elements of antique structures that make the homes they're renovating unique and special. Couple that with the fact that Joanna's designs are right up our alley, and Chip is that traditionally likable goofy guy, and it's a recipe for a show that we can really get behind.
Our second home is one of these special homes with layers upon layers of antique features that really makes it special. While many original elements of the home have been covered or removed in one way or another over the years, it retains original molding, doors, floors, and much of the original fabric hidden behind layers of drywall applied in the early 1990s.
We filled you in on our progress in removing drywall from our living room to expose and restore the plaster walls beneath. That project had to take a little break while we worked on getting the plumbing and HVAC up and running, but we're getting back at it now that things are almost done with the big utilities. However, before we get to wall patching and plaster restoration, we had to figure out what we would do about the large section of missing wall above the fireplace...
...and how to incorporate the post that has to protrude into the room opposite the fireplace.
While we weren't actively working on the project, we were debating it...endlessly. We kept talking about different approaches, different options, different looks. We discussed over dinner, we discussed while watching TV, we talked it into the ground and back up again. It felt like no matter what we just couldn't come up with a good thought. But then it happened...
Wendy, after she likely binge watched a few episodes of fixer upper said, "What about shiplap?"
Shiplap!!! That's it! That beautifully antique manner of wall cladding seen in various historic homes up and down the east coast that pushed westward over the years. It's a great look that is equal parts waterfront and rustic, and works great in homes with a comfortable and not too stuffy aesthetic. If you've watched any episodes of Fixer Upper, you've likely seen it uncovered in one of their projects and put on display as an interesting element in the room.

Photo Credit: Chip and Joanna Gaines - MagnoliaHomes.net
Even our house in Old Town has it beneath the exterior siding on the back 1900's addition on the house.
But the big question, does it fit in our second home? Well, the simple answer, "Yes, yes it does."
A little while ago we shared a photo of our downstairs bathroom where we had removed a large section of tile and drywall. If you look closely in the sort of gross part, you can see this section exposed the original horizontal wall cladding. While not large thick "shiplap" these are smaller tongue and groove boards, but the look is essentially the same. So we decided to take the plunge and go for it in our living as accent elements both above the fireplace and incorporated around the post to disguise that it's there.
We have experience with shiplap in the past, as the siding we did in our house in Old Town is a traditional German Shiplap profile using cypress wood. I liked how easily it installed and am far less intimidated with siding after that project.
When it came to our shiplap project, I had hoped we'd be able to use some shiplap available from one of the home stores, but it seems only Lowe's offers an actual "shiplap," and it's apparently primarily only available up around Canada and to the northern United States. Out of luck on the stock pieces we decided to make them on our own.
I did the calculations and bought about 30 lengths of 1" x 8" stock clear pine. I ended up having an internal debate about 1" x 8" vs 1" x 6" boards, and even laid them out on the cart at Lowe's to get an idea.
After deciding the larger looked better, I took all of the pieces home and sent them straight to the table saw. Shiplap works by rabbeting the opposite sites of boards, allowing each board to nest with the previous.
To accomplish this I simply had to setup my table saw's dado blade (the blade everyone with a table saw absolutely needs to buy), add the sacrificial fence (scrap plywood), and run each board over the saw twice.
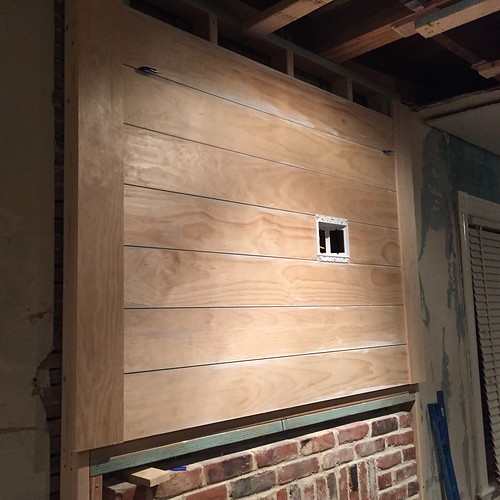
This gave me pieces of custom shiplap with about seven inches of face exposed on each board. Quick and easy overall, and I could prep them in the basement and then take them down to the other house the next time we went. We laid a few pieces out on the floor to give us a sense of the gap we wanted and how it would all look.
Once we transferred the shiplap boards we couldn't start right away. I had to build myself a structure to apply the shiplap against. The fireplace protrudes into the room by the width of a brick, and I've wanted to build a new mantel to give it a more substantial look in the room, so we decided to use this to our advantage. I started to build a 2x4 frame that would bring the shiplap wall almost but not quite flush with the front of the brick.
On the opposite side of the room, the post is off center to the fireplace, so we decided to build the frame around the post to mimic the same location as the fireplace, which should balance the whole room quite a bit. We'll be able to put the couch on this wall and center the couch across from the fireplace with the shiplap wall centered behind it.
We had discussed different space saving approaches, such as build in shelving and other stuff we'd absolutely do if space savings was the issue. But this room is huge, and we don't really need to squeeze space out of every area, so we're more just going with this large feature wall. It feels really weird, especially given that we go to such great lengths to get just a few extra feet of storage space in Old Town.
While I built the frames Wendy was priming the rabbets of the shiplap pieces. This is important since there will be a gap between the boards and you can possibly see in the gap. We'll paint the boards white eventually, so we wanted to have white primer in the gaps so your eye doesn't happen to see unpainted areas between boards.
Once the frames were built for the shiplap, and the boards primed, the whole project was just a methodical process that started with the most critical step, leveling the first board.
Getting that first board in place and level will set the tone for the whole project, and it usually takes the longest. In our case we put the two trim side pieces up first to get the correct measurement for the shiplap, then clamped a 2x4 to the front of the frame and then got the first board in place. We're also faking the idea that the shiplap is terminating into thicker boards by applying backer nailers on the side trim boards. This will give that varying depth and more interest to the wall.
Nailing the shiplap is a combination of blind and face nailing. I put one nail at the top rabbet and one face nail near the bottom but above the relief of the rabbet for each stud I'm nailing to. To ensure adequate hold I used 18ga. 1-3/4" brads to nail the shiplap to the studs and glued the ends where they terminate into the trim pieces.
For both aesthetic reasons and functional, we want a uniform gap between each board. The aesthetics are mostly a "because we like it" justification, but functionally you want to allow the boards to expand and contract during changes in the seasons without forcing the neighbor boards to pop themselves off the wall. To achieve a nice uniform gap we're using two stacked 1/16" Barwalt Horseshoe tile spacers at a few points on the wall. They work a million times better than traditional spacers for tile, and work pretty darn good for this as well. We just let gravity do the work for us.
Once that first boards were in we were able to get the rest of the wall up in just a few hours. Measure, cut, nail, repeat.
On the other side of the room we followed the same process. However, I made a slight change to the wall by building in a little cubby in the lower left.
There's an outlet down there inside of the shiplap bump out, so we kept it in place. I have the idea that we'll get a Sonos sub or something and can tuck it in the wall behind the couch and out of sight. Regardless, the hole will be trimmed out and nice looking and will also be hidden behind the couch. I guess the old space saving habits die hard and I can't leave it behind completely.
After a whole bunch of effort and all of our seemingly endless talking, we had ourselves a completed set of shiplap feature walls. It may not be 100 plus year old authentic shiplap wood full of holes and dings, but we think it looks really nice. We still need to finish off the little cubby area and the sides of the big wall, but the fireplace wall sides are in place and you can get a sense for how it looks almost like trimmed posts.
We feel like the shiplap approach does a good job of both disguising the post we can do nothing about, and breaking up the very large room. It certainly adds some visual interest to the large wall that would otherwise just be a large wall. We'll be adding crown molding as well, which should tie the whole thing in really nicely.
We can't wait to get to the point where we're building the mantel and painting the walls, but we have a lot of plaster repair to go before we get to that point. However, this room is starting to feel more like a room, and we're starting to see what it will eventually become. We're both very excited for the day we can bring the couch in and sit down to enjoy a fire.
And as far as Joanna and Chip go. Well, while it may not be original reclaimed shiplap, we hope they'd be proud.