Beadboard is beautiful in so many ways, but it's also ideal for creating secret doors.
In a house as space challenged as our home, we're always looking for little ways here and there that can help us squeeze just a little bit more storage out of any given project.
Whether we're recessing a jewelry cabinet within a wall and behind a decorative mirror...
...or turning our basement stairwell into the one and only "coat closet" our home needs, an efficient and effective use of space has been key to our happy existence in our 15 foot wide row house.
While we've been spending a lot of time talking about our purchase of a second house, we're still in the midst of many other ongoing projects, not the least of which is our master bathroom. Our master bathroom project has progressed quite a ways to this point, but the entire time we've been working on it we've kept ours eyes open for ways to eek out that little bit of extra storage space through planning and creativity. We've found the best way to do this is to ensure we have no dreaded "dead space."
A while ago, when planning out the shower, Wendy made clear her desires to have a built-in shower bench. Happy to oblige my lovely spouse's needs, we framed out the bench that will ultimately back to the tub. However, while doing this we realized it would create a rather large 1' x 3' dead zone beneath the bench once the beadboard we were applying around the room had wrapped the seat.
Rather than let this valuable real estate go to waste, Wendy had an idea. "What about making this little nook beneath the bench a small storage cubby for things bath or bathroom related?" I was sold and began figuring out how to do this.
While Wendy was perfectly happy with the little area having 2x4 and subfloor as the the floor, walls, and ceiling of the cubby, I knew we could do better. I had a bundle of small pine beadboard that had been hanging around in the basement for some time, so I decided to use this for the walls and ceiling of the cubby. I pre-painted it all so make install much easier and cut each piece to length.
Assembling the interior was tight, but not too difficult. I just used 5/8" brad nails along the very top and bottom and worked my way around the perimeter. Once the walls were in, I cut the ceiling pieces and applied those in the same manner. Since I had nailed near the very top of the walls, the ceiling pieces were thick enough to disguise the wall nails.
Finally, I grabbed some extra oak flooring lengths we had in the basement that were left over from our office project. I cut all of the pieces to the correct lengths and glued them all together with copious amounts of wood glue. I'll eventually apply Waterlox to the oak floor, giving us a low maintenance surface that will stand up to the occasional wet item.
We had ourselves a cubby, but we also had a pretty ugly hole. Next we had to create a door to cover the opening. We kicked around many different ideas on how to accomplish this goal...and I mean everything. We discussed a hinged panel that looked different from the rest of the room's wainscoting (negatory on that one ghost rider), we considered an automated door that included the entire panel, baseboard, moulding, etc (and by "we" I obviously mean "I"), and we even considered ignoring the whole thing altogether and just closing it in because "I'm sick and tired of how long this project is taking and I don't want just another item that will further delay my ability to take a bath in my own house!" I'm wracking my brain, but I just can't seem to remember which of us said that last thing. Oh well, the world may never know.
Then it dawned on me. If I was able to plan it out just right, we'd be able to create a small panel that's easily removable, but all of the seams would be disguised by the beadboard's natural profile! Bingo!
The idea here is to keep the tongue on the right piece, but then to alter the next pieces by removing the back of the groove, like so.
Test fitting this piece showed almost no visible seam and a perfect fit.
The other side of the door, which would have a tongue, would simply need the tongue shortened so that it would still fit within the groove, but wouldn't be so big that it would keep the door from fitting.
The door we were making consisted of two pieces of beadboard, so we'd need something to make it a solid and actual door. This was accomplished with a nice bead of glue between the panels on the back side of the tongue and groove, and two lengths of 1/2" poplar brad nailed to the back. I just had to be sure I wasn't nailing through one of the areas where the bead was, otherwise we'd end up with a brad nail sticking out of the front of the board.
After sufficient dry time, a few coats of paint, and a more than a couple test fits because I just couldn't wait for a secret bathroom cubby (which I know makes me a huge giant nerd), we had ourselves a door.
Apparently I thought it was a good place to store tubes of caulk and teflon tape in this cubby. I fear my storage for these items will likely be overruled once we have an actual bathtub in the room (which we're still trying to figure out how to get it from the basement to the bathroom). I did want to do something to "finish" the face of the interior a bit, but Wendy convinced me to leave good enough alone, paint the interior face white, and then move on with my life and focus on more pressing matters. She's right, I cooled-out and just went ahead and finished the project, though I may still caulk some of the gaps.
The only thing I'm not certain about at this point is how we're going to keep the door securely in place. It's decent on it's own, but I'm sure it will eventually fall out of not held in place. However, I'm worried that hinging the door with some fully concealed European style hinges will interfere with the storage space, so I'm thinking we'll keep it simple and just use a couple magnetic door catches mounted on the interior to securely hold the door.
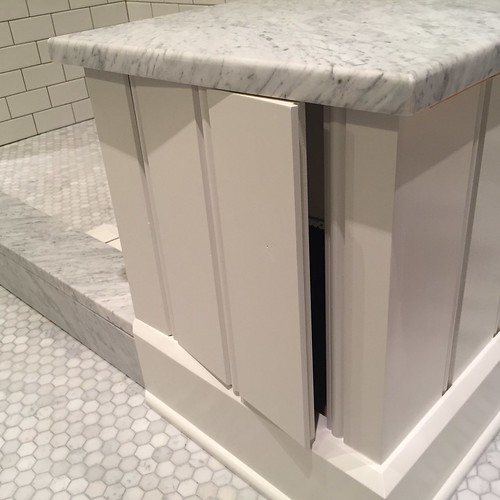
Now, anyone who comes into the bathroom will see nothing but a nice beadboard covered part of the bathroom...
...but we'll be able to stash away critical bath time accouterments. It's a win-win.
In case you're thinking what I'm thinking, "what, no light's in the cubby?" Don't worry, I had the thought, but Wendy vetoed my idea of having a pressure sensitive switch and some internal LED lighting within the cubby. It would have required getting power to the lights and I think when I asked her thoughts on the idea her exact words were something along the lines of "Nope." That sounds about right. I hate to admit it, she was right.
Do you have any cool methods for storing your stuff in concealed areas in your home? I know my granparents liked to hide things in coffee cans and peanut butter jars, but then they'd forget where they hid stuff and would eventually throw it away. I like the idea of making hidden doors better than coffee cans, as there's far less chance I'll accidentally throw away the contents.
We'll be back next week with another in our series of "House Hunters" style posts. We've got two houses down, and while we were initially going to share just one more, we really want to share two more of our final contenders. Not meaning to be even more of a tease, but the additional house is worth seeing.