Alright...where were we? Our water had heater failed in a glorious manner with a basement waterfall, but our WaterCop saved our butt by shutting off our water.
Mending our wounded pride for allowing such a catastrophic failure as theoretically responsible home maintainers, we showered with a bucket for a few days and endlessly researched water heaters. We finally decided on a tankless heater, hired an installer, and made a complete disaster in the biggest disaster area of our house by ripping out the basement wall that was previously in front of the old busted water heater.
After we reached this point we cleared everything out of the basement and we were ready for the install of our tankless water heater.
Brent, our installer from Tankless Concepts, turned up to our house right on time and ready to install. When he got started he unloaded the contents of his truck in our backyard and used the yard as a staging area. I loved this part of the project because I got to look over everything that was being installed. I was like a kid on water heater Christmas morning.
A lot of people see hiring someone to do a job as a way to get the job done without putting forth effort. Whether the customer has the ability to do the job or not, people tend to take a fairly hands off approach once a pro is on the job.
Personally, I look at the money being spent on hiring a professional to complete a job as paying for an educational course where the professional will complete the work while I look on and learn. My hope is that the next time around on a similar project, perhaps I could do some or all of it myself. At the very least I like to know what's going on, what's being installed, how it's being done, and why it's done as it is.
In the case of our water heater, I wanted so badly to do the install completely on my own, but I knew my typical pace (slow) wouldn't work given the fact we had no hot water, and that there were quite a few too many variables (new vent and gas line work) to worry about so I couldn't just knock it out on my own. But rather than just letting Brent do this thing, I did the next best thing to DIY...I'd gotten the okay to hover over our installer all day and learn.
As Brent got everything ready I chatted with him a bit and made sure he'd be okay with my being on hand as a resource all day, so if he needed me for a second set of hands on anything, or even to think through something aloud, to simply let me know. Brent was going to be working alone on the install, so he liked the idea of a helping set of hands and was fine with me tagging along. Win win.
The day really started with the removal of the old tank. I had already cut the lines and removed the venting before install day, so all Brent needed to do was disconnect the gas line and haul the old tank out of the basement. Another guy from Tankless Concepts dropped by to help lift the tank out of the basement, which was definitely a 2-3 person job. Since the tank was rusted and cracked, there was still a bit of grossness we didn't want getting on any of our rugs as they walked out. So we lifted the old tank and put a large contractor bag under and around it to keep all of the water in place.
Once the old tank was gone, the whole basement really opened up and Brent could get on with the install.
The first thing we did was determine the location for the vent. Initially Ed (who did our quote) was concerned there wouldn't be enough space in the nearest joist cavity for a vent. However, when I started looking around, I found a good spot where we could run the vent with a very short run of PVC in an open joist cavity.
Since the old furnace was using our flue for its vent, this new direct vent with PVC thing was a new animal to me, but one I've wanted to play with for some time. We had a few options with the Navien unit we were installing.
- We could put two holes in the exterior wall and run two lengths of PVC that are separated by at least 12" center to center. This approach would allow a lower profile look to the outside, but would require multiple holes in the wall.
- We could run a single 3" concentric vent, which nests the exhaust and intake pipes within each other, allowing for just one hole in the outside wall. But the PVC cap on the pipe, as Wendy put it, "Looks like a giant ugly boob!"
After weighing our options, and looking at the various setups, Brent and I agreed that the single hole concentric vent was the way to go. We'll eventually paint it the color of the house so it should all sort of blend in and won't be particularly boob-like.
With the type of vent chosen we started working on putting the hole in place in the brick. To be honest, the fact we had to drill through the brick from the inside to the outside, and then put a 3" hole in our home's brick exterior made me die a little inside, but if it means we may someday have a second working fireplace, it will be worth it.
After drilling the pilot hole from the inside, Brent made a Sharpie line where we'd need to place the large hole...
...and started to chisel away with an electric hammer chisel.
It only took him about 5 minutes to put a pretty nice hole in the side of the house...
...and we slid the concentric vent in place to test out the fit, perfect and snug.
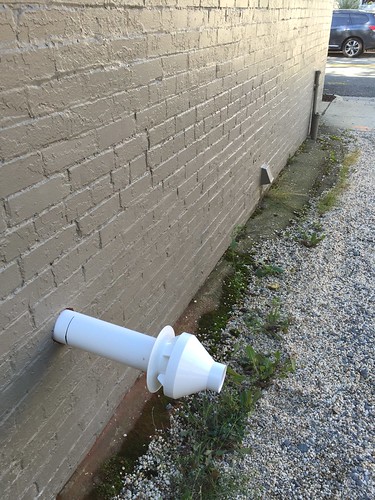
Don't worry, this was just a test fit. It actually sits all the way in against the house.
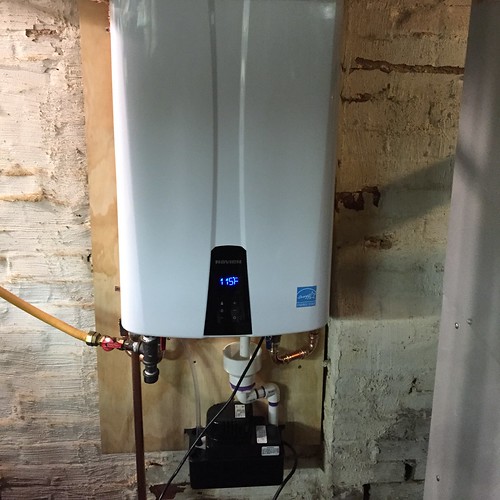
Once the vent was in place, Brent got to hanging the tankless heater on the wall. He started with three pressure treated 2x4s fired into the brick.
Next he screwed a piece of 3/8" plywood to those pressure treated boards. This plywood acts as the backing for the heater while the pressure treated boards keep the whole thing away from the potentially wet wall of the foundation.
Mounting the tankless heater was very easy. The unit comes with a metal cleat that is mounted to the top of the backer board and the heater is hung right on that cleat. It's then secured at the base by two screws through mounting holes.
After the heater's been mounted, the next logical step is to connect the vent. We have such a tight area where the heater is going that waiting to connect the vent until later would only cause difficulty. I went outside and made sure the vent had sufficient clearance from the wall and marked the location with a sharpie. Brent then cut the vent pipes to length and connected everything up.
It was strange seeing this new fancy device on the wall rather than our old and terrible water heater. But strange in a nice way.
The next step in the process involved the connection of the hot and cold plumbing to the inlet and outlet on the bottom of the unit. While plumbing is typically a pretty straight forward proposition, especially when it comes to soldering copper, Brent totally blew my mind. He showed me a way to make solderless connections with copper pipe using a very expensive and specialized tool.
The tool in question is the Rigid Propress. I'll probably do a Toolbox Tuesday post dedicated to it, but it's a tool that uses varying sized dies with special copper fittings that have inset rubber rings.
The pieces are fitted together and a tremendous amount of pressure is applied by the tool's clamp system to make no flux, no flame, no solder connections on copper. The tool is not cheap at all, but $1,500-$3,000 gets you a tool that allows you to make-up a bunch of solderless joints in minutes that might take you hours the traditional way. It's definitely not a hobbyist's tool to purchase, but if you're every doing plumbing it's most definitely worth renting for the day.
After about 20 minutes or so, Brent had all of the water line connections made and it was time to move onto the next step, the gas line.
The gas line aspect of the project was a little complicated. Needing 199,900 BTU our existing gas line and manifold was undersized for the water heater since it would be splitting work with the furnace and fireplace. In order to get us hot water sooner than later, the plan was to set up the new heater using the existing 1/2" line, since we wouldn't be using the fireplace or furnace in the next little while. Then Brent would come back and run a new gas line with a tee at the meter to get us the larger volume of gas we'd need. He determined all of this using calculations based on the length of run of the pipe, existing pipe size, needed BTU of the furnace and fireplace, and a little calculation chart.
A word to the wise here. In order to do gas line work you need to be a licensed plumber in our area, and this is the main area where I'm not able to DIY this solution. However, making up gas connections is actually very straight forward. The main thing here is knowing how you are allowed to run the gas line, what kind of connections to make, shutoffs to use, and all of the little idiosyncrasies that come with the territory. In other words, when you're watching someone who really knows what they're doing, it all looks really easy, but there's a reason for that, they really know what they're doing.
We were getting really close at this point. I could almost feel the hot water coming back. There was just one final step with the install that was necessary. This hot water heater is an high efficiency condensing unit, which means that it makes condensation as a byproduct of the efficiency. Much like an air conditioner, this condensation must be removed from the unit and pushed out of the house. Since we have our utility tub nearby, this was a perfect place for the condensate to leave the house. Brent hooked up a small pump with a length of clear plastic tubing that would take the condensate up and away from the unit and into the nearby sink.
He also created a little funnel that would allow the condensate to drop into the pump while maintaining an air gap. This air gap is important to proper function. If the pipe went right into the pump, the heater unit senses the condensate as having a backup of condensate. One a false backup is sensed, the unit shuts itself down as a precaution. This little funnel method resolves this nuisance.
And with that, our new hot water heater was installed and we were no longer living without a functional shower in our house. I used some Big Stretch caulk on the exterior wall of our house to seal up the gaps left around the new vent pipe, and shot a little spray foam insulation on the inside of the wall to seal out any cold air drafts that might try to sneak in through the wall.
Brent gave me a run through on the simple digital controls of the unit, explained the heat settings, how to adjust the temp, and what the ideal temp typically is. We also ran through the various parts of the system and purpose for each.
Now you know us, we don't typically hire people to work on our house, but when we do, and we have a good experience with them, we feel like we've hit the lottery. That's exactly the case with Tankless Concepts, and we couldn't be happier with them. Their group provides courteous and individualized service, they're all quite knowledgable when it comes to their work and products, and we felt like we were getting honest and accurate answers and input at every step of the process. Linda, the project coordinator, even went the extra steps necessary to check into a gas line issue with our gas company before we had even agreed to proceed on the project with them. Best of all, they are a very dog friendly group, and Lulu immediately took to them and trusted them, which is important when they're coming and going through the day. Though she did like to keep an eye on the situation.
And if you're curious about price, our hot water heater with install, including gas line modifications and running the new vent, came in just over $3,600. This is a bit more expensive than a new tank heater would have been, but not by much. The unit itself was more expensive than a tank, which accounts for a lot of the higher cost, but install ran about the same as a few quotes we received from other plumbers. A replacement high efficiency tank with direct vent would have been about $2,400-$2,700, but the life of a tank is about half or less than that of a tankless. Ultimately, the least expensive route would have been to keep the existing vent and gas line and just swap the tank with a new tank, which would have still been about $1,200, but that would have put the nail in the coffin of ever having a second functional fireplace.
In the end we're definitely adding Tankless Concepts to our list of local recommendations when it comes to both tankless water heaters and chimney work (which happens to be their other specialty). We've heard good things from friends, neighbors, and blog readers, so it's not just us. If you end up using them for anything, make sure to tell them Old Town Home sent you. Besides, we might need to give them a call in the future when we want to make our second fireplace functional again.
In the meantime, we're going to enjoy our never ending hot water, our increased room in the basement, and our reduced risk of catastrophic disaster related to basement flooding. If you need me, I'll be in the shower for the next several hours enjoying the hot water.