Though our beadboard woes were slightly all consuming over the weekend, I think we've got our emotions in check and are coming to an amicable consensus on how best to proceed. Deep breaths were needed, cooler heads as well, and we hope to have some progress to share a bit later (maybe next week). But for now, let's take a final fond look back at a project we've been recapping for you. The very satisfying end results of our massive (aka "one tiny part of our house") siding replacement project.
After months of research involving everything from ideal materials, historically accurate siding profiles, new power tools, scaffolding, copper work, a sudden inclusion of additional major project elements (gutters), many small meltdowns, at least one instance of sobbing like a child on the kitchen floor while completely overwhelmed (from Wendy), and at lease one fall off of our eight foot roof directly onto the bricks below (by me)...our siding and gutter replacement project was nearing completion. And I can't tell you how relieved the two of us were.
We had worked so long and so hard on this project, and we felt so completely in over our heads at several junctures, so just getting to the point where we could see the light at the end of the tunnel was a major victory in and of itself. But we weren't quite done.
I was busy putting the final touches on the upper section and side of the house. While the majority of the siding went up very quickly, that last little bit took a while longer because of the tricky angles of the pitched roof. I had to cut each piece based on this low pitch and fit them in place. It wasn't particularly difficult once I had measurements, but I was working about 21' off of the ground, and I had to keep making trips down to the yard to make the necessary cuts, and then head back up on the scaffolding.
One thing that was quite funny was how many people really wanted to go on scaffolding rides. When my parents came to visit towards the end of the project, my dad wanted to climb up and give me a hand. He helped out a bit, but I'm convinced he was more interested in the trip up on the scaffolding.
One person who hated the scaffolding, and actually hated me being out on the scaffolding even more, was Wendy. You couldn't give her enough money to hang out there with me. In fact, she was a bit of a nervous wreck every time I was out there. One thing she did that was extremely nice, which also told me she was very concerned, was food delivery. When I was working on the scaffolding and was up around the guest bedroom window, "Wendy's Wild Food Court" window would open and she'd tell me what was on the menu that day. From tuna fish sandwiches to pretzels, it was the best and only food option on the scaffolding, so I happily partook in the feast. I'd place my order, continue working on the project, and a few minutes later food on a tray would show up at the window ledge and I could sit and enjoy my lunch with Wendy, whose feet were firmly planted on the interior floor of the house.
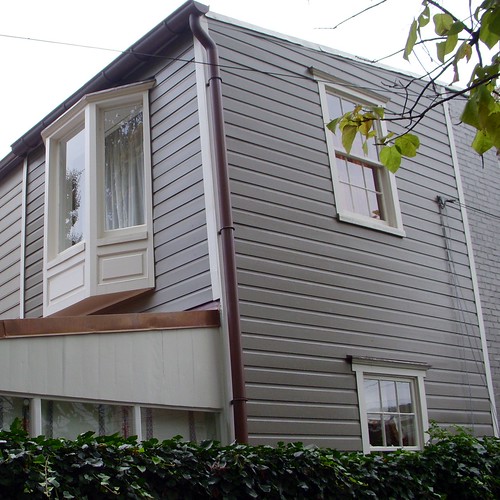
Once I finished up the side of the house my focus moved to the back wall of the guest bedroom. With the large and deteriorating bay window, I started an effort to dress up the window feature of the home that looked very "off" with the rest of the house. As you can see from the original photos, the window was very undersized and seemed to be missing something.
To balance things out a bit, we built a frame below the window and decided to add a few panels to give it more of a raised panel Victorian look.
We also removed and replaced all of the trim around the window to make the whole thing a cohesive element on the back of the house. In the interest of time, we ended up leaving some of the bay window embellishments until after the siding project was complete. The last thing I wanted to do was to hold up the painters because I was working on something I could just as easily paint myself.
All the while, I was slowing applying the siding on either side of the bay window, following the same approach using copious amounts of caulk at the corners and ensuring a water tight installation.
The thing that's funny about a siding project, as with many projects, is the majority of the time that's spent isn't spent doing the siding. The majority of my time and effort on this project revolved around getting the trim around the windows right, getting the corner boards perfect, the gutters installed, the roof transition properly flashed, flashing above the windows, etc. There are so many details surrounding demo, prep, and installation that have almost nothing to do with the siding itself, but will make or break the project.
As I reached the top of the back of the house with our siding install, I was really pushing the edge of when the work needed to be done. The painters were already painting the front of the house, and they were due to start the back in 48 hours. I was in a race against time, but I felt like I could squeak this one out. However, I still had scaffolding installed that I needed to remove, but more importantly, exposed nail heads all throughout the siding, and those needed to be filled prior to painting.
To resolve the nail heads (which were all driven about 1/32" to 1/16" below the surface of each board's face), I needed to apply a good wood filler. In this case, since it's an exterior application and takes the abuse of the elements Mother Nature throws at it, just any old wood fill simply wouldn't do. If I applied a waster based or drying type wood filler, it would most likely expand and contract with heat/humidity and cold/dry, eventually falling out and exposing the nail heads, letting water in, and ultimately causing disaster. Instead, I chose my favorite two part wood epoxy, Abatron's WoodEpox. The two part epoxy cures through a chemical reaction between parts A and B, leaving a more stable end result that will stand the test of Mother Nature, sitting tight through many seasons.
The only problem with this approach is the fact the epoxy needs a solid 24 hour cure time before priming/painting, and our oil primer would need to be applied to the filler and allowed to dry for another 6 hours...and by the time I finished up the filler, the painters were due to begin the back of the house just 12 hours later, so I was working late into the night to fill the holes.
That's when the threat of weather, yes, Mother Nature, showed up to help me out. There was a 60% chance of rain the next day, and rather than risk it, the painters delayed their final days of work by 24 hours. This saved me. I was able to allow a full cure of the epoxy filler, then apply the primer, and have it fully cured before the painters showed up on their final day of work.
Watching the paint cover the white primed siding was a true thing of beauty that we could only appreciate knowing the time and effort that went into getting that siding up on the house. It also helped quite a bit that we remembered just how horrible it had looked just a few months before, with duct tape covering gaping holes and absolute catastrophic deterioration throughout.
When we first started recapping this project, I mentioned that it was truly a project that pushed the envelope of our DIY capabilities. When we started the process we were hopeful we could take it on. By the time we reached the point in the project where we were watching the newly hung siding receive its first coat of paint we felt like we could take on the world, and it was truly a great feeling.
This project is proof positive that pushing the limits of your overall DIY prowess is a good thing and helps you to achieve even better things down the road. It's also a good test to see if you have the drive and desire to do larger and harder projects, or if you're more comfortable with the daily DIY challenges you've already tackled. Personally, we're ones to keep pushing the limits, and this project, still looking great a full eight years after completion, shows us that we should keep pushing our limits.
Have you ever taken on a project that was decidedly over your head only to realize you're ultimately capable? How do you feel about the results of those early efforts? Still satisfied, or could you do better? I know there are about a half dozen things I'd do differently, but it's just me being a perfectionist more than anything. Maybe on our next house? ;-)