Houston, we have a problem.

If you've been keeping up with our long, drawn out process of selecting elements for our master bathroom, you may recall our debate on whether to use tile or wood wainscoting. We certainly weighed our options, crunched numbers, and took hours of labor into consideration. Although I prefer the look of tile to wood paneled wainscoting, the price and effort were enough to sway us to the other side.

In true Alex overkill fashion, he tirelessly researched the various companies and profiles, and after much deliberation, we landed on a winner. Style WC 101 from Mad River Woodworks. 

Several weeks back we placed the order for our new, beautiful wainscoting, and have waited for its arrival with baited breath. This past weekend was our lucky day, as the hard rap on our front door indicated its long awaited debut.

Box after box, weighing in at a cool 66 pounds each, made their way off the truck as the poor delivery man grew more and more irritated. 

As I stood by, watched, snapped a photo, and kept Lulu at bay, Alex joined in the fun and helped unload and carry our new "walls" into the house. Even with the extra set of hands, the driver's frustration was palpable. At one point he even remarked, "You're killing me, man. I'm on home delivery because it's supposed to be easier." Sorry to disappoint, kind sir. Apparently he didn't get the memo that the crazy DIY-ers live on this block, or he'd surely have requested a route change.

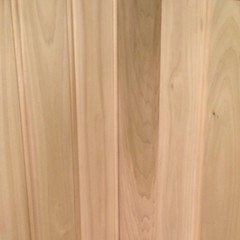
After dropping what felt like a mountain of boxes in our front hallway, like kids on Christmas morning we excitedly ripped into the first box, anxiously awaiting the first glimpse of our new paneling. After some cutting, ripping, prying, and audible grunting, we freed the first board from its cocoon of packing materials. 

We both looked at it...and said nothing. 

I suggested we pull out another board or two, lug it upstairs to the bathroom, and prop it in place to really get a good feel for the look of it. Alex obliged, we looked, and again fell silent.

Now I'm not one to bite my tongue, but I didn't want to burst my dear husband's bubble. I knew he was really excited about the wainscoting order, but my mind was reeling. The wainscoting looked ridiculously huge, both in width and in terms of the size of the bead. It looked like a circus-sy interpretation of a classic. And I hated it. 

What I was hoping would come in the mail was a slightly wider and more custom looking version of your standard bead board. Something exactly like this:

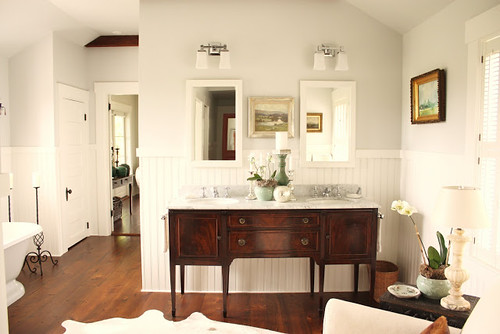
Photo Credit: for the love of a house

Hmm, what we had definitely did not look like the picture above. 

Hate is a strong word...but I really hate it. I also know that while I can visualize a space with the rest of them, I have two weaknesses in this area. First of all, I have a really tough time interpreting a drawing of the profile of wood molding. Until I see it in person, I struggle with visualizing it. This was the case with the online illustrations. I really couldn't picture them, whereas a picture of the installed product would have made perfect sense in my mind. 

Secondly, I fall victim to mid-project panic. You know, where you feel like you have a clear vision of a space, but once you're up to your elbows in it and it's too late to turn back, you start to get that nagging voice in the back of your head that whispers, "This will be the ugliest room in the history of the world. What were you thinking when you chose/bought/painted that? My eight month-long mid-project panic after I bought the rug for the sun porch is a perfect example.

So I decided to bite my tongue and see if I could get used to it. That was until Alex, even a day later, kept asking me what I thought of the new addition. I finally broke down, sticking a toe in the veritable waters of a massive DIY disagreement, and offered up a "I don't love it at this point, but I'm trying to reserve judgement until we see it in the space."

Well, that opened up the floodgates for him, and he confessed that he too was having similar feelings of doubt. On one hand I was relieved, on the other hand I thought, "Oh shit. Now we really have a problem." 

We've invested $1,000 in materials, $350 of which was shipping, and we can't return it. It nearly killed me the first time to spend the money...when we were using the stuff, but spend $1,000 on something to scrap? No way! 

So we're at a bit of a standstill and have been contemplating a few options. 

Option A: Prime several boards so we can better envision how they'll look in the room. It's hard to picture the true look of the wainscoting when looking at the current naked poplar.

Option B: Invest hours of effort in retrofitting each board. This would involve Alex re-routing the bead detail to make it smaller, and possibly even ripping each board to narrow the width slightly. This option will take a ton of time, and will also result in us being short materials as we had calculated our order based on the original width. I'm not a fan of Option B, but if it means salvaging $1,000 worth of good materials, then I'm all for trying it as a last ditch effort.

Option C: Sell/CraigsList the materials to recoup a portion of the cost, and start our sourcing efforts from scratch. At most we'd get a fraction of the original cost.

I keep trying to remind myself that this could be mid-project panic, and that all I'm looking at right now is the wainscoting. In the finished space, it will be a subtle background element, overshadowed by our gorgeous salvaged claw foot tub, glitzy beveled mirror, what is sure to be beautiful floor length curtains, and stunning built ins. It will also be largely obscured by items in the room such as the vanity, built ins, and tub, with the only long run being on the back wall of the bathroom opposite the door. 

While I try to temper my anxiety over this one, I welcome your input. Are we too close to the project at this point, unnecessarily obsessing over a detail? (After all, we are the couple that for months afterwards agonized that the caulk around our other bathroom's pedestal sink was "too white" next to the tile.) Or, are our fears well founded? Did you take a look at the wainscoting and thought it screamed "circus sideshow act" to you? We'd love to know what direction you think we should head.

Comments 57

Comments

Diana
9/16/2013 at 2:31 PM
I'm so sorry, and mostly, I think that your un-excitement must be right. I'm trying to compare with a new pair of shoes, say, that you order online and are disapointed when seeing them in person. There's no way "maybe" you'll love them with that dress or skirt.
But. Probably it's stupid what I'm going to say. Is it possible to add something to the middle of the plank to make it appear narrower? I don't know, some sort of wood, thin and flat? Stupid idea.
Wendy
9/16/2013
Hi Diana. Thanks for your input. We're toying with a similar type idea -- having Alex route a groove in the middle of each plank to make it appear as if two boards are positioned between each bead. We're not sure how that will look, but are definitely keeping it in mind as an option. Thanks!
Mike Howard
9/16/2013 at 2:45 PM
Oh my. I feared this when I saw your previous post. I'd consider routing another half bead down the centre of each board to make a narrower looking plank. If that's not going to work then either put it aside for another project, or sell it quick, take the loss and move on.
Wendy
9/16/2013
Thanks, Mike. We're considering all options at this point, and fingers crossed we can find a decision we're happy with!
Kelly C.
9/16/2013 at 2:48 PM
Personally I think you are unnecessarily obsessing but I'm not a visual person. And, my budget couldn't take that hit. But, y'all don't have 2 in college so chances are you can chalk it up to a lesson well learned. You probably won't get much if you re-sell. I don't think I'd ever be comfortable spending that much on something that can't be returned. But again, we all have different budgets that we are working with. You have to decide if you can live with it for years to come or not.
Wendy
9/16/2013
Thanks for your input, Kelly! It was a big expense to swallow when we thought we were going to love it, so we're in a bit of a tizzy over it at the moment. I think we'll start with the easiest option to prime a section of it, and then see where we go from there. Fingers crossed!
9/16/2013 at 2:48 PM
I totally get what you are saying about the mid project panic. However, in this situation, I would just use it. At minimum, I'd prime and paint a whole section of it (hey, you can't send it back) and live with it for a bit.

With projects like this when you are looking at each element alone, it is easy to get a little obsessed and overly analytical. However, all together, it usually works.

So for me...unless you can get your $$ back, I would use it. It doesn't look bad (heck - it looks good in my opinion!!) and I don't think that if you re-do it, you'll say "GOSH that was $2000 well spent" or "MAN I'm glad we spent another 20 hours doctoring up each board to get it .25 of an inch thinner".

Trust me - I'm all for staying true to your vision but in this case I think I'd stick with it :-)

Just my ol' crappy opinion!!
Wendy
9/16/2013
Thanks so much! I've definitely had feelings of mid-project panic many times before, so I'm really hopeful that priming a section will help lessen our fears about the width. Very good point about "gosh that was $2,000 well spent/I'm glad we spent an extra 20 hours." We tend to get a little nuts, and at this rate, we'll never finish if we keep doing and redoing every detail!
9/16/2013 at 2:55 PM
Blerg! I'm sad for you guys.

If it were me, I'd probably install it on the wall opposite the bathroom door, prime and paint...and see if I could get used to how it looks from the hall when just passing by. Chances are good that once this bathroom is finished, you're not going to be looking at the wainscot up close, and like you said...there will be a lot of other things blocking it out once all is said and done.

Good luck with whatever you decide!
Wendy
9/17/2013
Thanks for your advice, Ashley! I think we're going to start with the easiest options first, including priming/propping up the existing and "living with it" for a few days. I really hope we come around to like it!
9/16/2013 at 2:59 PM
I'm honestly really surprised that you all went with the wider planks. I don't think it looks "ridiculously huge" at all. I actually really like it. I just think it looks a bit casual for your home. I think of wider planks like this as more cottagey, and your house is the opposite of cottagey. But you're also bringing in a lot of fancier, higher end fixtures and finishes which I know will counter balance this really well.

Also, once it's painted and in a completed room, it wouldn't bother me in the least bit (assuming I had reservations about it in the first place, which I really don't). Really, the majority of it will be covered. But you all are a little crazy about details (and I truly mean that in the best way possible), and I kind of envision you looking at it every day and hating it even more. Maybe paint one box worth white, slide them together and think on it for a few weeks?
Wendy
9/17/2013
Ha ha! Yep you're right, Kate. We're totally crazy about details. I'm so glad you don't think it looks huge!

I've been scouring Pinterest and Houzz trying to find photos of the wide plank bead board to get a better feel for how it will look in a finished space, and will definitely try out a few primed boards in our room as a test run. Thanks for your advice!
Cheryl
9/16/2013 at 3:56 PM
I would paint a few boards & tack them on the far wall across from the door and look at them every chance you get for several days. You may find that the wide boards create a less busy look that works well in a small room with lots of other detail to catch your eye.

If you really feel the need to route a bead to make the boards look narrower I would also paint them and test them in place. Paint make a big difference with beadboard.

Good luck!
Wendy
9/17/2013
Thanks for your advice, Cheryl! Good suggestions, and definitely something we're going to try out. We'll keep you posted. :-)
linda
9/16/2013 at 4:07 PM
Different people will zero in on different details of a room renovation, and this is yours. That being said, when it is painted and everything is in its place, I think your angst will be gone as the sum total of this room will be beautiful, just like all of your others. I have countless examples of middle stage project anxiety too, I totally relate.
Wendy
9/17/2013
Thanks so much for your two cents, Linda! I'm really hoping this is a bad case of middle stage project anxiety, and we're paying too much attention to one detail vs. the look of the entire finished space. We'll try out a few primed pieces and hope the look will grow on us!
9/16/2013 at 4:15 PM
Are you planning to have the planks 36" or 32" high? If your plan is 36", I think 32" will reduce the visual weight and perhaps be a simpler solution to your problem. I don't remember your vanity height, so forgive me if I'm making a suggestion that you cannot possibly use.

I identify with mid-project panic. I believe the CDC has studied it and is preparing to release treatment protocols soon ... not soon enough for those of us with old houses and complicated, expensive projects to manage, unfortunately.
Wendy
9/17/2013
Hilarious, Connie! (And thank goodness the CDC is working on it!) :-)

We're planning on a tall bead board, roughly 40". Along the same lines as your comment, we're talking about how we could increase the weight of the bullnose/top rail detail to downplay the width a bit. We'll see how that works out, fingers crossed!
Kerrie
9/16/2013 at 4:59 PM
I'd leave it propped against the wall and 'think' about it for awhile (no that's not the same thing as procrastination). Then I'd probably paint a couple and groove a couple (it would be like sample 102 or 103 which are the same size as your pieces), and then 'think' about them for awhile. Then I'd have a big glass of wine and see how I feel at that point.
Could be just my way tho'.
I'm sure you'll find the method you can best live with
Cheers
Wendy
9/17/2013
Wine always helps make house decisions! :-) I love your suggestion to prop a few up against the wall and see if it grows on us. It's the free option, and one we'll definitely start with. Thanks, Kerrie!
Jessica Hallmark
9/16/2013 at 6:00 PM
My husband and I follow your blog and we purchased our house a little over 2 years ago so we have only done a few projects so far and with every single one I have "mid-project panic". We recently put up board and batten wainscoting in one of our guest bedrooms and due to a miss-communication between me and my husband he put up the batten with seams in certain spots allowing for the spacing he thought I wanted. Well when we first starting spacing the boards I started to freak out because it was not what I had envisioned. It took a while for us to figure out the spacing so I would be happy with it and now that it is up (we still have to prime and paint) I am happy with it, would it have looked better the way I was wanting it to maybe but it's done and it looks great. I think that you should maybe leave some of it up and see how you feel about it before you make a decision. When we bought the slip shade chandelier for our dining room and my husband put it up I literally almost cried it looked awful and we paid $1,000 for it and ordered it from a guy in CA who restores vintage lighting. But keep in mind when he put it up our dining room was still covered in dark blue wall paper with flowers from the 1980's and the light actually was my inspiration to what I wanted to do with the dining room. Also when we put up our trim I started to freak out b/c it was so thick (which I wanted) and now I love my dining room.
Jessica Hallmark
9/16/2013 at 6:00 PM
Thought I would show a pic of our dining room the camera quality is crappy and we still need to fix the furniture to go in this room. https://www.facebook.com/photo.php?fbid=3930927392008&set=a.3854544722489.2142917.1244453876&type=3&theater
9/16/2013 at 6:48 PM
Oh boy. What a tough spot to be in.

I'm torn on what I think you should do. My gut feeling is that, if you really dislike it, you should cut your losses, sell it on Craigslist, and move on to something you like better (maybe ordering one box just as a sample before committing to the whole thing...)

The reason for my thinking this is because I see how much attention to detail you and Alex possess. I'd hate for you to install it and then be bothered by it forever.

Of course, if you're on a budget and need to just use it, then there's that. And you can use it and just decide to be ok with it. But you've invested so much time and energy into the details of your home that I understand if you don't want to do that.

Of course B is sounding possible, too. I like the idea of routing a half-bead down the middle of the plank. . .

IN other words, I have no idea. :)
Wendy
9/17/2013
I'm glad we're not the only ones that are a bit stumped! :-) I think we'll start with the easiest option (priming and setting in place) and we'll go from there. I'm really hoping it grows on us. It wasn't love at first sight when I met Alex, and I've come to think he's the best thing since sliced bread. So maybe there's hope for our wainscoting? ;-)
bfish
9/16/2013 at 8:32 PM
I'm not going to be much help, because I actually like the oversized scale (width of board and size of bead). We were kind of ahead of the beadboard craze as we used it for the wainscot in our half bath at least 15 years ago (real boards, not panelling). I still like it but am tired of seeing it everywhere. What you have is a fresher interpretation.

As Kate mentioned above, think about how your other elements juxtaposed against the boards you bought will look. If other items are a different scale I think it will look very interesting. You may have shared what you're doing with the floors and tile (for shower or bath) but I don't remember. Anyway, what are the shapes and scale of these items? Are they and the beadboard complementary to each other?

Many of my and my husband's ideas or "visions", while within the acceptable scope of changes to an old house, are kind of out there. Sometimes early in the project we start to question what we're doing, but unless we really hate it we proceed -- and honestly have never been anything less than (ultimately) pleased with how it turned out.

So I'm clearly in the Option A camp. As others have said, you would have to be extremely lucky to get much of your money back when you sell it. Experimenting with routing a bead in the middle but if I did that, I'd go for broke and rout several grooves so you end up with something unique and yours only.
Wendy
9/17/2013
I'm glad to hear that you like it and think it's a fresher interpretation. That's why we started down this road in the first place -- we didn't want the "skinny" beadboard that you see everywhere. We've had many moments of doubt along the way, and there aren't any decisions I can think of that I still "hate" as much as I did in the moment of mid-project chaos. I feel really encouraged to trust our gut, and at least keep an open mind while we prime out some of the boards and take another look. Thank you! :-)
bfish
9/16/2013 at 8:35 PM
Sorry to add another comment, but wanted to continue with there's always Option D. This is the one we employ when we're confounded by a project. Start something else to clear your head and you'll come back to the wainscotting refreshed and perhaps with a more favorable view of your materials.
Wendy
9/17/2013
Excellent advice! Thank you! (Might be time to revisit the storm windows??)
Bea
9/16/2013 at 8:49 PM
I am with Connie. Mid-project panic is a terrible affliction that all DIY ers suffer from, some more than others. I have certainly had past attacks- over some of the elements that I have in the end loved.

I think that when the wainscoting is in place and painted it will look lovely in your bathroom. Since a quick retreat isn't really practical, why not chance it? It is not like you couldn't do it over if you really hate it-- but I think there is a very good chance that even if it turns out not to be your favorite element in the room, it will be okay.
Wendy
9/17/2013
Thanks, Bea! Alex offered up last night that after we install it, if I still hate it he'll rip it out and we'll start over. I don't know that I'd ever do that after we get everything in place, but it's nice to know the option is there in case of emergency. I'm going to try really hard to make it work!
9/17/2013 at 7:08 AM
Bummer. I agree.. it looks too wide between each beaded strip.

I don't think adding a bead in the middle is really possible, although I could be wrong.

Alex could probably get away with reducing the width and routing a new beaded edge with minimal added cost. Looks like regular old poplar board, but maybe 1/2" thick? He could either resaw some poplar on a bandsaw or just order a few 1/2" S4S boards from a lumber supply house.

It's the nature of the beast that is remodeling. You'll be fine.
Wendy
9/17/2013
Thanks, John. Although we're willing to try the routed groove in the middle, I agree. I'm not confident it will work, and actually might make it feel to busy. We're going to give it a try though. All options are still on the table, although I'd really like to make it work!
9/17/2013 at 8:44 AM
Before you get too worked up, prime a section and see what it looks like. You may be surprised. Even though I think this particular board was made for a ceiling, you have to remember that prior to about 1900 or so, most boards were wider than what they are today. Think of hardwood flooring - compare the width of the boards used in one of the early to mid 1800s houses you have looked at and compare it to the width of a 1920s house.

Before we bought our house, we looked at a circa 1870 Second Empire outside Richmond, Va. There was wide wainscoting similar to this in the kitchen and we think it may have been original and honestly, it didn't look bad other than having a dozen coats of paint on it.
Wendy
9/17/2013
Thanks Tom and Jada! I appreciate your advice and reminder about typical board width back in the 1800s (and when our house was built.) We're definitely going to start with priming the boards to get a better feel for what it might look like. Even if it's not what we specifically envisioned, we're still hoping to make it work.
9/17/2013 at 10:08 AM
You know what? I would use it. But then again, I kind of like things that are different from what everyone else has. And I do think once it's primed, painted, and installed, and once everything else in in the room (so that the walls are actually just a backdrop and not the main feature), it'll look beautiful. It's kind of a hybrid of planked walls and beadboard walls. I like it!

But then again, it's your bathroom. And it would be really sad if you went with it, went to all that trouble and hard work, only to feel disappointment every time you looked at your walls. So really, it's all about what you want and what you can live with.

But I like 'em. :)
Wendy
9/17/2013
Thanks so much, Kristi! I'm trying to reserve judgement until I can see it primed and/or painted. My hope is that it will take on a different look than the bare wood, and after all, we were going for something a little bit different (maybe not this different, but...) :-)
Old Town Home
9/17/2013 at 10:49 AM
Thanks so much for your advice and encouragement, Jessica! Unfortunately I can't see the photo of your dining room, but your reminder of how looking at one element in an otherwise unfinished space oftentimes skews our impression of that element. I think we need to take a deep breath, and "test" out a few primed boards in the space. Thank you!
Brendan
9/17/2013 at 10:52 AM
Use a router to cut a bead down the center of each board and you end up with WC102 which is narrower and what you probably wanted.

Alex is skilled enough that the router fix shouldn't be a problem. Maybe $50 on a custom router bit to get the profile to match what's already in the board. Once Alex gets the router table or jig set up the work will go pretty fast to modify each boart; 4-6 hours maybe.
Wendy
9/17/2013
Thanks, Brendan! We're definitely considering this option. We're going to mock up a few of the boards to see if we like the look, and if so, we'll go forward. I'm willing to try anything to use what we have!
Hannah
9/17/2013 at 1:03 PM
At first, I didn't like the wide planks either, but now I don't think they'll look that bad--especially when they're painted and you start adding in other elements of the room.

But if that still doesn't make them look like they fit, I would try installing them on the sunroom's ceiling. I always loved that look, and the wide planks would probably be perfect for that!
Wendy
9/20/2013
What a great idea. Thanks, Hannah!
ann
9/17/2013 at 1:19 PM
What about installing it horizontally instead?
Wendy
9/20/2013
Thanks for your suggestion, Ann! I love the look of horizontal boards, but unfortunately with the way they're cut, we'd run a little short/have too many seams. It's definitely something to consider for another space though!
Emiles
9/17/2013 at 2:35 PM
At first, I understand the freakout, but after looking at Houzz, I think you're going to be okay. In fact, I think with all the beautiful, glitzy items you're putting in there, smaller beadboard will seem too busy, even all painted white. Deep breaths, it will workout!

See: www.houzz.com/photos/50339/east-coast-traditional-traditional-bathroom-other-metro
and
www.houzz.com/photos/1849413/Portfolio-of-Work-traditional-bathroom-san-francisco
Wendy
9/20/2013
Thanks so much, Emiles! Seeing these examples of "afters" is really helpful!
Anya
9/17/2013 at 2:45 PM
Meh, Don't sweat this. I think it will be fine once painted. The bead board is just back ground music, and the headliner is the vanity right? Paint it white and let it fade into the back ground where it belongs. I think the narrower the board the more attention it draws to itself.
Wendy
9/20/2013
Thanks, Anya! I really appreciate your advice and encouragement!
9/17/2013 at 2:49 PM
Like several others, I think it's too soon to know you hate it. It's not what you envisioned but that doesn't mean it's bad. You could always post it on Craigslist at a break-even (minus shipping) and hope you get a nibble. If you don't, then you make a plan to deal with it.
Wendy
9/20/2013
Good point, thanks Melissa. We're doing everything we can to try to work with it. :-)
9/17/2013 at 5:02 PM
I recommend you prime & paint some before you make any final decisions. I don't know about you, but I look much prettier when I've put on my face & added some great accessories. The planks ARE wide, but I think they'll look great once you finish the room. It's a slight change from the wholly traditional wainscoting, yes, but I think it could add a nice visual pop.
Wendy
9/20/2013
Thanks, Becky! We're trying out some primed boards now and have been living with them for the last few days. Jury is still out, but I think we're coming around.
Jessica Hallmark
9/17/2013 at 5:39 PM
Sorry that you are unable to see the picture here is a link to my husband's flicker
Jessica Hallmark
9/17/2013 at 5:39 PM
http://www.flickr.com/photos/maxhallmark9/sets/72157635124111323/
Alex
9/21/2013
That looks awesome! Very nicely done.
JC
9/17/2013 at 8:25 PM
:S

Oh man. This just plain sucks. I understand how you feel, but didn't you guys get a sample first? 1000$ is a HUGE chunk of money, and I know if it were me, I'm 100% visual, and I never trust those computerized line drawings, since the majority of the time they're no accurate.

Suggestions: What does the BACK of the boards look like? Is it matched simple v-grooves? Could you live with that? Could you re-route a smaller bead on the reverse side? If so, you could set-up a router table (or borrow/rent one), and just run them all through pretty quickly (an hour tops).

FWIW, it's really not THAT bad. It honestly reminded me instantly of an original beadboard ceiling that I saw on a job site in an old 1890s farmhouse (and sadly they had boxed-in the ceiling and butchered it with huge holes for wiring and big ugly pot lights).
Alex
9/21/2013
I think it's slowly growing on us, so our crisis may have been averted.

The backs are just flat plank, no matched grooves or anything, so anything custom would be totally and entirely custom.

Thanks for reassuring us. The more research we've done the more we see that it's actually a pretty accurate and appropriate profile.
Old Town Home
9/20/2013 at 1:59 PM
It looks great, Jessica Hallmark! Thanks so much for sharing the picture. Keep up the great work!
Since you've not signed in yet, you will need to fill in your name and email below. If you have a Facebook account, save yourself a step and use Connect to login.

Denotes a required field.

Please enter full URL, including http://

You can use Markdown syntax in your comment. And you can also use lots of Emoji!
  • Search

  • Login
  • Follow
  • Advertising

If you're looking for information on advertising and sponsorships, head on over to our sponsorships page. You can purchase site sponsorships in a few easy clicks. 

Toolbox Tuesday
Open Housing
  • We're Featured!

Old Town Home has been featured in the following places and publications:

The Washington Post
 
Washingtonian Magazine
 
Domino
 
Old House Journal
 
 
Apartment Therapy House Tour
 
Washington Post Express Feature
 
Home & Garden Blogs
 
© 2024 OldTownHome.com. - Privacy Policy

Unexpected Error

Your submission caused an unexpected error. You can try your request again, but if you continue to experience problems, please contact the administrator.

Working...

Working...