Recently I wrote several posts detailing the process we've taken to repoint a portion of our 19th century masonry. From proper mortar selection to the whole learning process associated with making good looking mortar joints, it was a laborious task with a bit of a learning curve, but one made possible by ensuring I had the right tools for the job.
The point of this project was two fold. Primarily, I wanted to make sure the joints on this interior chimney section were in good shape before we cover them permanently, since we plan to eventually upgrade the fireplace it supports to make it functional. Secondarily, I wanted to take an opportunity to learn the skills I'd need for repointing, so I'd be able to put them to use when we perform the same process while exposing the brick in our guest bedroom.
After our last post on this subject, detailing the bulk of the work as well as my much awaited success, I had finished up repointing with the first bag of mortar. It was looking good from a technique and finished result standpoint, but the color was too gray, and wasn't a match to our original mortar. Since this will ultimately be behind a wall it caused me no concern, but I wanted to figure out the right color to use when we expose and repoint the brick in the guest bedroom (sometime in the 2020-2045 year range given our tortoise-paced whole house renovation).
I ordered a final bag of mortar in DeGruchy's "100" style and it turned out to be a nearly perfect match! After a few more hours working on the chimney, the repointing was complete and really looked great. Here's a comparison in the color from the first bag to the second bag.
As I said earlier, this finished result with clean joints was only made possible after I had picked up the right tools for the job. When I started the process I had most, but not all of the tools I needed, and the "finished" joints were far from how I wanted them to look.
Using just the masonry jointer I was left with these sloppy and unprofessional joints. I ended up leaving these in place, since they'll do the job, but I knew I'd be unhappy with that look in my future repointing projects. Rather than just plowing ahead and doing the whole chimney in this manner, I opted to order a few tools that would help me with creating better looking masonry joints. These critically important tools are known as "tuck pointing trowels," and they drastically improved my repointing ability almost immediately.
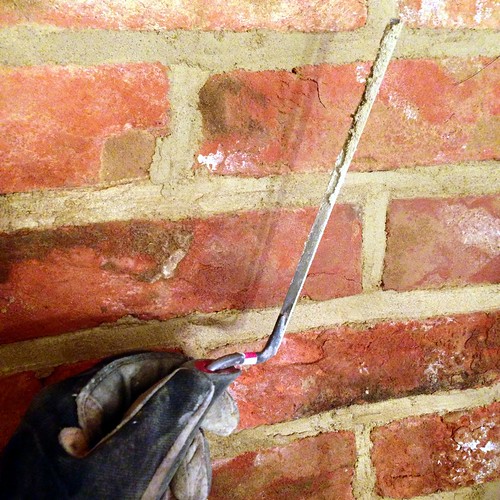
Where most trowels bring wide blade metal tools to mind, tuck pointing trowels are a significantly different animal. They consist of a handle and very narrow metal "blade" of varying width. These widths serve to work the mortar into the masonry joints and pack it in rather smoothly.
For our purposes I checked the width of a sampling of mortar joints by using the tape measure. I noticed that most joints were no smaller than about 1/4", and most were no larger than about 5/8". Given these measurements, I decided we'd need at least two of these tuck pointing trowels. I ordered one 1/4" trowel, and one 1/2" trowel. These two sizes would allow me to work most efficiently over the whole chimney, choosing the trowel I'd need at any given time based on the width of the mortar joints.
Given the use of a tuck pointing trowel, clean mortar joints, pre-moistening the wall with water spray, and a whole lot of patience...
We ended up with an absolutely great looking chimney that is ready to serve our house for another 100 or more years.
As I said, this result wouldn't have been possible without using the right tools, and I'm very happy I decided to wait for the arrival of the tuck pointing trowel prior to moving forward with the project. Now I feel like I'm completely ready and capable to move forward with the any repointing and repair project I need to take on...not just those that will be concealed behind walls.
Have you ever repointed anything in your home? Did you have a similar experience with the tuck pointing trowels allowing you to improve the results of your project tremendously? I can't wait to share future repointing projects with my newly honed skills in the craft.
Did you enjoy reading this post? Want to learn more about our first-hand experiences with other tools, devices or items used throughout our renovation? If so, check out our complete list of product reviews in our Toolbox Tuesday section.
Note: We weren't compensated for this review. We simply want to share good products when we see them, and hope that learning from our mistakes can help save you time, money and frustration.