In 1781, when speaking about the condition of homes in Virginia, Thomas Jefferson said,
"The inhabitants of Europe, who dwell chiefly in houses of stone or brick, are surely as healthy as those of Virginia. These houses have the advantage too of being warmer in winter and cooler in summer than those of wood; of being cheaper in their first construction, where line convenient, and infinitely more durable. . . . A country whose buildings are of wood, can never increase in its improvements to any considerable degree."
Our home, at the ripe young age of about 127, can vouch for our founding father's words as truth. While other wood frame homes have come and gone, or have required a level of constant upkeep through routine maintenance, the walls of our home have stood firm under their original mortar for over a century and a quarter. According to one mason I spoke with several years ago, the walls of our home are "as plumb as the day they were laid." This is saying a lot given the punishment I'm sure they've taken over the years. From the introduction of automobile vibrations to the rumblings of a periodic earthquake, there hasn't been a significant amount of shift or lean (save for one chimney).
In dealing with masonry homes it's true that you are provided with a great deal of convenience in maintenance. Where a wood frame home with wood siding often needs frequent maintenance in the way of paint, clapboard repair, bug infestation or rot remediation, a true masonry home can go 50 to 100 plus years before needing a significant helping hand. However, when mortar joints begin to deteriorate and crumble, the descent into disrepair can be rapid, and the cost and time needed for resolution of the issues to bring the exterior or interior joints up to snuff before you risk long term damage can be massive.
Now I'm going to preface this post by saying, I'm absolutely and unequivocally not a mason (and I'm not talking about a Masonic mason, though I'm intrigued by that). Never have been, never will be, and will never claim as such. But I've done a lot of research on this subject of masonry maintenance given that we live in and are caretakers for a mostly brick home, and I feel I have a better than adequate grasp on the topic of our home's bricks. I also stayed at a Holiday Inn Express last night, so there's that.
When performing maintenance on a masonry structure one of the most common and most appropriate forms of repair involves a process know as repointing (or tuckpointing as a less invasive approach). This involves the removal of failed or deteriorating mortar from the joints between bricks, then replacement of that mortar with new mortar that will provide a long lasting joint for the next 50-100 years. It sounds simple enough, but as it turns out, it's absolutely an art form. Everything from chiseling the old mortar without damaging the brick's face to ensuring your material removal is deep enough to matter but not deep enough to compromise the structure are critical steps in ensuring a solid and complete finished product, especially when you're starting with joints that look like these.
If you're interested in the various details of repointing, I can only give you so much technical information before I'm just copying and pasting from a pro. But as luck would have it, we have a project that we're working on where we actually need to repoint, so I can give you a bit of a how to on the approach we're using. Hopefully it will be a good reference on how a non masonry pro would typically repoint (or tuckpoint), if you're so inclined to give it a whirl. This might be especially useful if you'd like to work on exposing brick in your home without the need to constantly clean up the falling sandy mess of failed mortar.
The first and most critical step of repointing begins long before you take your chisel to old mortar. It involves the proper selection of your replacement mortar. The appropriate selection of mortar based on your project and the age of the brick and mortar you're working to repoint is not a one size fits all proposition by any means.
The most difficult aspect of materials selection is simply that not all brick is created equal, and a mistep in mortar selection could actually do more long term harm to your brick than good. The age of the brick and method of manufacture defines the features of the brick, and the type of mortar you will need for your project. If you've done any watching of This Old House, you've probably heard Norm or Tommy talking about this aspect of building, and it's extremely important. The recipe for creation of newer brick results in a very hard and solid product, and one which allows for a mortar made with Portland cement. The hard fired brick is able to support this extremely hard mortar without issue. But an older brick, such as those that make up our home, is usually much softer by recipe, and requires the use of a lime based mortar to prevent the brick from cracking, which would ultimately compromising the structure.
The rule of thumb is simple. You're mortar should be of a similar composition to the original mortar you are replacing, and the new mortar should be at least as soft, if not softer, than the mortar you are repairing.
A brick's mortar bed is meant to level and cushion the brick to brick contact, rather than to lock them in place. Gravity and the weight of the building and materials above the bricks do the job of keeping them from moving. By it's nature, the mortar disperses pressure evenly across the brick's surface. If you repoint with a mortar that's harder than the original, the weight and pressure on the brick's surface is no longer evenly distributed, putting force and pressure on the brick and causing cracks and failure.
Additionally, older bricks are porous and allow moisture into the brick, which is then allowed to leave through the soft mortar. If the new mortar is hard and locks the water in, the water deteriorates the brick form the inside, and a freeze cycle causes the brick to fracture, resulting in failure.
Failed brick is a ugly brick, and it looks like this.
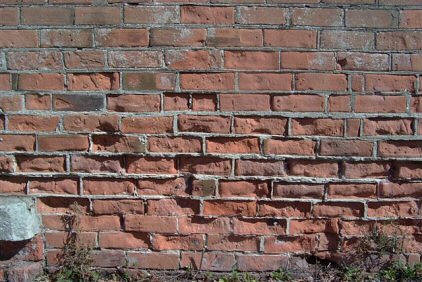
Example of "spalling" in improperly pointed brick.
Since our brick is about 125 years old and not 200 or more, we can use a slightly harder mortar, but still one that is lime based, softer, and more porous than a Portland cement based mortar. Through much online research I discovered a brand of mortar offered by a company called deGruchy's, which can be found online under LimeWorks.us. They offer a series of restoration minded products used to restore masonry and plaster through the use of historically accurate materials.
More specifically, they offer a brand of mortar called Ecologic Mortar. It's specifically formulated for the restoration of lime based masonry mortar structures, perfect for what we're working with. Better yet, it's a simple "Just add water" forumla mix.
Finding this product was a huge relief. I also double checked the product with a mason just to be sure we were using the right stuff. After a mason's seal of approval, we went ahead with the order. I ordered the 38.5 pound bag pictured above from one of our favorite online hardware resources, Killian Hardware. The only thing that stinks is that shipping on almost 40 pounds of mortar costs about the same as the bag of mortar.
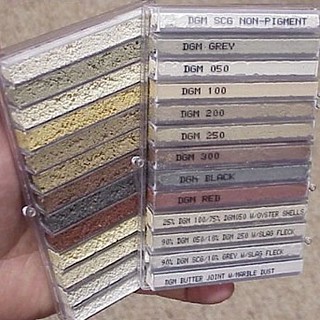
The mortar comes in several colors so you can match it to your specific mortar application. We ordered a gray color for our application as a baseline, but we don't ultimately expect the work we're doing to see the light of day, so color didn't matter all that much. Ultimately, when we expose the brick in our guest bedroom, I think we'll end up using their #100 coloring to match our home's original coloring.
Now that we have our mortar selected, the big question is, how do you repoint. We'll be coving our learn-as-you-go process of repointing in upcoming posts. I highly doubt it will be exactly professional quality, but hopefully our end result will be better than the beginners we are. In all I consider this first attempt at repointing a learning process so when we do it for real it will look closer to professional.
Have you ever done any masonry work? Have any tips for us noobs when it comes to repointing? I plan on only using hand tools to do all of the work, so I hope it goes pretty smoothly without the risk for massive damage.
Don't miss our several part followup on our repointing efforts. This includes our struggle to get the hang of repointing, as well as our ultimate success after finding the right tools and technique.