Today we're bringing you the final installment in our plaster repair/skim coating series. It's been a long time coming, but wrapping up any significant finish project like this is actually one of the more tedious aspects of the overall project. And like the many steps before it, this step involved less overall work, while somehow taking more time and requiring more overall attention to detail. Unfortunately, this is just a general progression of things when it comes to this type of work, but it's VERY close to complete.
After our last few steps of getting the corners just right, as well as seemingly nonstop sanding in the corners and on the large flat areas, followed by additional layer after layer of progressively thinner skim coats, we're finally at a point where the wall is nearly smooth. If you've been handling a similar project of your own you've likely endured the dry hands, clothes caked with dust, and inevitable bird poop-like accidents that come with the territory. Don't worry, it's made you a better DIYer.
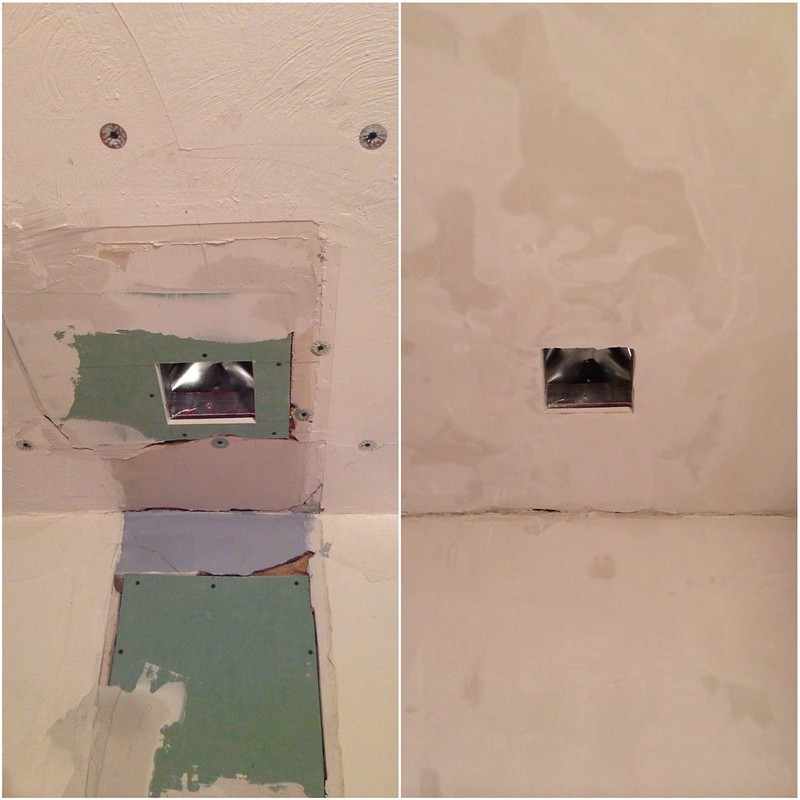
With a quick glance inspection, your wall and ceiling should essentially look smooth, consistent, and without significant flaw.
Keep in mind, as good as it looks at this point, the skim coat's variation in color and texture actually hides most of any flaws, but they're likely there. More often than not there are multiple places of significant imperfection that will really show up if you jump right to the primer stage of the project. Before moving on, we need to identify and fix these areas. At the very least, the next step is critical even if you feel your work is perfect (and if it is, awesome job). Think of the next step as validation of your work if that's the case.
As with overhead fluorescent lights highlighting the wrinkles in our skin and bags under our eyes, shadows and harsh light will show any significant issues that need resolution in your skim coat. To help identify these issues it's best to grab a work light of some sort. We have this weird makeshift light with multiple bulbs that we use for this very purpose. Holding the light at a sharp angle to the surface just off to the side of the area you're inspecting causes the irregularities in the surface to cast shadows and reveal themselves.
Moving around the room and across the ceiling, we like to circle each of the problem areas with a pencil. Tiny issues get small circles, larger scratches or lumps get large circles.
And anywhere that has a series of bumps or bubbles gets a circle with some writing that describes the issue. We do this because the bubbles and bumps require additional help over a normal scratch. Think of it the way a plastic surgeon marks up their patients pre surgery, but instead of marking blobs of fat for removal and "problem areas" that need a little lift or tuck, you're working to beautify your room.
This process goes pretty quickly but it's very easy to miss a spot or too. It may feel overly tedious but it's good practice to go over the room two or three times just to be sure you got everything.
Once all of your issues have been identified, you'll want to mix up one final (and very small) batch of mud and make it very loose. You really won't need much at all, so a gallon or half gallon buck will do just fine. In actuality, you'll likely only need about a quart or less of mud to complete this step. A little bit goes quite a long way.
Taking your mud and a few taping knives, apply the mud to the first circled area and immediately scrape it off at a very sharp angle. Keep in mind where the issue is that you're dealing with in the circle and work the material into the void from multiple directions. This will help ensure the void is completely filled and no air gaps are left. If you just apply in one direction you may end up either a gap under the surface or unsightly air bubbles as it dries. In the worst case, a gap could collapse down the road, leaving your finished wall with an unsightly scratch.
Once you finish one circle, move right onto the next. Try to get the skim as absolutely thin as possible, and try not to add any new scrapes or dings that you'll just need to sand out.
As you work around the room the walls will begin sucking the moisture out of your material and it will dry very quickly, even right on your knife. Keep mixing in additional compound to keep it pliable so you can keep working without the material getting too stiff or hard to work with.
If you start to notice more scratches showing up as your work progresses, it's likely that you've picked up little hardened pieces of dust on your trowel/knife. At this point I like to pause for a second to wipe down the tools with a rag and water. Keeping the tools extra clean at this stage of the game will really help your finished result.
By the time you get to the last few areas it's likely the first places you fixed will almost be dry. Like I said, it dries incredibly fast. Give it about 30 minutes to an hour to dry completely before grabbing your sander for the next step. I use a combination of the large drywall sander, spent sanding discs, and small sanding pads, but I'm always using 180 grit or higher, otherwise you'll leave large scratches in the surface.
I used a 120 grit spent sanding pad in this next photo to show how it leaves scratches. You can see them if you look closely below the sanding pad and a bit to the left.
The best part about this approach is that your patch coats are so thin that you can still see the pencil outlines of the problem areas. This means you know exactly where you need to sand to blend everything together. Grab your sander and begin feathering out all of your patched areas. It should go very quickly since the patches are small.
Once you're done sanding you're essentially done with this stage of the project. Look around, take stock of the finished work, and enjoy what you've accomplished. You've likely just taken your walls and/or ceiling from a damaged and nearly beyond repair state to a point where they look almost as good we new. Having done this in more than half of our house I must say, it's not easy by any means, and it drives me nearly to insanity when I'm in the skim coat, sand, skim coat sand process. Without a doubt, you should be very proud of your achievement.
It may not even be close to "finished," and most people might not think much of the work thus far (trust me, we've had plenty of people look at our smooth but unpainted walls and say "that's done?"), but I'm that special kind of house nerd that sands there and looks at the smooth and consistent walls and lose myself in the memories of before and dreams of the after.
The final step before you're ready to apply your primer and paint is to vacuum and towel the walls thoroughly. The sanding, sanding, sanding, and more sanding has undoubtedly left a significant amount of dust all over the walls. This dust sits silently and unassumingly until you start to apply caulk or primer, where it pops up and ruins your work. If you put on a Shop-Vac attachment that allows you to slowly and methodically vacuum the entire wall you'll get the majority of the loose dust. Once you feel the entire wall has been vacuumed, use a rag towel and wipe down the corners of the room, then the entire wall and ceiling, making long and consistent strokes. Keep the vacuum nearby to vacuum accumulated dust from the towel. The wall may look dust free, but you'll be shocked with how much ends up on the towel.
Alright! You're ready to start your next step in your room, and if you're anything like us that's almost always crown moulding, but more on that step of the project in a future post. Would you believe it if I told you we have some tips and tricks to help you there as well?
We hope you've enjoyed this rather long and drawn out process for fixing your flawed and failing plaster walls, and even making new drywall look more like old fashioned plaster. It's not an easy or quick process by any means, but it's one that pretty much anyone with the desire to try it can do with a good amount of success. However, I think the key to keep in mind if you're going to attempt to skim coat, Rome wasn't built in a day, and your skim coat skills won't be acquired in an hour. You'll definitely get better with time, and before you know it, you'll be skim coating like a pro.
If you attempt something similar in the future and use any of our tips or tricks, be sure to let us know, share some pics, and we can commiserate over your joint compound war stories. I'm sure you'll have plenty.
We have a whole series of plaster repair/skim coating posts you should check out if you like this or are trying to tackle the same thing. Here's the whole list for convenience:
- Plaster Repair for DIYers - No Need to Rip It Out
- Plaster Buttons to Fix Your Crumbling Ceiling
- Plaster Repair Part 2: Laying a New Brown Coat
- How To Fix Plaster Like a Boss: Sand Baby Sand
- DIY Plaster Repair: We Finally Put the Skim in Skim Coat
- My Skim Coating Nickname is Mr. Smooth - The Tricks I Use to Earn It
- The Final Steps to Perfect Skim Coating