Wendy and I had a tremendously busy but very fun and extremely productive weekend. Looking back on the two and a half glorious days away from work, we squeezed in hanging out with friends, dinners out, chores, events, and a good amount of work on the front door.
One of the major items we wanted to tackle over our Saturday and Sunday break was the punch list of remaining items on the front door. I'm happy to report that we were able to knock several of the items out and are rolling on our way to painting the door. Let's take a look at our list.
- Sand extension piece smooth
- Install molding
- Fill nail holes
- Fill old holes and gaps
- Fill old hinge locations on door jamb
- Sand door jamb
- Prime door jamb
- Paint door jamb
- Install weather stripping
- Transfer peephole
- Transfer knocker
- Transfer rim lock
- Buy and install deadbolt
- Complete/fix mail slot Grrrr... Purchase new mail slot
- Final sanding
- Prime door
- Paint (possibly multiple coats with wet sanding for high gloss)
- Darken screws in hinges
Phew! That's a lot of tedious steps!
First up, sanding the wood glue and extension smooth. The extra wood and wood glue left a ridge and some inconsistencies. I used our belt sander to remove the glue and create a uniform surface from the old door to the new piece. The belt sander made quick work of the task and left just a little cleaning up with the orbital sander as a necessary step later in the process.
Next we moved onto reinstalling the molding that lives around each panel on the door. In a previous post I covered how we labelled the molding pieces as we removed them from the door to make reinstallation much easier. Boy was that a great plan! It was a simple as firing up the nail gun, shuffling through the pieces, and setting them in their correct locations on the door.
Since the panels are floating (not glued or nailed in place, just sitting in the channels of the door), there was quite a bit of measuring to be sure they were centered before nailing them in place. Once they were set the brad nailer made quick work of the task. I used a 1" 16 gauge nail placed at an angle to give maximum hold without punching through the other side.
We also took this opportunity to write a note on the back of one of the molding pieces. We've done this throughout the house whenever we have a wall or ceiling open or something exposed that will eventually be permanently hidden. We've placed notes, photos, stories, and various other mementos throughout the house. We've not found many cool things during our renovation, so we're hopefull that many years from now, someone else will find and be happy or intrigued by the things we've left.
This our way of leaving a little bit more of a personal imprint on all of the things we've been doing.
With all of the molding reinstalled, I started to fill the dozens of nail holes in the molding. To fill these holes I used your typical sandable wood filler. I didn't want to use an epoxy on these pieces since they are not a flat profile and will require some imtricate sanding. Using the typical filler will let me easily sand with some steel wool without needing to worry about taking away any of the wood's detail.
I also worked on filling in the old door knob and lockset holes, as well as the old holes and hinge locations in the door jamb using my favorite two-part wood epoxy from Abatron. This epoxy is the best that I've used. I've tried a lot of different brands and styles of two-part epoxy, and this seems to be the most stable and consistent, dries without issue, can be sanded, cut, painted, etc., and doesn't have a horrible odor like so many others do.
Once mixed, the epoxy has a play dough type of consistency that easily spreads and fills voids. I leave the holes overfilled so I can sand them smooth once everything dries. Then, typically about 12-24 hours later, the epoxy is ready to be sanded.
I applied the epoxy in all of the various places on Saturday, so it was ready to be sanded on Sunday. Once again I used the belt sander to get the flat surfaces smooth and consistent. I also sanded all of the molding nail locations with steel wool to give a "you'd never know there was a nail here" appearance. At the same time, I used the orbital sander to take tool or blade marks off of the edges of the door.
Next up, I started to mark the locations for the hardware that we will be transferring from the old front door to the new one. The peephole is functional and has a little metal flap on the back of it, so we're going to reuse that.
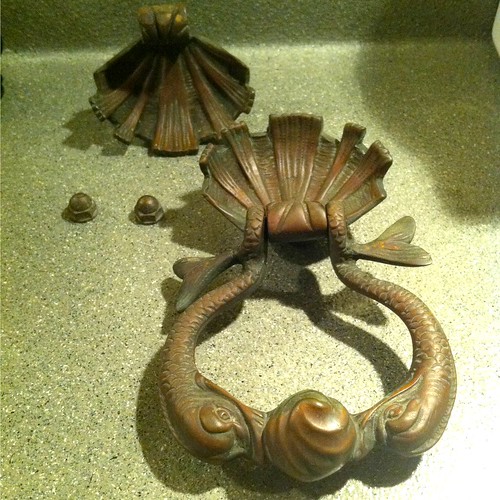
Wendy and I love the knocker from the old door. It's a pair of seashells with two fish holding a pearl of some sort. We're not typically into ocean or sea themed items (you'll never see a nautical room in our house) but we still really like this single item.
To get the proper peephole location, Wendy stood in from of the door and determined the most comfortable height to look out from. It was a little high for Wendy in the old door, so we took care of that issue for her and lowered it a few inches.
Knowing the peephole location, we were then able to determine the proper aesthetic and functional height for the door knocker. I then took the door back off of the hinges and down into the basement to put the various holes where they needed to go. I was able to drill the holes for the knocker, but the peephole requires a 1 1/4" drill bit for proper sizing. I have a 1" and 1 1/2" bit, so I'll have to make that hole in a few days when I buy a new spade bit.
Here's Wendy's artsy shot of me figuring out the proper peephole location...as seen through the peephole.
Then I got distracted and started taking pictures all over the place through the peephole. It was very productive.
To wrap up the work on the door for the weekend, I sanded the primed spot on the door jamb where I had patched earlier. All in all, it was an extremely productive couple of days. This project is definitely living up to the adage that the last 5% of effort seems to take about 95% of time. There are just so many small steps, many of which must be accomplished in order, and many that require extended prep or dry time to complete. But it feels good to really be heading in the right direction.
One major bummer of the weekend was a realization about our mail slot. You know...the mail slot that we had agonized over purchasing. The mail slot that we just decided to go ahead and buy the one we liked best, even thought it was more expensive than our budget. The mail slot we had written a whole blog post about. That mail slot, well, we discovered we can't use it.
The mail slot has two issues. First, the hinge on one side of the flap turned out to be broken. At this point, when you open the flap, half the time it falls off of the hinge. And second, the way the mail slot is designed, it can't easily open inside of the door because of the hinge and supports on the back. They don't make 'em like they used to, and in this case, that's probably a good thing. So we're back to the drawing board on that mail slot. I've got my eye on a few and they are actually less expensive (but don't look quite as cool). We'll keep you posted on that.
Let's see where we stand on our punch list?
- Sand extension piece smooth
- Install molding
- Fill nail holes
- Fill old holes and gaps
- Fill old hinge locations on door jamb
- Sand door jamb
- Prime door jamb
- Paint door jamb
- Install weather stripping
- Transfer peephole
- Transfer knocker
- Transfer rim lock
- Buy and install deadbolt
- Complete/fix mail slot Grrrr... Purchase new mail slot
- Final sanding
- Prime door
- Paint (possibly multiple coats with wet sanding for high gloss)
- Darken screws in hinges
Well, looks like we were able to cross off about half of our list, and some of the more time consuming items. What sort of projects did you accomplish this weekend? Just to be clear, sitting on the couch and watching TV or movies all weekend does qualify. Hopefully you didn't have any situations similar to our situation with the mail slot.