Last week we covered our very fortunate salvage yard find of our new front doors. We understood just how lucky we were to find exactly what we were looking for, but also knew that good luck on the front end was a simplified beginning to a project that was sure to get much more tedious and difficult.
The doors we had selected, while perfect from a styling and age standpoint, were in really tough shape. The primary door's mortise and tenon joints had begun failing, leaving large gaps and wobbly construction. It was also a bit out of square, having been shaved down a little for its previous opening. If this door was on This Old House, Norm or Tommy might have said it was "toast."
The double doors had gouges, holes, and small cuts all over the wood, and many of the panes of glass were broken.
And both doors had thick layers of peeling and flaking paint that would need to be removed before we could repaint. Thus began our lengthy paint stripping and door repair process to whip these doors that had seen better days into their top fighting shape.
When the doors were delivered from The Brass Knob, the first thing we decided to tackle was the stripping of the new main door. I got the door setup on saw horses in our little cramped basement, and started the process.
The first step was to remove the molding around each of the door's five panels on both sides. The molding was held in place by two small rusty nails and layers of paint. I scored the paint with my utility knife, then used my prybar and 5-in-1 tool to get under the molding and begin gently easy the molding up, a little from each side of the piece I was working on, until it easily came up. It's important to work back and forth like that, otherwise you're sure to break the piece of molding you are trying to remove. This step takes patience, that's for sure.
As I removed each piece, I would label the back of the piece of molding, using pencil, with it's original location on the door. This way I could be sure to put all of the pieces back in their correct locations. I used a simple lettering system that noted SIDE OF DOOR, LOCATION OF PANEL, LOCATION IN PANEL. I used O = Outside, I = Inside, TL = Top Left, TR = Top Right, M = Middle, BL = Bottom Left, BR = Bottom Right, L = Left, and R = Right. So you can see in the photo above, the small piece on the right is labeled O M R. This means that is the Outside, Middle, Right piece of molding. We have 40 pieces of molding that we needed to keep track of and strip, so this was an essential part of the process.
Once all of the pieces had been lifted, I removed all of the tiny nails with my nail pullers. Again, slowly and carefully, with the piece I was removing the nails from laying firmly on the table, otherwise I would have put too much force on the piece of wood and it would have broken. I also pulled the nails from the back of the wood, which left little external evidence of the nail on the surface.
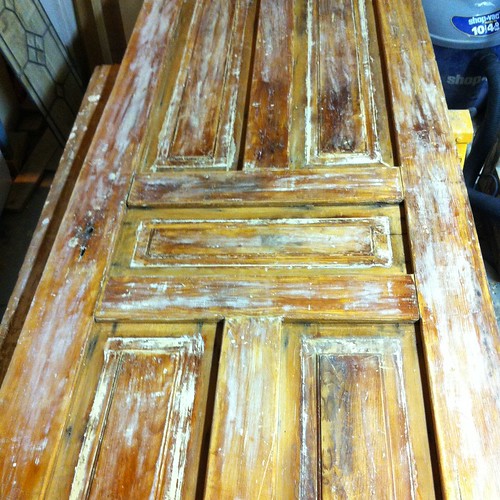
With the molding removed, we moved onto stripping the door and its panels. Because of the large flat areas of the door, I opted to use the heat gun to do the majority of this stripping. In retrospect, I wish I would have used Peel Away 7 or something similar on this piece, but I guess I was in a bit of a masochistic mood that day. (I'm shaking my head while writing this.) After a couple of hours we had the first side fully stripped, and it looked pretty good.
I then sanded the whole thing with 120 grit sandpaper on the orbital sander, and '0' steel wool for the raised panel areas. This really cleaned it up nicely.
The photo above shows the one piece of O M R molding I mentioned earlier, stripped and set in place. All of the short pieces of molding were really easy to strip. I poured some Bix chemical stripper into a joint compound plastic tray, and then just let them sit in the stripper bath for a few hours. Then I would take them out, wipe the paint off, and put them back in if there was still paint that needed to be loosened.
The short pieces may have been easy, but the long pieces were a real pain. The paint was so thick that I decided I was going to use Peel Away 1 on them. First, I laid them all out on the table in an organized fashion.
Next, I covered them in Peel Away 1. Whenever I use that stuff, I feel like I am icing a cake...and I'm really bad at applying cake icing. But the icing smells a little like fish, so the cake must be horrible. It's a bit of a boring process, so these are the random thoughts that go through my head. But once I was done, the cake molding looked like this.
Then I covered the pieces of molding with a sheet of Peel Away paper to keep the Peel Away 1 wet longer so that it could stay active for longer (remember, you can use wax paper).
At this point, I called it a night, knowing the Peel Away 1 would need about 16-24 hours to work, and that I probably had a hell day of paint removal ahead of me. It looks so neat and organized at this stage, but that is just the calm before the smelly and messy storm.
The next day, I started removing the paper and paint. The chemical process leaves a brown and water sludge that seems to get everywhere. It stinks, it sprays, it gets on your clothes, and it burns when it gets on your skin. It is a slow process and you need to have patience.
Once you get the paper removed and as much of the paint scrapped off of the pieces as possible, it is important to wash the paint off and neutralize the stripped wood. To do this, I used many rolls of paper towels and vinegar. The vinegar is the neutralizing agent and needs to coat the entire surface. It is also really good at getting the residual gunk cleaned off of the surfaces.
Stripping this many small pieces is much more challenging than a large door. You need to clean the pieces, keep them out of the gunk, move them to another place to dry, and fight every urge to knock into everything in the cramped basement while trying to work quickly but deliberately. Once all of the Peel Away had been removed, cleaned up, and disposed of, I let the pieces of molding dry for a few days before I started to do final paint removal and sanding.
The Peel Away does a good job of paint removal, but all of these pieces had some intricate details that held onto bits of paint. In order to finish this paint removal job, I used the heat gun to remove the stubborn paint that had held on, and then sanded each piece with '1' and then '000' steel wool. It was a long process, and one that took its toll on my hands (I'm so thankful for good work gloves), but the end results are 40 pieces of completely bare and nicely painted door panel molding, just waiting to be re-installed.
The last major thing we needed to fix on the entry door before we would be able to hang it was the fact that the joints had failed. If you picked the door up and held it vertical, similar to the way it would hang on hinges, the whole thing would sag and separate a bit. To fix this, I decided to pull it apart a little bit more, re-glue the joints as best as I could, then clamp the door together and install some dowels at each point.
With the joints glued up, I used my cabinet clamps to secure the whole door from side to side, then drilled two holes into each mortise around the door. The holes don't go all of the way through the door, just about 3/4 of the way. This would give the dowels enough hold into the tenons of the pieces, without exposing the holes to the weather outside.
Then I filled the holes with some glue, and tapped the dowels into their holes with a rubber mallet. If the glue didn't overflow the hole, I would remove the dowel and put in a bit more glue. As the glue dried, the dowels also expanded a little bit, leaving an extremely solid hold at two points in each joint.
The dowels protruded from the door a bit, so I had to sand them smooth after the glue had dried.
Once everything had dried up, the door is now as solid and stable as the day it was made. A quick shave and sand of the dowels and they are flush with the door.
This was a lot of effort to strip and fix one door, but the door is quite beautiful. We're still working on stripping the double doors and hope to have that post up later this week. We also need to work on fitting the doors to the openings and mortising the hinges, but that comes later. Let's take a quick look at our progress.
- Renovate the space, walls, ceiling, molding, strip, patch, paint
- Install new tile floor
- Purchase antique mail slot - still looking
- Replace interior doors with stripped and fitted salvaged door - (Stripping Done!)
- Replace exterior door with salvaged door after stripping and replacing glass panes
- Make interior transom window operational
- Replace exterior transom window with either leaded glass or painted house numbers, we're not sure on this step yet - (Any votes from readers?)
Stay tuned as this project is moving right along. We're also getting close on a paint color selection for the new front door. We want something that is very different from all of our neighbors, as well as something that pops. We can't wait to wrap this project up!