Up until this point in our plaster repair/skim coating series, the joint compound we've been applying to the walls has felt a whole lot thicker than the term "skim" implies. This is all normal since we've been building up the base and structure of the plaster with new material, but that's all about to change.
After you've completed those first base layers and your first sanding, you're ready to launch into the step that gives "skim" coating its name.
On a side note, if you missed our post on sanding, and the amazingly awesome sander we've been using for the last 10 years, be sure to check it out. I'm very happy to report that our post already helped Carrie over at Brick City Love. She rented the sander and use it over the weekend (and posted about it on Instagram). And Daniel, over at Manhattan Nest is coveting this same tool for his plentiful skim coating projects in their amazing house. I'll be talking a bit more about that tool next week, but how's that for some bloggity testimonials?
Anyhow, back to skim coating. Even though your first pass may be somewhat to very bumpy, even after you've finished sanding, no worries, you're still doing just fine. The goal of this coat of joint compound or plaster is to smooth those bumps out quite a bit with thinner coats of material.
IMPORTANT NOTE: The final, finished, and almost perfectly smooth wall you're after is still several skim coats away, so don't stress if you still have bumps and ridges, they'll go away.
First of all, let's grab the tools you'll need for this step. This gets down to the basics, but I just grab my 6" joint knife and my 12" trowel. But these aren't any joint knife and trowel. I've learned over the years that not all trowels are created equal, and while I've tried other brands, other handles, and other sizes, through trial and error these are the exact ones that offer the most control and best feel. As I said before, these are not necessarily the tools that pros use, but they work quite well for me.
For this coat of joint compound I like to mix it up very loose. This means more water and runnyness than you're used to. The consistency should be that of a thick soup. You should still be able to take a scoop out of your bucket, and it should stay a lump of sorts, but it will sag a little bit and look runny. Think of a bowl of melting ice cream, that's the look you want.
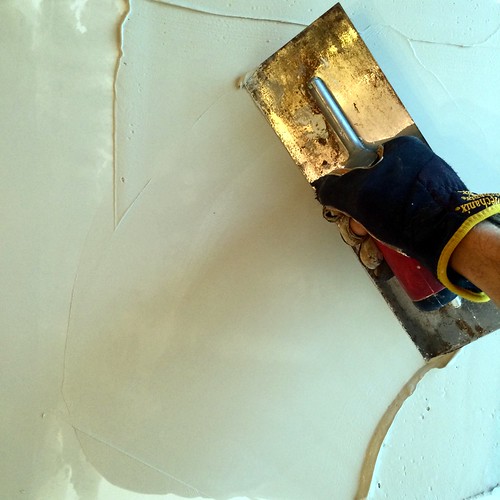
When you're feeling good and ready, take your first scoop, throw it on your trowel, and start spreading it on the wall. The key to this whole step in the process is to apply the material to the wall in an even and smooth approach, using fluid strokes of the trowel, moving quickly.
Easy enough? NO! It's actually the least easy/intuitive thing at first. It makes no sense that you want to spread, then re-spread, then re-spread in long smooth strokes evening out the joint compound on each stroke. It took me a while of doing this until I got to a point where I was totally comfortable. But it happens, you get the hang if it, and if you're lucky, it will only take a little while to pick it up.
I've seen a few people who use the top and bottom edges of the trowel in one step (like plaster pros), but I just can't get it to work in an acceptable manner. Instead, I take a little longer to do it in a way that works for me. You should do the same in your project, just get to a point where something feels right.
The key for me was understanding how it would look when it first went on, then how to use the angle of the trowel to really scrape it off. Each time I scrape I use the joint knife to remove the accumulation from the trowel, then scrape the trowel at the hard angle once again. Here's the rough angle I try to achieve on each pass.
After a few passes you have a smoother looking surface.
NOW DON'T TOUCH IT!!!
Futzing with skim coating imperfections has the same result as messing with a bead of wet caulk. The more you touch it the more it will get screwed up. It's best to just move on. Leave it be. It's imperfect and that's okay, you have more coats and sanding coming up later to fix those imperfections. The only good way to deal with the imperfections is to prevent them before they happen, or fix them after it's cured (or even after it's partially cured when you can still knock down any ridges with your joint knife).
Tips and Tricks
The first few coats of compound are more brute force than finnesse. You're throwing the compound on the walls and trying to get a relatively smooth surface, but it ultimately doesn't matter all that much. But once you reach these thin coat stages of the process, there's a lot that's gained from basic experience and a few of our tips and tricks that we've picked up over the years. I hope the following information goes a long way to ease your process and give you a perfectly smooth and consistent surface.
When working with joint compound one of the best ways to prevent the most common issues is to keep a wet edge, like with painting. If you let your compound dry out a little bit too much and then scrape the trowel over it, you'll end up with little raised areas that I call "bruising."
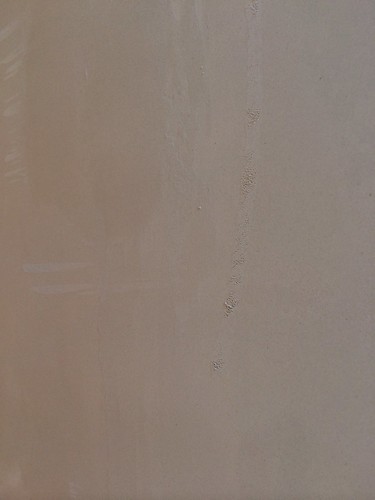
I know it's hard to see, but the bruising is obvious in person.
When this happens the perfect smoothness is lost and you end up with an area that you'll need to sand and fill in later with the next coat. It's not the worst thing in the world, but it's best to avoid it if you can. By keeping a wet edge, or by applying more wet compound then immediately scraping it off you greatly improve your surface and reduce the bruising. It also helps if you keep a bucket of water nearby to periodically wet the edges of your tools and wipe them to remove any material buildup.
The more you work with the compound on the wall or ceiling, the stiffer it will get on your trowel (since you're removing water as you work it and the previous surface sucks the water out of the joint compound when you spread it on the wall). Be sure to throw your lump of compound back into the bucket and take out a new scoop quite often.
As I said, you'll want to work quickly at this stage of the game. Don't worry about getting it perfect, and don't get hung up on areas that take a lot of time and precision. This is most important when it comes to corners and areas around intended holes (like vent openings or light fixtures/junction boxes.
For these areas I spread the compound on quickly using the joint knife and wiping away from the center of the opening, applying more than I need. Then I use the trowel to scrape directly across the opening and remove everything I can. This inevitably leaves a bit more than I need inside of the hole, but I just let the glob hang there and dry. It's much easier to come back after the compound has cured and cut it away with a utility knife or small hand saw. Also, be sure to tuck any wires or light sockets up and out of the way. I typically use a little bit of tape on the wire to force it to stay up in the fixture rather than hanging out.
The other area that tends to take a lot of patience are corners. There are two types of corners that you'll deal with, corners with two side (like those in the corner of a room), and corners with one side (like those where a wall meets a piece of molding).
Let me first say, you'll be hard pressed to do a good two sided corner by working on both sides at the same time. Also, don't bother with the corner knives you'll see at the store, they just don't work for our purposes (and often do more to damage your previous coats since they're designed for use with drywall, not plaster). Instead, tackle all corners one side at a time, allowing cure time before doing the other side.
When I do corners I like to use the joint knife to spread the compound right into the corner and then pull away from the corner. This ensures full coverage and that it fills any voids or gaps.
I'm a lefty when it comes to work requiring dexterity, so I use my left hand for this when possible, but sometimes you can't force it, so try to wok on using either hand. I know, easier said than done.
Once I've got the whole corner filled there are ridges and lines all over the place, so I take one fluid top to bottom or bottom to top stroke with the joint knife and remove any excess.
If you're working with a two sided corner, follow the same principles, and after the first side of the corner has cured (and maybe even after you've sanded), come back through the do the other side.
Often when I'm doing a large room I just sort of leave the corners a bit unfinished and full of gaps and imperfections, rather than spending a lot of time on the corners and allowing my compound to cure too much and end up wasted. Then, after a cure on the main walls, I'll come back with a very thin mix and do just the corners. But it's all up to you and what you're comfortable doing.
Those are my best tips and tricks for this stage of the game. After you've completed this first true skim coat the walls and ceiling will start to look really good and smooth, and way way way better than they probably looked when you started. Feel encouraged, it's important, especially since you've still got about 2 more skim coats left before your wall is "done" and ready for paint.
If you have any skim coating experience and your own tips or tricks to achieving that glass-like surface, I'd love to hear them. I've been doing this a while now, but I'm always looking to up my game. Who knows, maybe I should go apprentice on the weekends with a master plasterer and learn how I'm really supposed to do this stuff?
We have a whole series of plaster repair/skim coating posts you should check out if you like this or are trying to tackle the same thing. Here's the whole list for convenience:
- Plaster Repair for DIYers - No Need to Rip It Out
- Plaster Buttons to Fix Your Crumbling Ceiling
- Plaster Repair Part 2: Laying a New Brown Coat
- How To Fix Plaster Like a Boss: Sand Baby Sand
- DIY Plaster Repair: We Finally Put the Skim in Skim Coat - this post
- My Skim Coating Nickname is Mr. Smooth - The Tricks I Use to Earn It
- The Final Steps to Perfect Skim Coating