With demolition complete in our Foursquare's dining room, we're moving full steam ahead on reassembling the space. And while it's an odd feeling, we've recently found ourselves on a pretty serious project roll.
After removing the drywall covering the original plaster in the room, which also allowed us to remove the hated wallpaper border, we turned our attention to the all important aspects of a lighting and electrical plan, as well as wall repair. I know, it's totally sexy stuff!
First up, let's take a look at our lighting. When we bought our home the room had just one source of light via the dark and dated ceiling fan/light combo. Though we added lamps for a bit of additional light in the corner, the amount of light in the room always felt very flat, harsh, and especially gloomy in the evening and at night. Couple that with too few outlets placed in odd locations and at variable heights in the room, and we had several straight forward electrical items to tackle.
To remedy the insufficient and uninspiring lighting we're seizing this opportunity to not only add a recessed light in each of the four corners of the room, but also to correct a major oversight/pet peeve of mine in the room. Can you spot the issue in the next photo?
No? It doesn't immediately jump out at you? The truth is, it actually didn't jump out at us either. if you don't see it here's a hint.
Now you see it, don't you? You probably can't un-see it either, and it may even eat at you like it ate at us! The light/fan was mounted about 8" off of the center of the room. And...it took us about two years to actually notice it, but once we saw it...it was all that we could see. It's like noticing that the space between the "E" and the "X" in the Fedex logo actually makes a not-so-subtle arrow. Try looking at a Fedex truck on the highway and not seeing that now. You're welcome.
After we purchased our home we realized the old fan was not mounted with a supported junction box appropriate to support a ceiling fan. As a result and in anticipation of eventually replacing that fan with a chandelier, Alex ran new electrical to a new properly supported junction box in the ceiling, but he ran it to the same place where the old one was mounted. Keep in mind, this was way back in late 2015 when Alex was working to plug holes from old radiator lines before we got our floors refinished. We realized the wires were run by pulling up flooring rather than putting holes in the ceiling, so it was an easy thing to handle since the floors were about to be refinished anyway.
About a year and a half later, sometime in early 2017, we were standing in the kitchen daydreaming about what our plans for the dining room might be and we made the horrifying discovery that the new junction box...in the very same location as the old junction box...wasn't properly centered in the room! I'm not sure how we missed it (perhaps the fruit border served as a distraction), but we knew the current location wasn't something we could live with when we ultimately redid the space. We were absolutely kicking ourselves! Leaving it put meant either the chandelier wouldn't be centered over the table, or the table wouldn't be centered in the room if we chose to align it with the new light fixture.
Had we realized this issue back when we ran the new wire and box, Alex could have easily accounted for the eventual need to move it by leaving a little slack in the wire, but he hadn't, so he's been beating himself up about it, obsessing, and dreading the need to get back into the ceiling to run a new wire. Honestly, there are few things that Alex does better than getting into his is own head and obsessing about projects, but I had confidence we could figure it out.
Leading up to the start of this room's renovation we've had heated discussions. We've fretted. We've agonized. And, we slowly accepted the fact that when we started the work in this room we'd have to either cut out a section of the ceiling to run a new wire, or we'd need to pull up our beautiful, original, and carefully refinished hardwood floors in the hallway and bedroom above to correct the ceiling light placement issue.
Ultimately we decided that pulling up a section of the floor (just like we'd done before) would be less invasive. (I was still on the fence, but since Alex heads up our electrical projects I deferred to him on this front.) In three separate visits, we slowly worked to pry up individual boards to give us access to the wire and locations needed, all the while attempting to leave the finish of the floor as intact as possible.
Alex carefully scored the lines between the board to allow the finish to naturally fracture on the division, rather than pulling finish off of neighboring boards as the floor was pulled up. Then he slowly slid the pry bar beneath the flooring while protecting the adjacent board with cardboard. The only reason this was possible is because the underside of the floor board's groove had already been removed, so it was only a matter of freeing the nails.
The good news was that we were able to access the wire after pulling up only three boards, and Alex did it so carefully that we were able to achieve our goals without damage to the board or the finish. The other good news was that once we opened up the floor, we saw that there was enough slack in the wire that between the two of us, we were able to carefully extend the wire far enough to safely reach the location of the new junction box just 8" further into the room. Score!
In addition to addressing the location of the ceiling light, Alex spent time running electrical to a few new outlets and correcting old outlet and switch junction boxes that were haphazardly punched through the plaster behind the drywall. The old outlets were all installed at different heights and because of the drywall over the plaster, tended to wiggle around in the wall when inserting or removing a plug. Not exactly confidence inspiring.
What we've found is that when plaster is compromised (any cracking or crumbling, especially with holes too large) it tends to be pretty horrible when it comes to supporting junction boxes. When in this situation we like to cut back the plaster a sufficient amount and then patch in a little drywall with a hole for the junction box. This allows us to support the new junction box while tying it in with the plaster around it.
This is the same approach we took where the prior outlet holes were a complete mess. Once you have the patch fitting nicely all that's left is to screw the drywall to the supporting lath.
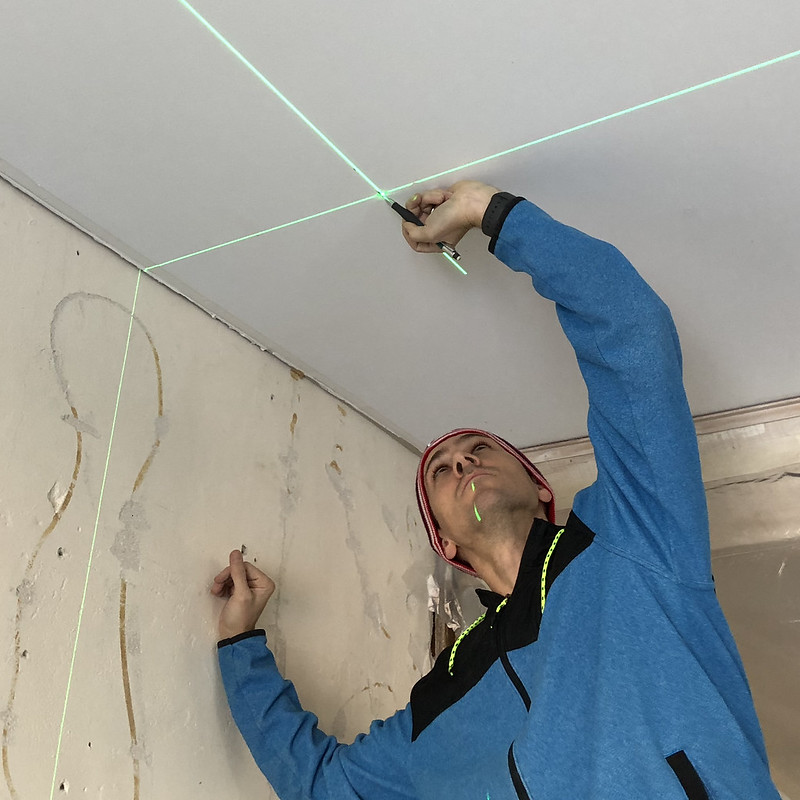
The final electrical item we handled was placing and installing the four recessed lights. We'd run dead wires to the rough locations back in 2015 so it was just a matter of marking where we wanted the lights and cutting holes where necessary. To ensure an accurate and consistent placement in each corner we used a cross laser line to plot out each location before making the cut.
In choosing the location we opted to place these lights much closer to the walls than you may normally see. This was completely intentional (though we questioned our approach several times while we were making the decision). I know recessed lighting can be a polarizing lighting choice, especially in an old home. But we feel that recessed lights add a wonderful layered lighting look. But recessed lighting can also be really annoying if they shine into the eyes of you or your guests when they are seated. In a dining room you certainly want to keep any recessed lighting away from spotlighting your dining table guests, so putting the lights near the wall will highlight the perimeter of the room rather than illuminating your guests.
After marking the first spot we were able to use that spot to move the laser to the next location and mark the next spot. If we'd had two lasers we could have done it all in one fell swoop, but we only had the one so it took a little longer.
As you can see from the next photo we were able to position the four lights and to get them installed, as well as to get the chandelier moved to the center of the room before moving forward on the wall repair. Installing recessed lighting, especially low voltage LED recessed lighting is a pretty straight forward proposition if you have access to run wiring to the location. You'll certainly need to confer with local codes and restrictions if you want to tackle this work yourself, but it's certainly a DIYable endeavor.
Finally, before we could really move forward on the plastering project we had to patch in any missing plaster. When we do this work we cheat a little. While we're trying to preserve as much of the original plaster as possible, anywhere that we're missing plaster we'll patch in with half inch drywall over the lath before skimming it with plaster.
This can sometimes be a frustrating process that requires a good deal of patience, but when it's all in place you'll never know just how bad the wall looked at one point. You certainly end up with strange looking drywall scraps when you're trying to patch areas like those around our French doors.
The most important aspect of this work is to ensure the drywall is solid, secure, and just slightly below or right at the level of the surrounding plaster. We also prefer using smaller pieces to get an accurate fit rather than trying to use a single large piece. In this case we also used some surplus green board we had on hand that just happened to be the right size, but either green board or standard drywall is fine as long as you're properly preparing it to accept plaster.
Once all is said and done, but before plaster can start, you do need to treat the drywall with a bonding agent that will allow the plaster to properly adhere to the drywall paper. We'll go into more detail on this process and our progress when it comes to plastering in our next post.
What do you think of the progress we're making? And how much would an off center chandelier bother you? We're rolling right along and can't help but feel extremely excited about what this room will become. We're still on the hunt for a great antique farmhouse dining table with tons of character, and I'm not sure if we'll finish the room before finding it or not. It's certainly a race to the finish.