When it comes to light fixtures, they don't have to cost a small fortune to be visually interesting. In fact, with a little ingenuity you can make a low cost but very unique and stylish fixture of your own.
In our quick office makeover we had initially planned on keeping the ceiling fan that came with the house, even though we never really liked it. Though we had plans to spray paint it white to help it disappear into the ceiling, we realized just how much this room was missing a central ceiling light fixture with a little style.
After determining we didn't need fan in this room thanks to the installation of central A/C, a massive search begin for a new fixture that was reasonably priced, fit the casual style of our home, and importantly, was the right size. We held up fixtures I had already purchased for other rooms in the house, looked all over Northern Virginia including several HomeGoods stores, Lowes, Home Depot, and World Market, and scoured online.
Unfortunately though, we were striking out. Rather than spend a lot more time looking for that elusive unicorn of a fixture, we decided to go ahead and make one on our own.
Our first stop was at our local Restoration Hardware Outlet in Leesburg, Virginia. They have a large collection of lighting parts and fixtures that work well for this sort of thing. This is actually where we found the light above our bathroom vanity, in the room adjacent to our home office. (Check out this post for a complete look at our home's floor plan and how the rooms all flow together.)
My hope was to score a fixture that was from the same family as the bathroom fixture (called 20th Century), and then use that as a base. But the inventory at the outlet is very hit or miss so you never know what you might find.
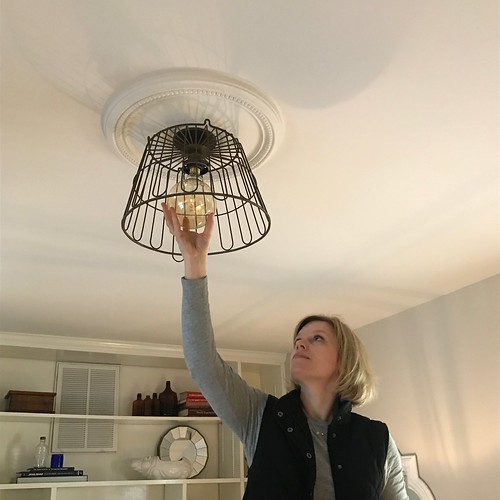
The great news is that on our trip we really lucked out! We found one fixture buried near the back of the shelf that just happened to be a style match to the bathroom fixture, but was also a ceiling flush mount version. After opening the box to be sure everything was there, we had the base of our fixture. After discounts the total price was just $32.
Next we started searching for something to make the light fixture interesting and unique. We had kicked around the idea of finding an antique oyster basket and had looked around the Old Lucketts Store (our favorite place to shop for antiques), but didn't find anything that had the right scale. It needed to be large in diameter (at least 12" across), but short in stature (max of about 10" tall). Anything larger would protrude too far into the room from the ceiling, threatening to hit people in the head.
After turning our search to eBay with terms like "vintage oyster basket," "antique egg basket," and "crusty clam bucket," we eventually came up with a few good options. We settled on a basket that was about 14" in diameter and 9" tall.
The most important part of the basket is that it had a hole in the bottom where we'd be able to run the light fixture and wires. Total cost with shipping, $49.
To light the room we wanted an interesting lightbulb for the fixture, but it also needed to be energy friendly. Alex was shopping for bulbs at Lowe's and found this great large bulbed light that is also a filament style LED. This bulb was $15, which is a little more expensive than we anticipated, but it would add that very unique look to the light.
Finally, we needed to disguise the very bumpy and oddly cut section of drywall around the junction box. We could have patched it with joint compound, but we'd still have the issue of the junction box protruding from the ceiling.
Instead we settled on an 18" diameter ceiling medallion with a classic yet simple look, also from Lowe's. This medallion rang up at $21.
Before we get started on the build, let's look at total cost. All of the parts and pieces together, including the ceiling medallion, came to $117. While there are certainly many fixtures you can find for less, there are quite a number you'll see for far more. A little over $100 for a cool one-of-a-kind ceiling fixture was something we could live with.
The build of this fixture was very straight forward. I'd rate it an easy to moderate on the DIY difficulty scale.
The first step was to place the ceiling medallion. For this we had to slightly alter the polyurethane backing to accommodate the slight protrusion of the fixture box by razoring away some of the backing. In the process Alex nded up stabbing himself in the stomach with the blade. It was a minor scratch but I recommend omitting this step if you're following along at home.
Once the medallion was ready to be placed, Alex ran several beads of Big Stretch caulk around the backing and then used a fixture plate screwed to the fixture box to secure it in place while the caulk cured overnight.
He also took the opportunity to run a good bead of caulk around the perimeter of the medallion to fill any gaps.
When it came to assembling the fixture it actually started with disassembling the base fixture we picked up from Restoration Hardware. Alex unscrewed a few pieces and removed an internal nut on the threaded rod, and suddenly all components of the fixture were in pieces.
Our goal was to thread this fixture through the hole in the bottom of the basket and reassemble. This simply meant following the reverse process of what he did to take it apart while including the basket as part of the process.
The majority of re-assembly just involved screwing all of the parts back together.
We also paused to remove the handle from the basket since we won't be needing it hanging into the room. This only required a pair of pliers and some brute force to bend the loops back open.
Attaching the wires was simple enough. The ground attached with a nut on the threaded rod and the neutral and hot were threaded right from the light socket.
As we assembled I pointed out a small bend in the basket wire that was driving me crazy. This was a simple fix by gently pressing a wrench against the bend to straighten it back out. We used the wrench here to make sure we didn't scratch the patina with the coarse teeth of a set of pliers.
As we worked on the fixture we noticed how much rust was falling off of the basket by handling it. We want the old patina to stay, but we don't want a circle of rust appearing on the new carpet below the fixture. In order to prevent a mess in the future, Alex knocked off the loosest rust and grime with a little "00" steel wool.
We continued assembly by reattaching the components, running the wire through the threaded rod, and securing all of the components in place.
In order to control this light we're using an Insteon micro dimming module that is installed in the fixture box, so Alex installed that before placing the light on the ceiling. The intent of this step is to reduce the need to hold the light awkwardly near the ceiling several steps down the road.
Things were humming along pretty nicely and all we needed to do was to install the fixture in place on the medallion.
Since the bottom of the basket is very close to the ceiling, it was a little tricky to place the small nuts on to secure things, but we were able to make it happen as I held the fixture while Alex carefully threaded the nuts onto the posts.
We thought were were done, but we thought wrong. I mentioned we were using the Insteon micro module. Well, in our haste...someone...forgot to record the 6 letter/number code that uniquely identifies the module, and we needed that to properly program it.
Our friend staying with us that day perfectly captured the moment when Alex informed me we needed to take the light down, write down the number, and complete this process of struggling to install the light fixture all over again. Apparently this is the look I give when my partner in crime has forgotten a critical step in the process and we have to duplicate our efforts.
After removing the light, getting the code, and then putting things back up one more time, we turned the breaker back on and got ready for the light!
It was perfect. The large bulb looked great and cast wonderful shadows on the ceiling from the wire basket.
The light it gives off in the room complements the desk lamp and floor lamp and really adds a much needed layer of dynamic light to the room.
All that's left now to complete the whole project is to replace three light switches and then we can call this quick office makeover done.
We feel absolutely great about the end results of this project. It turned out better than either of us hoped, and now that we have our completely custom DIY light fixture, the room has what it's always been missing.
Have you ever gotten creative and made your own light fixture? If so, how did it work out for you? Do you feel like you created something unique for far less than you may have paid elsewhere, or was it more of a DIY Fail?