Protecting your finished surfaces, especially flooring, when working on a project is as old as house projects themselves.
From drop clothes to old carpet, pretty much every option has been tried and each has their pros and cons when it comes to keeping paint, dust, scratches, liquid, tools, boots, and just about anything else from ruining your finished floor.
The naysayers will proudly state “this is why you should finish your floors after your major work is complete!” But we all know this is a pipe dream and not based in reality. Even if you are doing it all in the “right order” you’re probably painting the room after the floor is done. And if you’re a DIYer, there’s a good chance you’re working around beautifully finished floors in just about every project. Finishing floors is often one of those things people do right when they buy their home, then they work on all of their projects over the years (it’s how we’ve done it twice).
Notice the beautiful floors and ignore all of the work the walls and trim need
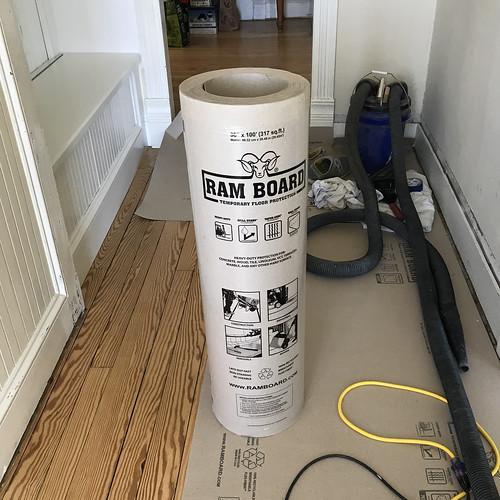
We've tried many different temporary flooring protection approaches over the years, and last week we applied what is our newest favorite product to protect our flooring. This is critical when dealing with soft antique pine flooring that is easily damaged by a dropped tool or drug ladder. We're hoping our experience can help you select the right material to protect your floors, which is why we're talking about our use of Ram Board today.
We actually started using Ram Board about two years ago in our living room, applying it around the perimeter while doing plastering. We really liked how it protected the new finish on the floors from inevitable plaster splatter, and that it didn't let wet material bleed through onto the wood. But in this case it was just used for perimeter protection to get a feel for the material. After finishing up and pulling everything out of the room we were very happy to see that it hadn't damaged the new finish of the floor (it's actually designed to let newly finished floor breathe while covering), had done an excellent job protecting the very soft pine, and likely could have been reused had we wanted to clean it off (it had so much plaster dust on it, we opted to roll it up and toss it).
In addition to how we used it in the living room, Wendy also fashioned a makeshift workspace/storage area in our back "hobbit" room by covering the floor with Ram Board. To this day, it's still holding strong. We ended up using duct tape to hold it all together (but not applied to the floor), which has started to peel up a little recently.
Now that we're kicking off the hallway project we don't want to take any chances in this smaller area. We'll be working on the ceiling and walls, so we want to completely cover the floor for the duration of the work.
For our project so far we purchased two rolls of 38" x 100' for use between the workroom, living room, and hallway, and have a good amount left over. Since the Ram Board comes in rolls it has a tendency to curl up at the cut ends rather than try to deal with the duct tape again, this time we went ahead and bought a roll of the RamBoard Seam Tape.
This tape is 3" wide and is made specifically to hold the material together at the seams. It's not meant to be applied directly to the floor, but covering the entire space pretty much locks everything in place to the point where you don't need to tape directly to any flooring. We found that a socked foot does a pretty great job of really securing the tape, though I'm sure a sleeve or towel would work just as well.
The Ram Board material feels like a pliable cardboard and is 46 mil thick, which is substantial. But it cuts extremely easily with both utility knife and scissors. Our cutting tool of choice is a pair of heavy duty scissors, as I'm sure I'd end up scoring the floor with the utility knife at some point.
The layout of the hallway is a little bit of an odd space, and Ram Board is not inexpensive, so I didn't want to waste a bunch with a lot of overlap. As a result I ended up rolling out enough to cover most of the area, and then cut the various odd shapes, notches, and doorway pieces to size from the cut off. When all was said and done we had a small pile of scraps remaining...
...and a floor completely protected for the duration of this project.
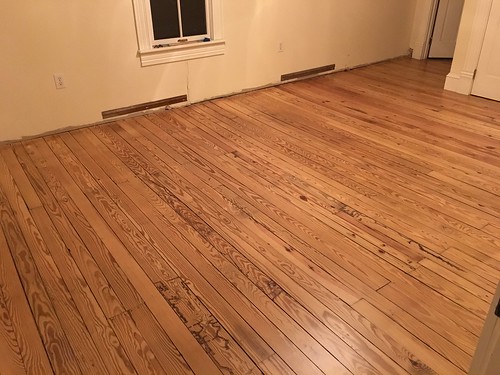
It's our hope that this flooring protection doesn't need to stay down too long, and we can get things wrapped up in a somewhat reasonable amount of time. But regardless of the time it takes to knock out this project, we're happy that when we're done we'll be able to pull up the flooring protection to reveal beautifully protected antique pine flooring.
From our use of Ram Board for temporary flooring protection, we can absolutely recommend it and will likely be using it for the majority of our projects. We've paid about $75-$80 per roll shipped to our house, so it's about $0.25 per sqft plus tape. At about $500 for coverage of 2,000 sqft of finished space, that's a small price to pay to protect an expensive and time consuming flooring finish.
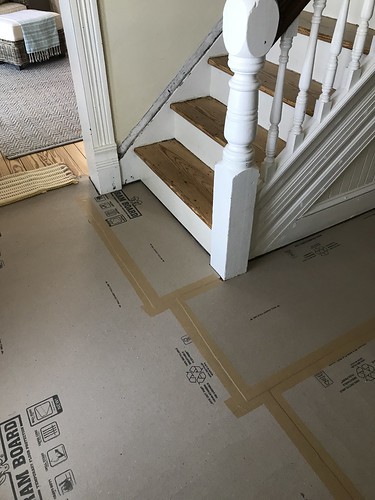
We need to figure out how we want to protect the stair treads
Do you have a temporary flooring protection that you like to use in your home when you're working on a project? Does this seem like something that might work well for you in your house? We'd love to hear your thoughts and experiences.
Did you enjoy reading this post? Want to learn more about our first-hand experiences with other tools, devices or items used throughout our renovation? If so, check out our complete list of product reviews in our Toolbox Tuesday section.
Note: We weren't compensated for this review. We simply want to share good products when we see them, and hope that learning from our experiences and/or mistakes can help save you time, money and frustration.