Today we're really excited to share a good amount of progress on our salvaged bead board storage bench!
Yep, that's right, we're starting to actually get stuff done...who knew that was possible with our projects?
Our last updated we gave you a glimpse into the start of our beadboard application. After a weekend worth of effort we went from a stud-wall skeleton covering our HVAC return duct to a partially complete beadboard covered bench and wall that helped us see the direction we were headed.
Over the last few weekends we were able to carve out a little bit of time to make a whole bunch more progress.
I don't know about you, but I'm a little bit obsessed with hidden panels, secret compartments, and other aspects of home decor that appear to be something other than what they actually are. This obsession started as a child, likely while watching Scooby Doo when Shaggy would invariably accidentally stumble on a dusty book on the shelf that when pulled would open a secret compartment. (Though we always knew which book it was as kids because the cartoon coloring was just a *little* bit different on that one book.)
Ever since those early days I've always wanted to build in secret aspects of our home. Now that our crawlspace access is below the HVAC return, I need to maintain some level of access to the crawlspace for home improvement and maintenance, so this is my opportunity to build in a truly secret compartment! My childhood dream is finally coming true. Here's a look at how we get into the crawlspace...
After our last update, we moved onto placing the long diagonal trim board along the stairs. I had to get a little creative with the top end of the board since it's both an angle and a curve. I ended up cutting a template from a small piece of wood and then tracing that template and using the jigsaw to cut the curve. It worked out pretty well and will look great once it's caulked.
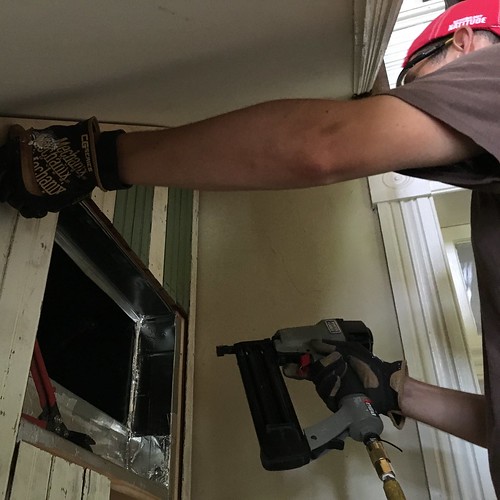
Before we could keep working on the beadboard or any of the time boards, we needed to figure out exactly where the bench top would sit. And before we could figure out the bench top, I needed to start assembling the interior of the storage area. While this will simply be where we keep our outdoor seat cushions, I didn't want it to be an open stud interior. Instead I used some 1/2" birch plywood and cut several panels to line the interior of the storage bench.
In order to maintain access to the crawl space, I cut the panels in a way that would allow a partial panel to be completely removable. Additionally, the two by four across the back is also removable once the panel is taken out.
Did I mention that I typically make all of my cuts outside on our side porch? Whether the sun is beating down or the sky open and it starts to pour, the side porch is a perfect place for a project.
Once the interior of the storage bench was covered we could place the frame boards around the upper rim so you won't see any of the 2 x 4 boards.
Like we did with the interior, the frame piece had to be fully removable. I cut a piece of frame just a bit longer than the panel and then nailed the frame directly to the removable panel. This means I can remove the panel as one large piece with the frame intact.
When the frame was placed we could determine exactly where the top of the bench would sit, which then allowed us to begin placing the remaining trim boards.
One of the major elements of this project will ultimately be the large antique cast iron grate that will cover the air intake. Due to the tight space and awkward location of the trim boards, we ended up building a frame on which the cast iron grate will be mounted. This will make the grate flush with everything around it and will keep us from having to notch out sections of the trim boards to accommodate the grate.
After all of the trim was in place we got to work placing the base cap molding to make the whole thing match the rest of the stair trim.
One of the angles was so sharp that my miter saw couldn't cut the angle. I had to cut the angle at 65.5 degrees, but the saw only goes up to 50 degrees. In order to accommodate this very sharp angle I had to cut a fence board at 45 degrees and then set my saw at 20.5 degrees.
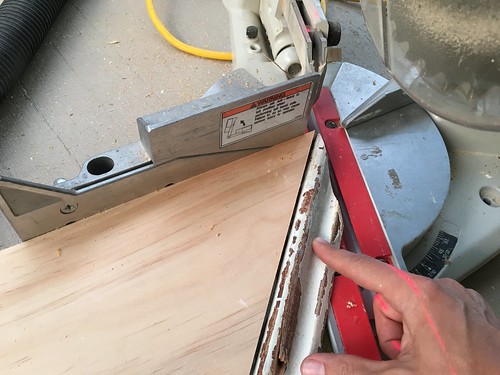
Don't worry, my hand was very clear of the blade while making the cut.
Once I had the fence forcing 45 degrees the cut of 20.5 degrees was very easy. Before I knew it I had a nearly perfect and very acute angle cut.
Putting the whole thing together is a little like a giant jigsaw puzzle. Every piece we placed we had to worry about how it would fit, if it would allow the necessary pieces to be removed to be could get access to the crawlspace if needed, and if it would look okay. One of the more difficult pieces was building the large removable beadboard panel in a way to allow easy removal without letting you see that it was a movable panel.
To accomplish this we ended up mounting lengths of beadboard to a large piece of plywood that would perfectly fit in the opening. This would give the panel the structure and rigidity it would need without the risk of it balling apart if someone were to lean back on the panel. Then when we install it, the beadboard will slid up and behind the frame molding around the intake.
After a good amount of patience and measuring we had ourselves a removable Scooby Doo panel.
Once the panel was put in place the whole area quickly came together. I sanded all of the wood filler smooth and slowly got everything in shape and ready for priming.
Looking into the same space from the kitchen, the space we were starting to get used to seeing a giant metal duct sitting there, we now have a very nice view of a bench in the making.
We didn't have time to apply the primer this weekend, so it's on our "we can't wait to get back to do stuff" list. We'll also finish the interior of the bench in the same way we finished the floor, and we still need to build the bench top and apply the large silver piano hinge. Oh, and we still need to clean up the cast iron grate a little more before we can paint it with oil based primer (or it will rust through) and put it in place. While we made some great progress over the last several weekends, we still have a good amount of work to go. Paint, plaster, and a bit more woodworking, but boy is it starting to come together!
Before we close out this post I want to share a photo of our house that I absolutely love. The sunset is often a breathtaking time, and over the weekend we had an amazing pinkish purple sunset. I ran outside and snapped a few photos of our home from the pier, and I really like how this one turned out.
We can't wait to knock out the rest of this bench project, but this beautiful sunset was a good reminder to work hard and play hard too.