Do you remember our dingy, floral on floral on floral covered first floor bathroom?
You know, the one that we started stripping wallpaper in the first weekend we owned the house in 2014, and then kept starting and restarting projects in until it ended up looking like this?
After all we've done in this tiny little room to resolve the number of flowers that rivaled the number of weeds in our garden, it's now a functional bathroom with a fair amount of charm. But we had one final aspect of the project we needed to finish before we could officially call it complete. The vanity! Here's a look back at the way it looked when we bought the house.
The space that once housed a pedestal sink and cracked and stained tile needed something new to go with the vibe we're planning for the whole house. We started by changing out the light and mirror, but we weren't nearly done (even though at the time we thought we were).
Because of the whole house freeze in February of last year, we ended up removing the baseboard radiators when we installed our new HVAC system. While the room looked passable before the freeze, afterwards we were left with gaping holes where the radiators once stood. This meant we had to patch the drywall, repaint the room, and install new molding. So while we were putting it back together again, Wendy convinced me that now was the time to address the tile and sink as well.
Wendy's hope in renovating and decorating our entire home is to turn it into an "historic farmhouse meets beach cottage" feel, and we started this process by focusing on this little vanity and bathroom. The phase two transformation was kicked off when we made a vanity top from a butcher block remnant piece given to us by some friends that had it left over from their kitchen renovation.
With a lucky find of some shiplap beneath the drywall, an inexpensive drop in sink, and an oil rubbed bronze faucet, we were very much in business, but that was only the vanity top. We still had the area below the vanity where we'd need to install something.
Given that space in this small bathroom is pretty tight, and we had nowhere to put toilet paper, cleaning supplies, towels, or anything else related to a full bathroom, we wanted to do something that would maximize the open area by turning it into a little storage. In order to save on cost, maximize ease of installation, and to ensure this project would be a much quicker project to execute, we decided to build a vanity facade right into the little nook.
I kicked things off by building the vanity facade face frame out of stock pine, and the lower shelf out of 1/2" birch plywood. To support the lower shelf, since we're just doing a vanity facade, we added a few cleats to support the sides and back of the shelf.
I had to drill a few holds in the base of the cabinet since the supply lines come up through the floor. We'll need to work around these lines once everything is in place, but shouldn't be too difficult to work around.
The face frame of the cabinet was quick and simple with a few pocket holes to connect everything. I cut all of the 2" x 1" pine to ensure a perfect fit...
...and drilled all of my pocket holes.
.Once I had all of the sticks cut I then screwed it all together to make sure it looked good.
It looks so delicate, doesn't it? I was a little worried at this point since it just felt so light and wimpy, but I kept going forward despite my doubts.
The thing about this vanity is that the little nook is very tight, and there's no way I can just drop it in since the vanity top was already in place. To accommodate this, I came up with a way to assemble the face frame in place. By detaching one side I'd be able to place it all into the opening and then screw in the pocket hole screws to secure it all.
Once I had the vanity front looking and working how we wanted, we did a final test fit to make sure everything was going to plan.
Do you see the little piece of wood on the center support of the photo above? That's the example of the bead we planned to apply, but the tools to accomplish are in our basement in Old Town. So we took the little vanity front back to Alexandria where I have my table saw, router table, and other woodworking tools. This would allow me to beef up the vanity front with a little bit more embellishment.
Just like the bead details on our master bathroom cabinets (that are STILL in progress of being built, by the way), I cut the beads on the router and ripped them on the table saw to apply them to the cabinet face frame. It's amazing what these beads can do to the look of a cabinet face frame. I just love the look, and it's so easy.
A few days later we took the face frame back to the new house to install everything. The first major step was to sand and paint everything, but this was done with the side piece disassembled.
After a coat of primer, a little sanding, and a few coats of our trim paint, we were ready to go.
In addition to the paint and assembly of the face frame, we also finished the cabinet shelf with the same finish as we applied to the floor, Pallmann X-325 and X-96.
The little vanity was starting to take shape. All we needed to complete it was to build the doors.
As usual, I over complicated the door build just a little bit. I decided I didn't just need to do rail and stiles, but I also wanted to do full on mortise and tenon joinery on these doors. Not sure why I thought it was a good idea, but it certainly added a little time to the build phase.
For the doors I did a simple shaker style with flat rails and stiles and a flat MDF panels. I glued them up and got them ready for install.
To simplify things a little bit we decided to use non-mortise hinges in oil rubbed bronze. This means I wouldn't have to do a bunch of router or chisel work to mortise in the hinges, but we can still maintain the vintage hinge look we wanted.
I test fit the doors and it seemed pretty good overall, but it would certainly be tight once the hinges were installed and doors painted.
At this point I futzed around with the hinges to get them all installed before I painted up the doors. I'll do a how to post in the future on the tricks to properly install non-mortise hinges, but that's a much different, much more boring conversation. We're getting close to the finished cabinet, so there's no time for that right now.
The final hardware item involved the proper placement of the knob. This critical decision can make or break the entire thing. Too high and it looks terrible, too low and it's borderline non-functional. We opted for centering the knobs on the stile and placing it about 3-1/2" down from the top.
After a little sanding, some minor planing, a coat of primer, and two coats of paint...
...we were ready to install the doors!!!
I can't tell you how happy we are with the overall look of this little vanity. We were both worried that it would make the room feel too tight and closed in given how small it is, but it doesn't at all. Best of all, it gives the bathroom some much needed storage!
Total cost of the wood, sink, hardware, faucet, and everything else we needed came in at about $175 which I think is very reasonable when you look at the cost of pre-made compressed fiberboard vanities out there on the market. Not to mention the fact this is solid wood and completely custom built for the space. Not too shabby at all, especially where you think of where we were just a short time ago!
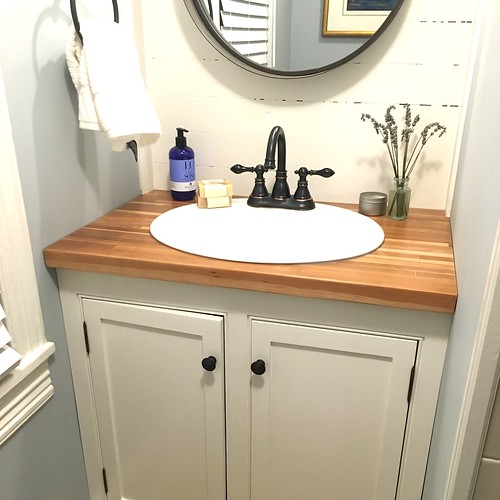
Wendy feels like I really didn't do a good enough job photographing this finished work, and I have to agree. But I didn't want to wait until next week to share our progress just to get a final photo. I'll try to add one a little later, but for now, here's some marginal photography using a somewhat dark iPhone crazy wide angle lens with tons of distortion. **Update, I added a better photo after the next one.**
Okay, here's a better photo without quite as much distortion.
The general look of this tiny little room is exactly what we hope the rest of the house will eventually embody. It won't be a fast transformation by any means, but this bathroom is a quick fix lens on the rest of the house. I know it's going to be a lot of effort over a very long period of time, but this is our vision and where we're headed!