One of the most difficult aspects of renovating an old home is to ensure your alterations are not only functional and attractive, but are in keeping with the character of the house.
Anyone who has renovated a home of a certain age knows this all too well. The simple fact is that an old home’s character and identity comes from its many small details that were given the utmost of attention. If you complete a project in a old house that retains some of its original detail, and you and don’t take the time and effort to mimic these original details during the new project, your work often ends up sticking out like a sore thumb.
When we had ducted HVAC installed in our new home, we had to work hard to ensure the ducts would run inconspicuously throughout the house. While we were able to accomplish this in almost all cases, the one place where the air return duct had to make an unsightly appearance was beneath our lovely main staircase.
Though we hated to lose this space to a large metal air duct, we understood it was a necessary sacrifice to ensure the system would be able to run efficiently and effectively. But rather than putting up a few studs and throwing some drywall over it, we decided to make an effective use of the space that attempts to keep with the character of our home.
Earlier this year we shared our process on our under stair built-in bench plan and progress. We used some salvaged beadboard we found in our attic after we bought the house to create a new wall and storage bench that not only disguised the HVAC air return, but also allowed access to our crawlspace via a removable panel and provides some decent storage to boot.
We plan on using this small storage area for the cushions that we use for the outdoor furniture, so we will likely be accessing this storage space quite regularly. In order to facilitate expedient access to the cushions when we need them, we decided to make the bench top a flip up hinged lid.
I had a long term internal struggle with how we wanted to build the bench top and hinge to be both functional and attractive. I thought about using fully concealed European hinges, standard mortised hinges, or non-mortise hinges spaced across the back. But in each case I was faced with a primary dilemma. Since we needed the whole bench top assembly to be removable if we need to get into the crawlspace, any typical hinge method would likely prove clunky and difficult to manage.
After my lengthy struggle Wendy helped put my mind at ease by offering up her specific solution, which ultimately gave me the direction I needed rather than allowing me to continue spinning my wheels. She said, quite simply, “Why not just use a piano hinge?”
Perfect! If you're not familiar, a piano hinge is a long hinge that fully supports a door all of the way across the opening. It’s typically used on a piano’s top (so not just a clever name), and used quite often on built-in benches. We purchased a hinge that was 70” long, which is a little longer than our bench top, but I made sure I could trim the hinge to size.
Building the bench top was relatively straight forward. It’s pretty deep at about 17” front to back, so I biscuit joined two pieces of 1” x 10” pine that were ripped down to the size I needed.
To add a little visual interest to the bench I added a 45 degree angle to the leading edge. This will also help make it a more comfortable seating area if anyone ever wants to use it as an actual seat.
Since this needs to remain removable, I made the bench smaller than the full opening and cut two small pieces for either side of the bench. These side pieces will be held in place by dowels but will be removed when we need to take the bench top down to gain access to the crawlspace.
I dry fit everything in place before moving onto the hinge and all seemed to fit quite well (though the thickness of the top looked a little wimpy, but we'll deal with that later).
For some reason installing the piano hinge intimidated me. I’m not sure why, but the idea of installing a nearly 70” long metal hinge seemed daunting. But rather than worry, I launched into the process one step at a time.
First, I had to trim it to length. I measured the entire length of the bench top to determine the specific length of hinge we’d need. Next I made a small pencil mark on the chrome hinge where I’d need to cut it.
After thinking about several different options to make a good clean cut on the hinge, I opted to use my cordless oscillating tool fitted with a metal cutting blade.
To get a good clean cut I had to do a few things while cutting. First, since the hinge has a slight gap when fully closed (which is the position it should be cut in), I had to insert a small 1/8” shim between the two sides where I was cutting. Next, I held a board that would act as a fence against the hinge at the cut location. I could then rest my cutting blade against this board and not worry about the blade jumping off of the line while I cut.
The actual cut only took about 30 seconds, which is far less than the time spent on neurotic paranoia of making a bad cut…but I did only get one shot, so I guess my paranoia was a slightly justified.
Once cut to length the installation of the hinge is not too difficult. First I flip the hinge around to a position beyond open and make a 90 degree angle. This location tells me how I should mount the hinge in order to allow it to fully open. Wendy held the hinge against the back of the bench top with the hinge pin oriented toward the top of the bench. If you don’t have a helper, a bit of painters or masking tape to temporarily affix the hinge to the wood will work well.
I marked the first screw location, drilled a small pilot hole, and secured the hinge on the bench top. Then, holding the hinge securely in place and evenly across the back of the bench, I repeated this on a handful of screws.
I didn’t put a screw every single hole at this point, only enough to make sure it would be held securely. This would allow me the ability to fix any mistakes before I make them permanent by drilling too many holes.
After I had the hinge secured along the bench top I moved onto attaching it to the back piece that will act as the bench jamb piece (not really sure what to call it). After sliding everything into place I could make a small pencil mark to tell me exactly what the ends of the hinge should be.
I then followed the same approach as before with Wendy helping to hold it while I marked screw locations and affixed the hinge to the jamb using about four screws total.
With the hinge fully installed I test fit again and everything seemed to work perfectly.
The next step we wanted to complete was to artificially beef up the look of the bench top. Using “one by” material is effective, but at only ¾” thick, it looked a little thin. In order to resolve this issue we ripped a narrow piece of one by to attach to the underside of the bench lid.
Before attaching it we had to make a small alteration to allow the bench lid to close around the side moulding of the lower section of the project. It didn’t need to be particularly pretty, it just had to work.
Once cut we glued and nailed nailed the embellishment to the front underside of the bench lid. After it was all sanded you could barely even tell it was added. This took the bench from a ¾” thick piece of wood to one that looked more like 1-1/2” thick, which was much more appropriate and looked more correct in the location.
After glueing and nailing, I also wood filled along the whole line to take out any gaps or cracks and then sanded it all smooth.
At this point the whole bench was looking great. The final step was to paint everything.
As we did with the bench interior, we kept the underside of the bench lid natural wood by finishing it with the Pal X-96 floor finish.
We’re painting the whole bench and wall the same color we’ll be painting the trim in the entire house, White Dove from Benjamin Moore. But we’re going to be using the BM Advance paint, which is a Waterborne Alkyd formula. We’re using the high gloss finish and hope this will give a brilliantly smooth and glossy sheen to our finished trim work.
I really like this paint and feel it goes on smooth and easy. It doesn’t dry too quickly so it’s pretty straight forward to keep a wet edge, and it goes have a very glossy look to it.
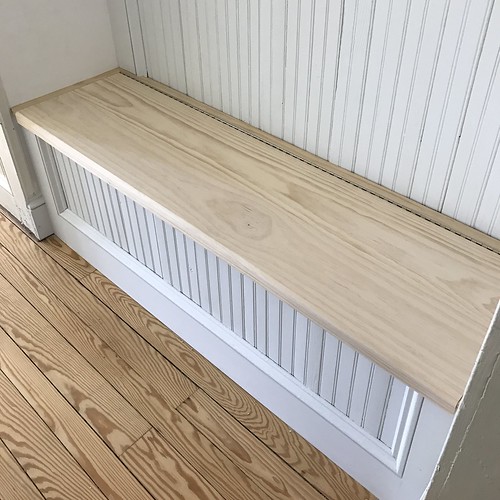
After a couple of hours of painting we were almost done. I placed the piano hinge back on the bench lid, but this time I put all of the screws in. After everything dried and had two coats of paint applied, I assembled the whole thing and took a look at our nearly completed project.
It is really looking wonderful, and we’re both happy with how it’s turning out. It looks natural in the space, like it belongs in the house and has possibly always been there. What was once a mess of metal duct is now an interesting and functional storage place in our home.
We still have to paint and place the antique cast iron register cover over the opening, install the metal lamp, and hang something very special in the space. And if you noticed, there are two small unpainted pieces of wood on either side of the bench. I need to make a minor alteration to the one on the left and paint both of them. We also need to prime and paint the new plaster on the walls and ceiling. As usual with our projects, there may be a good amount left to complete before we can really call this under-stair bench “done,” but until that day, it’s looking really good and we're happy with the progress.
Most of all I’m proud that this truly looks like it belongs. The salvaged wood, gaps between boards, and unevenness of it all add to the look and make it fit in the space. As I said when we started this blog post, “One of the most difficult aspects of renovating an old home is to ensure your alterations are not only functional and attractive, but are in keeping with the character of the house,” and I feel like we’ve done our duty and due diligence to make sure this is the case.