What's black, and white & red all over? My newest holiday baking experiment, a moist chocolate cake with a sweet peppermint buttercream!
It feels like it's been ages since I wrote a baking post! While I haven't been diligent about documenting my various creations, I love surprising my friends and family with a homemade baked good (typically of their choosing) for their birthday.
For example, my parents' cake this past July we nicknamed the earthquake/flux capacitor cake. If the photo doesn't answer any questions you may have as to why we named it that, there was a massive crack/rift that occurred in the top layer. It was a complete and total #pinterestfail and absolutely not "blog worthy", but rest assured it was delicious and was all consumed in short order.
Alex's birthday in November brought about a labor intensive but crowd pleasing sea salt caramel cupcake. These little goodies consisted of a caramel cake, filled with gooey caramel, and topped with a swirl of sea salt caramel buttercream. Personally I found them a little too sweet, but the birthday boy gave them two thumbs up.
Which brings me to this holiday season's latest birthday treat. A good friend of ours has a December birthday, and when I asked her what kind of cake I could make her this year she was brave enough to leave it up to the baker. I poked around online for some inspiration, but no matter what I looked at I ultimately kept coming back to her favorite childhood cake, red velvet with candy cane frosting. I made this for her a few years back and wanted to put a new twist on it this time around.
The last time I put the candy canes in the frosting I crushed them almost to dust and wasn't thrilled with the slightly gritty texture. In order to solve this issue this time around, I ultimately landed on the idea of baking a chocolate cake with a mint frosting, decorated with candy canes.
The chocolate cake was a simple Ina Garten recipe I found online, but any recipe for your favorite chocolate cake will work well. The thing I liked about this particular recipe is that it was very moist but wasn't overly sweet which works well when paired with such a sugar rich frosting. I baked the cakes according to the recipe and then gave them ample time to cool. (They also needed a bit of extra encouragement to get them out of the pan.)
While they were cooling, I started on the mint buttercream.
Ingredients
- 1 cup (two sticks) unsalted butter at room temperature
- 4 cups confectioners sugar
- 1 1/2 teaspoon vanilla extract
- 1 1/2 teaspoon mint extract
- 2 tablespoons fat free half and half (optional/as needed -- you can also use milk or heavy cream)
- pinch kosher salt
Directions
Using an electric mixer, cream butter on medium speed until smooth. The real key here is to use room temperature butter.
Slowly sift powdered sugar into the mixing bowl, combining with butter at low speed. As it combines the butter and sugar mixture will begin form somewhat fluffy concoction.
Once fully combined, scrape down sides and add the salt, vanilla, mint extract, and half and half. Mix again at medium speed until well combined and the frosting reaches a smooth, creamy consistency. I make sure I continually taste the frosting to determine if I need a little more salt, a little more extract, or need to loosen it up a little with more half and half. It's a rough job to be the taste tester, but I couldn't risk serving improperly flavored buttercream to the birthday girl and her guests, after all!
Once the buttercream was given the stamp of approval, I got to work frosting the cooled chocolate cake. Since I wanted the presentation to look nice, I slid small slips of parchment paper under perimeter of the bottom layer. This way I can frost away to my heart's content, and simply pull away the paper when I'm done, leaving a clean cake pedestal behind.
With such a moist cake, you have to be careful not to apply too much pressure or go over frosted areas more than is necessary. Otherwise you'll start to see chocolate crumbs make their way to the surface of the frosting.
Like in the photo below.
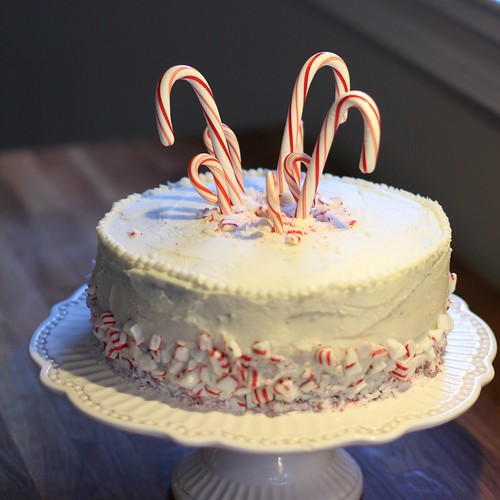
While I was able to keep the top relatively crumb free, the sides were a challenge. Professional bakers would tell you to apply a crumb coat, which is a thin layer of frosting that seals in the crumbs before you apply a final later of frosting. But I'm not a professional and I was worried I might run out of icing, so that's where my peppermint accents come in.
I took two bags of peppermint disks, placed them into a ziplock bag, and then proceeded to take out any pent up aggression with a rolling pin. This quickly and effectively crushes the candy into smaller pieces while leaving some decent sized chunks.
Once the candy was crushed, I applied it using a wooden spoon, gently pressing it into the icing around the lower 1/3 of the cake as well as a small pile on top in the middle of the cake.
To get just a little fancy (and cover up the less than perfect top edge), I piped beads of frosting around the top using a small round Wilton tip.
The final step was to insert large and small candy canes into the center pile of crushed candy to add a whimsical and three dimensional element to the cake.
While not perfect by any stretch (ugh, I just couldn't get those sides perfectly smooth!), all who partook deemed the cake to be rather delicious. But most importantly, the birthday girl loved this take on her childhood favorite. While it works well for December birthdays, it would also be a fun addition to a Christmas party or as a surprise left for Santa.
Do you have a favorite cake recipe that you like to make? And if you had your choice of any homemade birthday cake, what flavor would you choose?