Much like War and Peace, Gone with the Wind, or The Academy Awards, our bathroom renovation is running long.
As the years have progressed and our patience runs thin, the bathroom has slowly progressed. Rather than drawing comparisons to various epically lengthy novels or movies, let's instead use The Little Engine that Could as our literary project point of reference.
Why? Because it doesn't matter how long it might take, I'll be dammed if we're not going to finish this project one way or another, even if we have 20 other projects going on, including a giant effort in a new house without HVAC or plumbing. I think this is primarily because we're some healthy combination of crazy and masochistic and possess an undeniable love for our home and desire to do too much ourselves.
So where are we on this bathroom project? Well, not that our work on turning an antique buffet into our vanity is complete and we love how it turned out, we're turning our attention to building the tall storage cabinets that will sit on either side of the custom double vanity.
It's been our plan from the start to augment the storage in the vanity with two large but skinny storage cabinets. They'll each consist of two components, a lower and upper section. The lower section will act as a combination of two laundry hampers in the bottom compartments, and two storage drawers. The upper portion will then have two glass front doors for visible storage.
While I purchased the lumber for this project a few weeks ago, my tick bite had me a little delayed. Now that I'm feeling much better and getting treatment, I'm finally moving on these bathroom cabinets.
I decided to build these cabinets out of solid pine so they'd "feel" a little more natural in our home. They're not going to be particularly complicated or complex, so my goal is to make these cabinets look like they've always been in our bathroom. My secondary goal is to more or less make these look like pieces of furniture in our bathroom, rather than built-in cabinets.
Okay, let's get on with the project.
My first step in base cabinet construction involved the base cabinet box, which is what I'll focus on in this post.
The cabinet depth is about 16", but the widest pine boards I could buy were 1" x 12", so decided to biscuit join a couple of 1" x 8" boards to make the flat sides.
After glueing and clamping everything up we were ready to start work.
Since we were going to be making two identical cabinets, we decided to double every cut we were making to make both at the same time. It took a little more planning but it meant we'd be able to knock things out much quicker.
After cutting the two sides to a length of 38" (the height of the base cabinets), I set up the dado blade to start cutting reliefs in the sides for the cross supports.
I cut a dado groove along the back of the pieces as well as two mid shelf/cross supports and one along the top. A dado groove is pretty much the easiest way to make a solid and sturdy cabinet base. You can nail, screw, or pocket screw a piece into place, but using a dado, some glue, and a few brads, and you've got yourself a joint that will be hard to compromise.
When you're cutting and assembling multiple items with pieces that can easily swap between items, it's best to come up with a labeling scheme to keep everything in order. In my case you can see how I labelled the side pieces to keep it all straight.
In this case I numbered based on which cabinet this was for (1 or 2), put an R or L to tell me if it was the right or left piece of the cabinet, an O to tell me which side is the outside of the cabinet, and then added two arrows to tell me which end is up and which is the front. This all went together to give me instruction as I was cutting to ensure I was putting each cut in the right place on the cabinet. And once everything is assembled, the pencil lines will all just sand away.
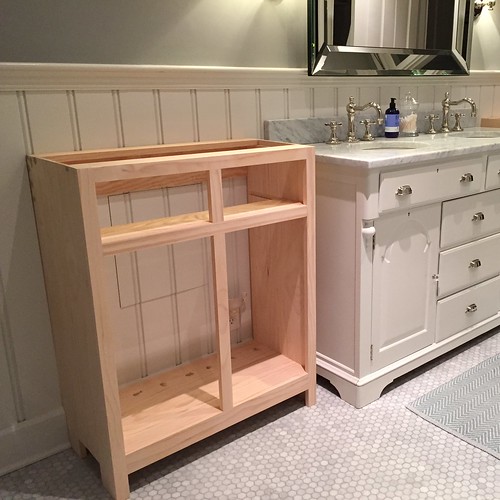
Before we glued anything up we took the two side pieces into our bathroom to check the scale of the two cabinets in the room.
We initially started with 32" wide cabinets but felt this would be a little too wide for the space, so we dropped them to just 30" wide. This is the best part of building something completely from scratch, you can make it exactly what you want it to be, and it only requires a few cuts to make adjustments.
As you can see from the photo above the cabinets sit off of the wall because of the baseboards on the wall. In order to accommodate these baseboards I wanted to notch the side pieces of the cabinets to match the profile. I started by using a contour gauge.
This gauge has pins that move as you push the handle towards the profile and gives you both the positive and negative profile, which you can then transfer to the piece you need to cut by simply tracing what you have in the pins.
Then all you need to do is to use a jigsaw to cut the pattern you've created.
We were all ready connect things up. I double checked to ensure we were making true 90 degree angles in the cabinets before I started to glue and nail.
Once we were happy with the scale and squareness of the base I started to attach everything. As I said, a little glue and a few brads and we had ourself a solid cabinet base.
I hate the chance I might miss the nail where it needs to be, so I like to setup a guide with a few support pieces of wood and the square. This lets me nail at exactly the same point along the line without the chance of wandering and driving a nail into nothing.
Taking a look at the finished base without a face frame I was feeling good. Since we have outlets behind where these cabinets are going we've opted to leave the back open. This will allow access to the interior at any time with completely hidden wires if we choose to light the interior uppers of the cabinets.
The next step in this process involved assembling the face frames and attaching them to the cabinet bases. While you can easily nail the individual face frame pieces to the cabinets, this leaves you open to future cracking and possibly sloppy looking cabinets. I'm a big fan of assembling the face frame first, then attaching it to the cabinet with biscuits. It works really well and gives a solid and sturdy front to the cabinet. We used this same approach when building our custom office desk.
I start by cutting all of the various pieces for the frame from the stock I'm using. In this case I'm building the whole thing with 1" x 2" pine (and also 1" x 4" ping for the lower cross piece).
Once all of the pieces are cut, it's time to assemble. There are a lot of options to put these sticks together at this point, including mortise and tenon joints. But in this case, I decided that pocket hole screws is good enough for me. The interior frames will be hidden from view and most of the pocket holes will be away from what you can feel. It may not be the cleanest method, but it's really the least effort with the best results.
So I clamped up all of the cut pieces and begin drilling on my Kreg jig. I tend to have a lot hate relationship with pocket hole joinery. On one hand I love them and how easy they are to use, but on the other hand I hate how the DIY internet as a whole has overused and abused these conveniences. I actually wrote a whole ranting post about it where I was an elitist smug DIYer. Anyhow, I digress.
I went ahead and drilled everything at once to save some time.
After everything had been drilled I dropped a piece of plywood on my table saw top so that I could have a sturdy clamping surface for the face frame (I wish I had a larger work space for things like this). This is essential to making sure you have a good pocket hole joint. If you don't clamp the screws will almost certainly push things apart and make it all a giant sloppy mess by the time you're done.
Once I was ready to screw together all of the things I applied a little wood glue to both ends of the joint and then smoothed it with one of the cheap disposable glue brushes. I have a huge bag of them around at all times and always keep more on hand.
Using the carpenter's square to ensure a good square joint I clamped both pieces of the joint to the plywood and then slowly screwed in the pan-head screws. I was very careful not to strip the screw in the soft wood, as this is one of the easiest things to do with pocket holes to simply ruin your project.
With pocket holes, the screws are there to hold the joint firmly together while the glue dries. Remember that when you're working with pocket holes, always glue, the screws are just your clamp.
After the whole face frame was assembled I dropped it in front of the cabinet to ensure good fit.
Happy with the fit I moved onto the next essential step, marking biscuit locations.
The biscuit slots on the face frame and on the cabinet must line up almost perfectly for this process to work out. The best way to ensure this happens is to use a carpenter's square to mark the cross line of each biscuit. The joiner cutter has a mark to line up with these pencil lines to that ensures the slot is cut correctly. I was using a #10 biscuit with the face frame, but a #20 biscuit on joining the side pieces I mentioned earlier.
Making corresponding cuts in the cabinet as the frame just uses that same pencil line on the opposite piece. It really can't be much easier.
With the biscuit slots cut I applied the final items in the face frame by pock hole screwing in the two vertical support pieces in the face frame. I didn't want to do this until after I had cut the biscuit slots to be sure the pieces didn't impact my ability to cut the slots. After all was said and done I dry fit the face frame on the cabinet with biscuits to be sure everything looked good and lined up.
Once I was happy with the fit I liberally applied and brushed glue all over the joints and put them all together for real.
It's at this point where I realized that I've done something wrong in my life. Throughout my many decades on earth I've apparently failed to acquire a sufficient number of cabinet clamps. Though I have some, these are not enough, and I must acquire more. As it turns out, I had just enough for this since small cabinet, which meant I wouldn't be clamping up several cabinets at once. This is okay, but a bit discouraging too. Must rectify at some point.
While the cabinet bases were drying I also started working on the top. This top will act as a division between the base and the upper cabinet and will give a good visual breaking line between the two components. But this top is pretty deep and required joining a few more boards. This is the theme of this project.
By the time the top was drying the based glue had setup enough and I was sanding the glue lines away to make a consistent and solid surface over the whole face frame.
Once the top was joined and cut to size (31" x 15-7/8") we popped it in place and put the cabinet bases in place next to the vanity to make sure it looked how we wanted. Sure enough, it was headed in the right direction.
I still have a bit more to do on the base, like adding a baseboard and maybe some beading embellishments, but this is how it looks today. I've got some drawer slides ordered and on the way, and will be building some drawers and doors to fill in the openings. My hope is to get to all of this over the weekend so we have something nice and finished (just not painted) middle of next week. Then we can move onto the upper cabinet elements.
I'm excited to be back to doing woodworking and was able to get completely immersed in it last weekend and the early part of this week. I have a few plans to do some really cool stuff with these cabinets, but I'll share some of those plans with you next week.
Until then, what do you think so far? Can you picture what we're trying to do, or are you just going to patiently wait to see the end result.