Now this might come as a total shock, but Wendy and I have multiple ongoing projects.
No, no, I'm serious! Can you believe it?
While we may have a literal disaster when it comes to our heating and plumbing at our new house, and we're overwhelmed almost to the point of panic attacks (if they weren't so often interrupted by catatonic paralysis) when we start to research our options, that's not to say it's taking all of our time. Estimates, insurance, and continued uncooperative weather have meant this isn't going to be a quick fix by any means.
The good news is that we still have a bathroom to complete in our house! Yes, yes, we're still working on it... again, can you believe it? You can't? I had hoped you thought more of me.
Though DIY ADD, with a side of disaster, may have gotten the best of us over the last several months, the unfortunate delays in our new projects mean we can focus on knocking out some of our ongoing projects. More specifically, we can finally finish up our master bathroom vanity project within a project. I guess our projects are like onions, they have many layers.
Just a quick recap since it's been so long since we've talked about it. Our eventual vanity started life in an antique store in Del Ray's section of Alexandria. It was so long ago we purchased it, that the store has since moved and has been replaced by a Walgreens.
Wendy saw the walnut piece and said, "You think we can make that our vanity?" I think I said "Nope, probably not..." and tried to move on. The thing is, Wendy doesn't like to hear weak excuses, and would rather push the envelope, so I begrudgingly agreed and it launched this seemingly unending transformation of the piece from a dark stained buffet to a marble topped white bathroom vanity.
Though we modified the vanity for plumbing...
...reinforced the structure for the marble...
...painted the carcass...
...placed the marble top...
...and even got all of the plumbing and sinks hooked up a few months back...
...we never actually finished up the project. What was left? Well, we had to trim and then paint the drawers and doors, as well as select and install some new hardware.
When I was altering the drawers I noticed just how loose several of the joints were. I ended up needing to re-secure several of the dovetail joints that had failed, which isn't particularly hard, but a very necessary step to ensure the vanity will stand the test of time.
And in true snowball fashion, that ultimately led to re-glueing the joints on the doors.
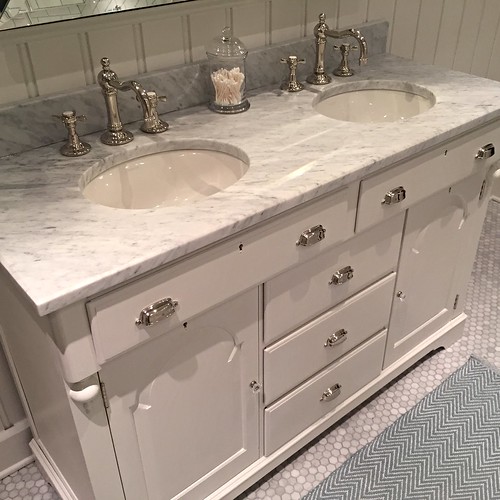
While I know there was differing opinion among commenters regarding the handles of the buffet, we were never really keen on the look of the chunky wood handles. We both have the preference for metal hardware on the piece and felt it would look best to match the finish with the polished nickel finish we used throughout the rest of the bathroom.
After searching high and low for a set of handles that would look nice on the vanity, we settled on a simple 3" low profile bin pull with a single raised detail just above the lip. We found it at Restoration Hardware and placed the order online (since our local store is closed and the stores don't carry any sort of restoration hardware any longer).
We also opted to pick up some small glass knobs for the two doors, and a few sets of 2" hinges for the doors. Both of these items were finished in polished nickel and both came from House of Antique Hardware, which has lots of reproduction antique hardware, true to its name.
Before we got to the step of painting everything, we filled the old drawer pull holes, sanded everything that hadn't been sanded yet, and started to mount all of the hardware on the drawers.
Doing this hardware mounting step prior to painting meant we'd have the ability to correct any mounting mistakes if they were made, and would also help prevent chips or scratches in the paint as a result of careless drilling.
To help ensure consistency, I made a small template from a scrap of painters paper...
...and marked the horizontal and vertical center lines on each drawer front.
Then, using the template and the center lines, I placed two pencil marks where I needed to drill pilot holes for the screws.
Once the pilot holes were in place, the rest was cake. I do have to say that I dislike that RH supplies Phillips head screws for the hardware. The slot head screws look so much better. Might have to swap it out down the road.
Another of the tasks we had to tackle was the placement of the upper drawer fronts. Since the two sinks are now in place, and they're very near the front of the cabinet, there's really no room for those two drawers any longer.
We had thought about doing some very shallow lean out drawers for small storage, but given how I had to alter the interior of the cabinet to support the marble top, the lean out hinge mounting was proving to be more of a challenge than anything, so it ended up something we decided against. Instead I needed to figure out a good way to mount these drawers in a semi permanent manner.
Using two bolts and a few nuts on each drawer, I was able to give the drawer fronts mounting posts. Next I mounted a few pieces of poplar 1x2 pocket hole screwed to the interior of the openings, and drilled two holes in each one for the mounting bolts.
Overall it was a pretty easy approach to the situation, but there was one other issue. My reinforcement of the upper section of the vanity to accommodate the marble, and years of something heavy sitting on the top of the buffet before we owned it had caused the center of the vanity to sag. This sagging had caused the two upper drawers to lean down towards the center of the piece. Now that the top was level, the very apparent half inch gap above the drawers in the middle needed to be resolved. But how?
I decided to do my best to disguise this situation with a few new pieces of wood (cut from scraps from the original buffet top). Had I realized this gap was there while I was doing all of the restructuring before placing the marble top, I would have addressed it then in a prettier manner, but I didn't have the foresight to do it at that point. I guess I'll remember for next time.
Once all of the drawers had their hardware mounted, false drawer fronts were in place, and new pieces of wood cut, I had to sand and paint everything to match the body of the vanity.
I had thought ahead on this. When I first painted the vanity I thinned enough paint for the whole project and set it aside. Now I just needed to grab the paint I'd already had mixed and start up my sprayer.
Painting took a long time for these doors and drawers. The walnut is a dark wood that tends to let a lot of orange color bleed through. And the paint sprayer puts on many thin coats of paint with each pass. So this meant I ended up applying about six coats of primer and nine coats of paint over each piece.
It was a serious pain, and one that ended up showing me that I needed a new paint mask...
...but the end result was a very smooth and very even paint application over all pieces. (I know it looks splotchy, but it's just shadows on the doors.)
After allowing the paint to fully cure, I began placing the new hinges on the doors. The new size of hinges helped the screw hole situation so I didn't have to simply reuse all of the old holes. It may sound odd, but this made me very happy. How weird is that?
After wrestling with the hinges and getting everything lined up with no gaps and no rubbing, we had ourselves a finished vanity.
Okay, not 100% finished, I'm still looking for polished nickel keyhole covers, but like 99% finished, which is close enough.
We're both very happy with how it all turned out. It was far more effort than I ever expected it would be, and we ended up needing to make far more extensive alterations than we originally anticipated when first looking at the piece in the antique shop, but we're quite thrilled with the look and function. The one thing that we didn't expect is how well the extra height works. The vanity counter is about 3" taller than the average vanity height, and it just seems to work much better.
Taking a look at the before and after of this project gives me a tremendous sense of pride. Of course, this isn't going to be a perfect looking piece like we picked it up from the showroom floor, but instead a unique and one of a kind repurposed piece of furniture that looks as at home now as it did as a buffet. There are gaps and marks of age, idiosyncrasies and oddities, but it really makes the bathroom feel more like it belongs in our house that's full of exactly the same.
I don't know if we'll ever try to repurpose something else in the same way again, but it certainly helps me realize that we can absolutely tackle it if we want to try again.