As Alex mentioned in his post on piling caps, we're a little all over the place with our DIY focus right now. We have a list of projects going on simultaneously, and it seems we're having a hard time checking any of them off the list as fully completed. The makeover of our new home's downstairs bathroom is one of these projects.
To quickly recap where we are on the bathroom, the weekend we bought the house, my mom and I had the floral wallpaper down (yay!) but in removing it, a lot of the drywall paper came off too (boo!). Over a several week period, Alex painstakingly skimmed the ceiling and walls to give us a good, smooth surface for our new paint job.
The wall color, Benjamin Moore's Wales Gray, and ceiling color, Benjamin Moore's Silver Crest, both went up without issue and we're really happy with the results. The trim color, on the other hand, Sherwin Williams Alabaster, was a total miss. The color is too yellow and the sheen feels really chalky, not the smooth and shiny finish we're after. We're in the process of selecting a new option, with a lot of great input from commenters, and will later repaint the trim.
That brings us to today's post.
For weeks I drove around with the shower curtain and paint samples in the trunk of our car so that if I found something I thought might work for our room, I had these important pieces in hand to do the necessary comparisons. I also started online shopping (or more accurately, aimless web wandering) for well priced options to incorporate into the space. I was on the hunt for lighting, window treatments, and accessories, but the hunt was going slow.
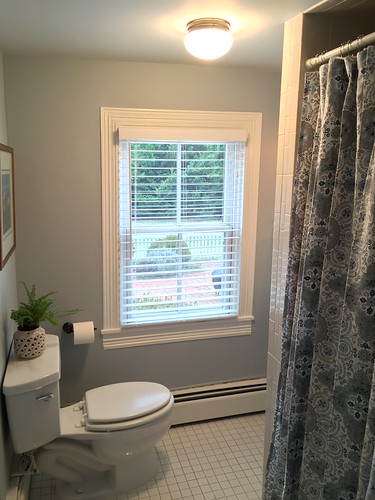
One of the items I knew we had to address was the window coverings. The bent metal ivory blinds were beyond saving for the space, and the floral valance isn't my taste, so into the Habitat ReStore donation pile it went.
It's such a small room that I wanted to keep the window treatment simple, yet functional as it will need to be closed for privacy as it's in direct sight of our front yard's garden and fire pit area. I looked online for roman shades, fabrics, blinds, and more, and had a hard time finding something inexpensive that met our needs. I eventually came across a very reasonably priced option from Home Depot, these simple white blinds for under $25 that you can order to size. Done!
I ordered three of them, one for the bathroom and two for our master bedroom. They arrived before we were ready to hang them, so we stored them away until we were ready. On the day the painting was complete, I excitedly brought out the blinds for the bathroom and opened them up. Alex began mounting them as I handled the quick assembly.
All was going smoothly until after snapping the blinds into the mounting hardware, we realized they wouldn't stay up at the desired length. We would pull the string and attempt to lock the blinds into place, but they would revert back to the fully extended position. Fresh off the trim debacle, as well as several other minor issues with trim and baseboard radiator covers, I started yelling about how this room is giving us nothing but problems. Alex, with a cooler head, grabbed one of the blinds we had ordered for our bedroom to compare the two. It seems that a crucial piece was missing from the bathroom blinds...a small "hair pin" looking metal piece.
The purpose of this little clip is to put pressure on the wheels and keep the pull strings in place. Without it, the blinds just can't stay up. As a temporary solution, we borrowed this piece from the other blind set so we could continue to move forward and like the trim paint, we'll circle back to address the missing hardware issue later so we can still install the cannibalized blinds. So frustrating!
This fix worked, and were were able to hang the blinds and have privacy once again for the small room.
With the blinds in place, I was able to turn my attention to the issue of lighting. The overhead fixture in the room was a brass flush mount fixture with seashell shaped glass globe. Lucky for us, the master bathroom also sports a matching light. Can you detect the sarcasm in my voice?
Not only is the room very small but the ceiling is low too, seriously limiting our overhead lighting options. While a recessed light may work really well, that would require far more invasive work in the ceiling, which is not "quick fix" material. So I was determined to try to make this light work with a little TLC, and started to dig around in our basement to see what I could find.
After a few minutes I was happy to stumble on an old can of spray paint that we used on our hallway light fixture 10 years ago. We're not the "spray paint everything in sight" types of people, so having this on hand was a nice surprise. In hopes that it would work, I took the fixture apart, lightly sanded the metal, covered up the wires and sockets with foil, and gave it a couple light coats of paint.
The fixture was already looking better. Not bad for a free improvement!
Alex reinstalled the base and lights, and I ordered a simple replacement "mushroom" shade in the correct size.
With the shade in hand, we screwed it into the base and stepped back to admire the reinvented light fixture. For around $8 for the replacement shade, we have a "new" light that will look much more at home in the bathroom with the new changes.
Speaking of lighting, we also hunted around for several weeks for a new vanity light. A trip to the Restoration Hardware Outlet in Leesburg, Virginia resulted in one of our first great finds. For less than $30, we nabbed an oil rubbed bronze and antique brass light fixture for over the vanity. The antique brass would tie into the 1980s brass fixtures that we don't want to replace at this point (like those in the shower), but the oil rubbed bronze of the fixture can take us in another direction that's more our style. We also used an Edison bulb because they're awesome.
Another hurdle was the bathroom mirror. Mysteriously the existing mirror went missing between us buying the house and us closing on the house, so we needed to come up with a new option. I've never had to shop for powder room mirrors before and I was floored by the cost. I didn't find what I was looking for online, so I continued to scout HomeGoods type places for months until I finally found "the one," both in terms of looks and price. I landed on a circular mirror with a rope accent for under $30 that would work well with the bargain light. Hanging the mirror from the rope wouldn't work though because of the limited height we have over the mirror, so we took some liberties and simply draped it over the top of the mirror.
To go along with the two lights and mirror, I started pricing out new oil rubbed bronze options for the towel ring, missing TP holder, towel bars, and vanity faucet. Prices were all over the map, and most were more than we wanted to spend given this is a budget makeover. After a lot of searching, I came across a crazy cheap option on Overstock for a five piece oil rubbed bronze hardware set. When combined with a 10% off coupon, we purchased this faucet and accessory set for $72 and change. Score!
Around the sink I hung a white towel and placed a few soaps as a functional and decorative touch. We still are thinking about removing the off center pedestal sink and building a small vanity in its place, so we'll hold off on installing the new faucet until we have that completed. In the meantime, it will drive me crazy that the pedestal sink is off center on the wall and the "backsplash" tiles were not measured correctly and one was cut short in the middle to correct this. We'll see what cool stuff we can come up with to disguise/correct these issues.
Turning my attention back to the commode side of the room, I got creative. I pulled an old framed picture out of the basement. This picture was given to me by a neighbor years ago when she was doing a spring cleaning, and for years I had it hanging in my old office at work. I thought the shades of blue combined with the gold frame work well in the room. We also hung the new TP holder, and I put a small fern in what is technically a ceramic candle lantern from Target, now doubling as a plant holder that I bought last fall on clearance.
We still have a fair amount of work left to do in this small room. Between a possibly new vanity to replace the pedestal sink, and the need to restore the door hardware and paint the door, we still have a little bit of work to go, but I think you can agree with me that it's looking significantly better than what it was before.
Here are a few before and after shots that will show you our direction in our semi-completed makeover of the new home's downstairs bathroom.
While there are still a few things we want to tweak before calling it "done for now," like building a vanity, repainting the trim, and painting/rehanging the door, I'm thrilled with how it looks. We've spent about $275 including paint, but to me, seeing this serene space each time we arrive is priceless.
