A few weeks ago we reported on our efforts to remove the odd half wall in the living/entry area in our new house.
As much as I wanted to take on this major structural renovation work on my own, I knew the effort necessary and that it was likely best to let the pros handle this work.
With that in mind, we reached out to several construction companies and found one we clicked with to do the work. We worked with them to define the scope of work and where their responsibilities would end. Ultimately, we wanted them to tackle the wall removal and structural beam install, and we'd handle the rest. We even did a little of the demo ourselves.
The best part of hiring things out is the speed at which things happen. What might have taken me and several friends a week of planning, buying, hauling, demo, and work, would only take them two days of effort.
They started on a Thursday when we weren't even there. This pained me more than you can imagine. I wanted so badly to be on hand in case of any issues, but I had to let it go just a little bit and let things happen. It also meant fewer photos, but I guess that's okay in the name of expediency.
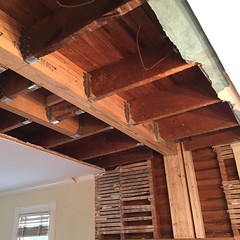
Midway through the day Thursday, I received a call from the guy in charge of the project, Steve. Steve had sent me a photo of some of the framing they uncovered during demo that altered the plans a bit, and he needed an okay on an additional charge for labor and materials.
As you can see from the photo, there was an additional header in an unexpected area in the ceiling. In retrospect, this header was not totally unexpected, as it formed the outline that allowed the chimney to pass through the center of the room, but it was a bit of a surprise and was carrying a lot of weight from the room above, and it no longer had its lower wall to support it.
Now it makes sense why the floor above this room always seems just a little bit more bouncy than the others in the house. After reviewing the photo and the situation with Steve, I gave him approval to move ahead as planned.
The other issue with the beam install had to do with where the beam would be supported on the inside wall. Since there is an extremely large corner post in the wall that goes all the way up to the attic and roof, he didn't want to cut into it and risk compromising that post's structure. I agreed 100%, but it meant we'd need to put a small four and a half inch protrusion into the room by way of a jack stud support post. Not an ideal solution, but not many options otherwise without really starting to destroy more things.
We made it down to the house on Friday afternoon just as they guys were finishing up their work. It was perfect timing as we were able to go over the work and chat with them for a bit. I have to say, I think they did a really great job on the work and we're both very happy with the results. This is the view we were met with when we entered the "new" room.
They used several very large engineered lumber beams, one for the header replacement and the other for the major structural element.
During the process they built temporary walls on either side of the wall we were removing which supported the floor above. They then cut back the floor joists to create a larger pocket and remove the existing beam. It did make me sad the original structure was removed, but it was undersized to do what we needed.
At that point they recessed the new engineered beam into the pocket and were able to make everything flush with the ceiling. We were worried we wouldn't be able to make it flush, so this was a big win.
As I mentioned earlier they had to place a triple Jack stud on the interior wall to support the new beam. We'll need to do something with moulding to make the post look like an element of the room, but it definitely is an inconvenience since we want to put a couch on that long walk, right where that beam is located. Wendy and I have already started discussing options.
On the other side of the room, above the fireplace, they really did some great work. They determined the header above the fireplace wasn't sufficient for the new load, so they put in a good sized LVL above the brick, and then completely redid the post structure to allow the new beam to be let into the wall pocket. This also allowed the whole structure on that side of the house to be flush with he wall, which we definitely wanted.
Overall we're very happy with their work. They accomplished what we wanted in the room and now the space is open and makes far more sense in the house. We will no longer have that large dead space in front of the door and interrupting the focal point of the fireplace. We still have quite a bit of work to do to get this room up to snuff, but we're definitely headed in the right direction.
The other added benefit of this work is the amazing stiffness it added to the master bedroom above. As soon as I walked into the room after the beam had been put in I could immediately tell how much more solid everything was. I'm excited to get this project moving forward but we're going to have to figure out a lot of little things, including where to get some reclaimed heart pine to patch in the floor. Wish us luck.