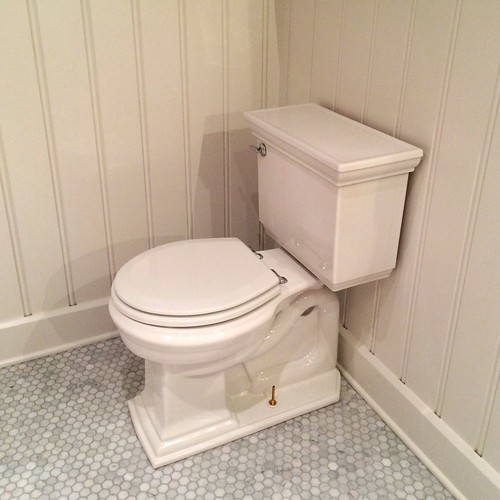
We've got ourselves a functional turlet!
Yes, that's right, an official and flushable lavatory! This is big news. No, no, actually, this is really big news.
Up until last night we've been without a second seat in our home for several years. We've endured visits from friends and family with sadly a single sanitarios. We've entertained small groups while lacking more than a lone loo. We've hosted dozens at our Halloween party with simply a stag stool. Yet somehow we made it work.
There have even been days where Wendy and I both have to use the lavvy so badly on the way home that we actually bargain for first rights or race each other up the stairs to lay claim to the throne.
And I'd be lying if I said the thought of "oh man, what happens if we both happen to he worshiping the porcelain god at the same time due to some sort of stomach virus?" hadn't crossed my mind...on a regular basis.
But somehow we've made it through life with but one John.
Yesterday. Yesterday, a day seemingly insignificant in the grand scheme, was actually a very special day for Wendy and me. Yesterday, something special happened, and our long life with our solitary small house came to an sudden stop.
Yes, that's the exciting news of the latest addition to our household, but the story of how it occurred is far more serpentine.
After finishing up our baseboards we had ourselves an empty corner of our bathroom just begging for a big honkin porcelain throne. The good news, we just happened to have a Kohler Memoirs two piece round front comfort height crapper sitting down the hall in our home office. What are the odds? Apparently pretty damn great when you purchased the thing months earlier and have had it sitting around your house since there was snow on the ground. What? You don't have an oval office sitting in your home office? Come on now. All the coolest kids are doing it!
But a chamber pot alone does not make an install. There are two critical items needed to make this sculpted piece of glazed plumbing more than a work of art. In fact, beyond the bowl, there two essential items to take this baked sculture of vitreous china into a functional waste receptacle and removal device.
Specifically, I'm talking about a wax ring/gasket and a supply line and shutoff.
That's the thing with a place of easement, it's not very useful unless you have a way to fill it up with water, and a way to flush the water (and anything else) away.
Waxless Gasket
First let's look at the wax ring. Or in our case, our waxless gasket.
It's a rule of thumb that's best to live by in the plumbing world. When you're setting los servicios in place you have to seal it to the closet flange with a wax ring. It ensures your waste water only goes out through the waste line and doesn't flow into your ceiling. But if you do it wrong, there's simply no recovery. Once you drop your gardyloo in place it's down. There's no take backs, no re-dos. You can't pick it up or move it or your wax ring is wrecked and you might as well buy a new one.
I don't know about you, but the idea of "no re-dos" doesn't doesn't sit well with me. I like to make sure I did things right, check my work, double check my work, triple check my work obsessively like I have a problem, that's how I like to work. With a wax ring, this really isn't all that possible.
In steps the Fluidmaster waxless gasket. Made to fit a 3" or 4" waste line and closet flange, it's a waste line gasket for your God of Abraham with a 10 year warranty and ability to place, remove, and replace your cloakroom to your heart's content.
The idea with this device is its ability to fit snuggly over the waste exit hole in the base of your can...
...then a large rubber gasket sized for the diameter of the waste line fits over the base of the plastic boot and into the plumbing. Here's a mockup of how it looks from inside of a PVC. As you can see, the large rubber ring makes a watertight seal between the hard plastic and the PVC.
With this great little gasket and properly sized rubber ring, placement of the big white phone is simple. Just pop the boot on the waste exit, place the closet bolts in the closet flange, and lower the privy into place. You can actually feel the rubber ring engage the waste line and create that seal that will allow it to last at least as long as a wax ring.
The instructions for the waxless gasket say to place it into the waste line first, then lower the thunder box onto it. But I prefer to place the boot on the bottom of the toilette first, then drop the whole assembly into place.
Once set in place and level is ensured, just pop the washers and nuts on the closet bolts and you're halfway home to some functional facilities. But be sure not to over tighten (which is actually a very inexact instruction in any installation guide that I simply loathe).
Tank Assembly
After the potty was in place it was still sans tank, the part number two to our two part London. Attaching the tank to the whole assembly is not particularly difficult, but those words appear again in the manual, "don't over tighten." Seriously, WTF does that mean in quantifiable terms where one needs a definitive answer on what represents "over."
The tank attachment takes only three nuts with washers to make it happen. A large rubber grommet between the tank and base compressed as the nuts are tightened making that required water right seal. This whole aspect of W.C. install is eliminated with those newfangled one piece Khazis, but that would simply look out of place in our project.
The key to attaching the tank is to tighten the nuts onto the bolts in an even and rotating manner. Tighten one a little, then move onto the next, then the next. Lather, rinse, repeat, until the tank is securely adhered to the base. You can also use these bolts to slightly adjust the tank to ensure level. Just pop a level on the top of the open tank and make minor adjustments until you've reached your level state. But remember, don't over tighten. Grrrr.
Finally, we could look on with pride for what we had accomplished. But most importantly, we needed to dump a bucket or two of water in the pool to fill the trap and ensure sewer gas wouldn't escape into the room. But that's artificially added water, we still had to hook up the final phase of or project, the supply line.
Supply Line
One might not realize this, but a supply line and shutoff valve for a biffy you've been waiting to install for multiple years is not something to select willy nilly. No way! I want our hopper's supply to match the rest of the hardware in the bathroom. We've covered our selection of polished nickel hardware for the shower, tub, and vanity, as well as our various polished nickel accessories, so the toilet has to match. So I selected a very pretty quarter turn shutoff valve from Mountain Plumbing, a 3" long 1/2" polished nickel pipe nipple, a 3/8" tank filler tube, and a 1/2" wall escutcheon (not pictured).
These items would ultimately combine to make our evening of Johnny house install rather trying.
I grabbed all of our necessary tools and supplies for the job, primarily a pipe cutter, some Teflon tape, a debuting tool, and a pipe bender and set down with my trust steed by my side for install.
The pipe bender is to slightly maneuver the supply line since the shutoff valve doesn't quite align with the water inlet on the bottom of the tank. We'd need to make a slight S curve to achieve our roughly one inch offset between the two.
We started with the nipple and shutoff connection. Applying some Teflon tape to the threads of the nipple, in a clockwise direction, always, we threaded on the shutoff valve and twisted the whole assembly into the waiting supply line.
After wrestling to achieve the final 1/10th of a turn to make the valve's supply truly perpendicular (it involved swearing, a large pipe wrench, and towels to protect the finish of the valve), we had met our install preference.
Foolishly, I continued hooking things up rater than testing the water tightness of the valve's connections.
I measured out how much supply pipe we'd need to achieve our connection and marked just beyond the cut line with a little blue tape. This would give me a point of reference for bending.
Using the spring bender I fed the length of supply tube into it and used even pressure to make slight bends in the tube where necessary. The spring bender helps to ensure even pressure and will reduce the chances of a kink and need for a new tube.
Once I felt the tube was bent to the right shape to make a solid connection to our latrine, I marked the official cut line and used the tubing cutter disc to make it so.
The brass of the supply tube is very soft, and the cut edge left a lot of burs that needed to be removed with the deburring tool.
And at long last I was connecting the supply line to our chunder box with the compression nut at the valve and plastic coupler.
A few twists of the various items and we powered up the supply. The toilet began filling as I realized I hadn't repeated my mantra before beginning the process. I'd somehow omitted the obligatory "no drips, no runs, no errors," I always say around before turning the water on. Surely it would all be fine? Surely this is a silly superstition? Surely I can't believe that those simple words are ultimately responsible for the actual success or failure of my work. Right?
WRONG!
Yes, that's right, superstitions are real and must be honored, lest you pay the price. In our case, the price was in a very slow drip from the base of the shutoff valve. It was tragic.
I had, as I said, foolishly missed testing the valve before moving onto my next step. I also didn't say those magic words. I was doomed to failure from the start and I didn't even know it!
Utterly defeated I threw my arms in the air and almost gave up. But I knew exactly what I had done wrong (besides not reciting my plumbing chant). I knew just what I needed to do to make it right. I had made a mistake I've made in the past, and it could be easily corrected.
Like a dope, I omitted the pipe dope and only used teflon tape.
Many people swear by the use of one or the other when making up their connections. Most prefer pipe dope when making in wall connections, and Teflon tape when the connection may be visible. But I've met many pros that swear by the double whammy approach.
The double whammy approach first lays a base of Teflon tape on the threads, which is then followed by a few daps of pipe dope, ensuring a watertight seal for many years to come. For some reason I didn't follow this during our install and our shutoff valve leak resulted.
I unhooked everything, backed it all out, reapplied the teflon tape, then added the necessary pipe dope to the whole assembly and brought it all back together. Our minor Necessarium install hiccup had hopefully been resolved.
Knowing my "fix" would only be as good as my supersitions allows, I very clearly said aloud, "NO DRIPS, NO RUNS, NO ERRORS," and turned our water supply back on.
TAH-DAH!
That did it, we were in el baño business folks! With a flick of the handle (which is chrome and not polished nickel, by the way) the dunny flushed and tank refilled without a drip in sight.
We were triumphant! We still need to cut off the extra closet bolts, but we finally had a fully functional secondary Jerry sitting in our master bathroom.
You want to know the funniest thing? We've yet to christen our thunder mug because we "don't want to get it dirty." Yes, those are the exact words Wendy used when describing our completed efforts to a friend. We've completely lost our minds.
Who knows, some day we may even use the garderobe for its intended purpose, but until then, we can just sit, stare, and appreciate our new Jericho in all of it's glory before putting the long drop to use as a functional element in our home.
And if you're counting along, those are just 47 of the many different names a toilet might go by...make that 48.