Last week we gave you the rundown on our wireless DIY home security system search and selection process. After much deliberation and research, we decided to purchase the 2Gig Go!Control system to meet our needs. It seemed to offer the best combination of features, capabilities, aesthetics, and price.
Before I bore you with the details of our install, there's a major question at the end of this post that we need all of you to weigh in on. So even if you don't care at all about this awesome topic, please check out our big debate.
A few days after placing the order, I eagerly awaited the arrival of my box o'goodies. I don't care what it is, if it's a technology item and I ordered it, I get a little bit of nervous anticipation before it arrives. When the box showed up at our door I eagerly tore into its contents like a nerdy kid on Christmas.
This happens to be one of those projects that we've put off for years. We've been talking on and off about a new system since our old one had its first problems back in 2006. But as much talking as we did, we never actually pulled the trigger. To be totally honest, I'm glad we hadn't. Waiting has allowed the technology to come up to speed with the smartphone world, while the hardware has gotten lower profile and better looking. Once the box arrived at our house, well, it got real.
The project quickly moved from concept to reality, and it was up to me to make sure the box didn't sit in the basement collecting dust like so many other projects we'll get to "some day."
Rather than wait, I took the bull by the horns and started configuring our system right away.
The install of the system seemed pretty straight forward from the quick start guide, but I knew there'd be quite a bit of configuration necessary. The manual suggested I install each sensor and device in its intended location, then install the panel, configure and test everything. But I knew that would be a huge pain with a lot of running around the house while doing each step.
Instead, I sat everything down first on the dining room table (which made Wendy less than happy), then on the coffee table and started to work through everything while sitting in the comfort of our couch (which oddly also made Wendy not happy...hrm).
This also allowed me to take my time with the configuration and not worry about taking the old security system down until the new one was ready to go.
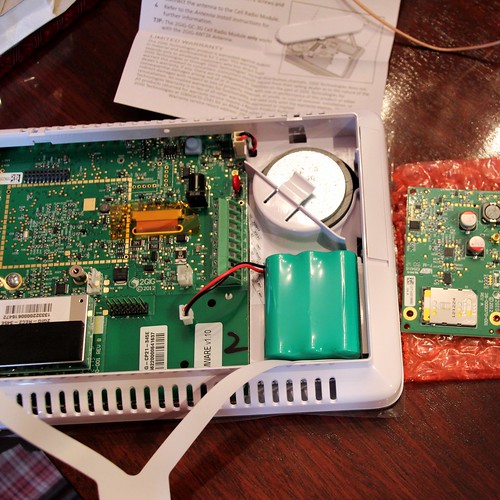
The first step was to install the items I'd need in the main panel. While the main panel comes with the basic items necessary, adding a cellular module for 3G communication with the monitoring agency and the 900mhz module for communication with the additional touchscreen panels had to be done before I got started. I'm sure or can look intimidating, but it was actually quite straight forward.
I just had to plug both modules into their designated areas on the panel's circuit board.
There's also a sticker that comes with the cellular module that shows all of it's pertinent serial numbers and other items that you'll want to stick inside your panel for easy reference.
The next step in getting the system running was to connect power to the panel. Each panel comes with a small adapter plug but no wire to connect each item. This makes sense since the amount of wire each person will need varies significantly. Luckily, I had some 18ga copper thermostat wire in the basement that would work perfectly. I grabbed the wire and my wire strippers and connected the first adapter to the panel.
In order to keep everything straight I opened my laptop and started a Google Doc spreadsheet, and I grabbed our label maker.
To configure, the system, I'd need to designate each sensor along with its intended location in our home. But since they all looked the same, I'd need something to differentiate each one so I'd know where to install it. This is where the labeler came into play. As I got to each component I'd print out a label and stick it on the case to tell me where it's final home will be.
After labeling the device, I'd move into the spreadsheet and enter all of the information about the device. I'd collect name/location, device type, serial number, etc.
Once everything was recorded I'd start to configure the device for use in the system. There's a system configuration screen in the main panel that allows you access to the portion of the software to manage all of your system components. It's here that you define the sensors, system name, how it should act in the system (as a window sensor, as a entry/exit sensor, as an non-alarmed sensor, etc), and all of the other minor details. The install guide walks you through each element and you perform all configuration through the keypad on the panel.
This is not the fastest process in the world, but once you get used to it, it probably takes about five minutes per device you're adding to the system. But with everything sitting on the table in front of me I could add the device, test it, and record it in my spreadsheet without having to run around the house and make sure everything was functional.
Pairing all of the devices with the panel was easy due to the "learning mode" of the system. When I had a device ready to pair, I'd just enter learning mode and then hit a button somewhere on each device, which would then send a signal back to the main panel.
When I felt I had all of the various items configured in the system all sitting on our coffee table, I moved onto the panel install phase. The key for this step is to select a central location in the house where the panel can effectively communicate with all of the various sensors and panels throughout the house. Since the 2Gig main panel is also a control panel, there is some initial thought that it should go near one of the doors in the house, but that wouldn't work for our house like it would for a more traditional home with a centered front door and more traditional layout.
Instead, we opted to install our panel where our previous system's panel was installed, as we knew the previous panel was able to communicate with its system sensors in all rooms of the house.
Install of the panel is straight forward. It just requires a few screws to attach the back plate, followed by wiring up the panel to its permanent power source. We used a spare plug in the basement where our old system has been plugged in, but if we had wanted to, we could have run the wire a pretty major length to any outlet in the house. Luckily we just used the small wire and sort of tucked it away and out of sight. Eventually we'll likely run the wire in the wall to totally conceal it.
One thing I liked about this system was the little handle strap attached to the main panel that hangs over the mounting plate. This allows you to place the panel where it will need to go, but also let's you work on attaching wires and other items with both hands, rather than juggling.
Check out our new panel's sleekness vs our old control unit's oldness.
When I was satisfied with the panel I moved onto the next major step, install of the sensors. Using the labels I attached to each sensor as my guide, I just walked from location to location and stick them in place. Though they all come with screws if you'd like to mount them that way, two foam adhesive strips come with each sensor. Since the adhesive for our original sensors were still holding strong all these years later, and the 3M strips are widely available for future replacement of needed, I just went ahead and stuck each one in place.
After all of the window/door sensors were in place, I screwed the smoke, glass break, and motion sensors into their various locations.
And finally, I placed our various touchscreen panels in their temporary resting places. I say temporary because their final locations haven't been determine as yet, especially for one in particular, our bedroom panel.
Actually, this single solitary aspect of our alarm system has caused some rather heated debate in our home. I'd be lying if I said we'd not reached the point of temporary silence during our discussions. The simple fact is, it all comes down to a basic differing of opinion. The main difference, we think the both think other's opinion is wrong and based around solidly flawed logic.
We both agree that we want alarm panels at the front and back doors of the house, that's a no-brainer. The third panel, in or near our bedroom is also a known item. However, the the question is entered when it comes to actual panel placement in or near the bedroom.
One of us feels strongly that the panel should be placed on the wall in the bedroom proper, showing off the glorious technology and making access to the panel at any time quick and easy. It will be mounted in an inconspicuous area but will add clutter to the wall, will require us to fish a wire from the attic and put a hole behind the panel, and may add unwanted noise/light in the room with voice announcements.
The other person feels the panel should be tucked away in the bathroom closet, out of sight. The panel will still be accessible in the bathroom closet, but running the wire will be simplified as there is already a power source in there. This will also reduce the possible clutter on the bedroom wall, and will remove the risk of light/noise in the bedroom. The primary drawback, it's not right there on the wall and you'd need to go out of your way to check the status of the system, arm/disarm, or call for emergency help.
So, the big question: What should we do with this 3rd touchscreen expansion panel? Team Bedroom Wall and Team Bathroom Closet, sound off!
Next time I'll fill you all in on the monitoring station/company selection, and what sold us on the service. I'll also walk you through the process of setting your system to communicate with the monitoring service, and show you some of what you get with the service we choose.
But until then, what do you think about the 3rd panel? Should it go on the wall in the bedroom behind the door, or tucked away in the bathroom closet? And since I didn't tell you which of us wanted which option, can you guess who is on Team Bedroom Wall, and who is on Team Bathroom Closet?