Last week we introduced you to a major undertaking we had to tackle after the extensive water and termite damage we discovered in our kitchen. The water infiltration, poorly installed and poor quality siding, the shoddy and unsightly architectural element attached to our home, and the failure to remove prior coverings before applying new siding left us with the need to reside the entire wood frame addition on our home.
After covering our rotted and leaking siding in duct tape as a temporary fix while we determined our next steps, we launched into the massive research effort necessary to determine our best course of action. There were three items we had to determine.
- What kind of siding should we use?
- What additional tools will we need?
- How am I going to do the work all the way at the top of the house?
Today I'll cover the first item on this list, as it turned out to be a project in and of itself.
If you have ever looked into siding, or even perused it as a casual home enthusiast, you know there are a great deal of siding options in the marketplace. From natural to synthetic to tried and true, and even to newfangled, the styles and options truly run the gamut.
Obviously there are a few options that we simply couldn't (or wouldn't) even consider since we're living in a historic district. The various mandates, as well as our desire to maintain a certain historic aesthetic, meant we couldn't even entertain the idea of things like vinyl or aluminum siding.
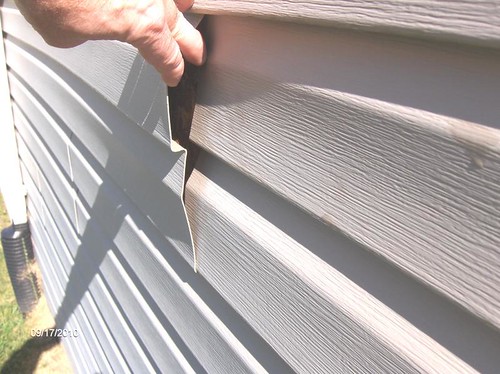
Photo Credit: The Craftsman Blog
We weren't particularly upset by any of these so called "limitations," as we both really like the look of the more traditional materials. Given this little detail one of our decisions was actually fairly easy, we knew we wanted clapboard siding.
While shingle style siding is wonderfully charming on Queen Anne Victorians and along a coastal community...
...in the city you really only see clapboard profiles when looking at wood frame homes. Through extensive research we determined that a "German lap" or "ship lap" siding, where each pieces sits on top of the other inside of a slight rabbet, would be most appropriate.
While we briefly considered using a cement composite and rot-proof product like Hardi Plank, their profile selection was limited to standard clapboard siding. This might work for many people, but we were interested in a more Victorian/period leaning in our profile selection, besides the fact we would have had to get special city approval to use the material. I also had concerns with using this product due to the extra weight it would add to the house and its 100 year old addition framing.
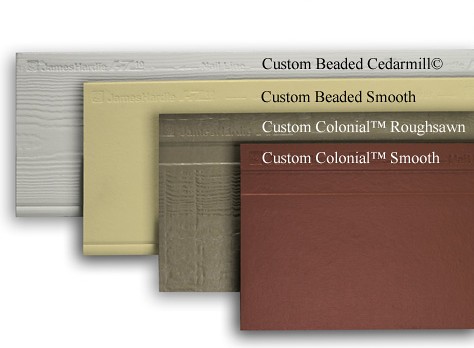
Photo Credit: James Hardi
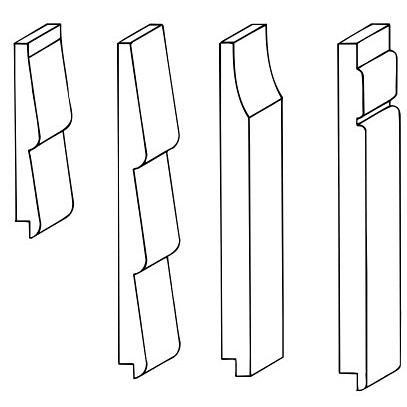
As you can see from the available profiles, they were somewhat limiting based on our preferred look. We definitely didn't want to use one with the faux texturing, and the profile with the bead detail was pretty much what we were already removing from the house.
However, there are several Victorian profiles that would work well for our house. Through our research we found a few profiles that we tend to see throughout Old Town that we felt would be most appealing and accurate on our simple Victorian home.
For whatever reason we were drawn to something similar to SDG 104 from the photo above. Though we have seen several of the other profiles around town, there was just something about this particular pattern that more or less spoke to us. With our profile selected we priced out the profile we wanted in the various material options.
Rather than something synthetic or composite, we decided we wanted to be true to our home's period and use a real wood siding, but we weren't sure what kind would be best. Our first step was to start talking to local mills about all of the various and most common options. Strangely enough, many people suggested using new growth pine, simply due to its low cost and availability. However, the species of wood we would use was a critical component to our project. If we were going to put the time and effort into doing this project ourselves, we didn't want to use materials that had a high likelihood of rotting or failing that would ultimately require us to just do the project over again before we knew it. I mean, the owner who installed the pressed board did just that, and look at how that turned out for us.
Ideally we wanted to use something that is a good exterior rated wood. Western Red Cedar is actually an ideal species of wood to use for a siding project, but it is significantly cost prohibitive to get 1000 board feet of WRC in 16 foot lengths cut on the east coast. As we looked into the options we actually came across using Cypress as a viable option.
Cypress offered several very distinct positives over other materials
- It's a tried and true exterior wood species.
- It has a natural sap/oil (cypressine) that hardens over time, making the wood less susceptible to rot, insects, and mold.
- It's a species of wood that takes paint really well.
- It's far more reasonably priced in our neck of the woods and we were able to get a local mill to supply the profile and deliver it right to our backyard in our required 16 foot lengths all ready to install.
Total bill for the set up, material, and delivery of the siding ran about $2,200. With step one of three out of the way, we threw a tarp on the wood in the yard and allowed it to "acclimate." Well, at least that's what we called "leaving a giant pile of wood to sit in our yard while we futilely worked to get the walls ready for the siding."
The research and purchase of the siding was a crash course in clapboard education, but we felt a little bit better about going into the project once we had the materials decision knocked out. As you can probably guess from the photo, this made entertaining in our backyard somewhat difficult, and Wendy was none too pleased about this aspect of the project. We had to kick it in high gear to get the siding project rolling before fall arrived. But before we could really get to work, we needed to keep working through our three prerequisite items.
Little did we know we'd soon be up to our ears in sawdust, fighting like mad hornets, and having a DIY meltdown that makes it into the top five worst renovation moments in our 10+ years hammering away at this project. Let's just say it involved some tears, some throwing of wood, and some sleepless nights. Yup, we were just getting started.
Do you have any experience with siding profile, material, or wood species selections? I'm definitely very interested in anyone else's experience in making these difficult decisions in your projects.