Well, maybe we ask that you don't stick a fork in our new counters. We're still basking in the glow of their newness, and aren't quite ready for wear and tear just yet. If you stopped by yesterday, we left off covering our ongoing butcher block install and related “quick fix” kitchen upgrades, and took you through the process of how we successfully brought our crap cabinets to level and were able to cut a consistent 45 degree angle and join the two largest pieces of butcher block together. It wasn’t the easiest thing in the world by any stretch of the DIY imagination, but we're happy with the results.
Wendy and I were actually discussing the whole ordeal over the weekend, and about how “DIY friendly” a butcher block countertop is. Our assessment is that, well, it depends.
We'd classify it to be a beginner level DIY project if you’re just replacing an existing counter top or adding a new one with a single piece of butcher block that is about the right size. Like our "wine bar," it's easy when you don’t have to alter it all that much. A little trim, some sanding, and oiling and you’re good to go.
On the other hand, it’s more of an intermediate level of effort if you need to do anything complex with the butcher block. This includes significant trimming, scribing, joining multiple pieces, routing the edge, etc. It’s still very doable, obviously, but it’s not quite as easy as just slapping a piece in place.
And finally, it's our feeling that that it should be considered an advanced DIY level project when you’re trying to do all of the above and you’re also dealing with significantly out of level and poorly built cabinets.
No, we’re not just patting ourselves on the back here and talking about how hard the project is, but we are being realists. We feel like, though it was looking great, the whole process was turning out to be a whole lot more difficult and involved than we thought it was going to be. And that brings us to the final few items before we could officially put a check next to “Install Butcher Block” on our kitchen work list.
To give the new counter tops the diagonal piece that would sit in front of the sink we needed to employ a little bit of wood working trickery. We had plenty of remnant pieces of butcher block from the trimming of the other pieces, so I selected a piece that I could easily cut into a nice triangle. My plan was to then put the same edge detail on the front (hypotenuse) of that triangle, then cope the back sides of the triangle (its catheti) to match the edge of the two pieces of counter we were installing it against.
Easy enough, right? Yeah, it took me almost the whole evening to knock this piece out. If you’re not following my explanation, that’s ok, I’ve got some photos to help.
Remember the router bit we’re using for the front edge of the counters? If you notice, it’s actually perfectly symmetrical and fits within itself. If you flip it upside down it's actually the perfect mirror image.
This means that all I have to do is to flip the triangle piece of wood over and slowly take off enough material to make the back side of the cut a perfect cope of the front. Like routing the front edge, it’s best to take off a little at a time, making several passes to get the desired amount of wood removed.
Starting low and slowly raising the router bit in the table, you can eventually achieve the perfect complement to the front edge cut.
I think this was a case of "measure 45,729 times and cut a little at a time until it's just right." I must have made 100 trips up and down the stairs to test fit this piece. One final thing I did was to trim the very back corner off of the piece I was fitting. This would end up under the sink anyhow, and I just didn't want the corner getting in the way of a perfect fit.
After a ton of futzing and testing, I had a nearly perfect piece of diagonal butcher block, all with the grain of the wood running in the right direction, that fit perfectly in the corner slot. Just look at this beautiful joint.
And I think the icing on the cake is that this joint actually made a far stronger joint than if it were just a flush cut. The two back pieces of counter top actually support any weight put on this new corner piece.
We did the same biscuit joint treatment on this piece, but only on the flat bottom part, and then clamped it together and let it fully cure.
Once cured, I put some wood filler in any and all little gaps, crevices, or spots I could find anywhere on the whole counter top then worked it into those places as good as I could.
Once the filler had dried I sanded the whole counter top in a very methodical manner.
Step 1: Wipe the whole counter top with a damp sponge to bring up the nap of the wood.
Step 2: Sand with 80 grit paper
Step 3: Wipe with damp paper towel, raise the grain slightly.
Step 4: Sand with 150 grit paper.
Step 5: Wipe with damp paper towel, raise the grain slightly.
Step 6: Sand with 220 grit paper.
These steps are supposed to give you a good, consistent, and hard counter surface to work with. So far, it seems to be working for us. And as far as the seam from the corner, I think it turned out nearly perfect once the wood filler was sanded smooth.
Once fully sanded we want ahead and attached the counter top to the cabinets with several 1 5/8" screws. These screws are more meant to just hold the counter top in place since the general weight of it and gravity is enough to actually hold it down.
The next step of our long and convoluted counter top install involved the much dreaded cutting of the hole for the sink. Let me tell you, this is not for the faint of heart. We had spent so much time and effort up until this point that I almost couldn't bear cutting into the wood. If I made a mistake now...I just...I just don't know what I would do. To kick off the process, I made a pencil outline of the sink location based on our previous detailed measurements.
Next, I made a small template using scrap wood (see, more uses for my scrap wood) that would allow us to cut the sink opening using the same straight cutting router bit I used to give me nearly perfect 45 degree angled cuts on the two large pieces of butcher block. This is another case of measure a million times so I can only cut once.
I was able to clamp the template to the counter and use the wall to support the back, giving me a completely stationary base to cut against. The final piece was to screw a piece of wood into the center of the cutout area that would allow us to get a grip on the piece as we cut it away. This piece was critical in preventing the butcher block from falling down and destroying the plumbing and garbage disposal that was still sitting beneath this area.
After about 10 passes, each one taking about 3/8" of nerve rattling wood out of the counter, we finally had a nearly perfect hole for our sink.
It did make it a bit easier that this was an above mount sink rather than under mount. If this were under mount I think I would have made the initial template just a hair more narrow so that I could make one final pass to take off a remaining 1/16" of material to give a nice and consistent edge. Not impossible by any means, but far more difficult.
We giddily dropped the sink into its new home! Can I tell you what a huge sigh of relief I let out when I saw that the sink fit and had no gaping holes around it! What a huge load off my shoulders. I hadn't royally screwed the whole thing up!
The final steps were to secure the sink in place, sand away any pencil lines from cutting the hole, attach the faucet, and apply a bead of silicone around the perimeter. All were relatively child's play compared to the hell of trying to cut the hole perfectly. Have I properly expressed that this step sort of stressed me out?
To secure the sink I just screwed a few pieces of excess wood to the bottom of the counter that pinch the sink into place. This was nothing fancy and I actually used the pieces of wood I had previously used to clamp the butcher block together while the glue dried. Placing the hardware on the sink was quick and easy, since it was just placing back what was already there. The hardest part of the faucet re-install was putting the plumber's tape on the connections. And applying the silicone, well, that took a few minutes longer.
I started with painters tape around the perimeter of the sink to give a boundary of where I wanted the caulk to sit. I tend to be a bit of an "over caulker" so I like to do this when working somewhere that I can't just wipe off excess or paint over it.
With the tape in place, I can caulk to my heart's content without fear of using too much.
Using my finger, I wipe off the excess and force the bead into its crevice. Once it's all wiped, I immediately pull up the tape before the caulk has a chance to skin. This then allows me to make a final pass with my finger to settle down any ridges that were raised. It all took about 10 minutes, but it is invaluable in making a water tight seal that will stand the test of time and protect our counters.
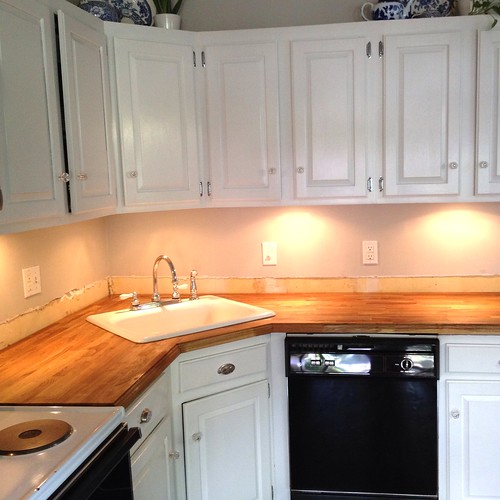
So there you have it folks. We are the proud owners of newly installed butcher block counters. After a bit of caulk cure time and a few coats of mineral oil, our kitchen feels like it's finally starting to take shape.
I think all of my obsessing about the cross piece in front of the sink paid off, as it really turned out great.
But ugh, what about that horrible looking and chewed up backsplash area? Yeah, don't worry, we're working on that too and will fill you in on the deets on that project in the coming days.
We've come a long way over the years. Our first days when our kitchen resembled a hunting lodge didn't give us much hope for what was to come. Those ugly green laminate counters had to go, but we were working with very limited funds.
But using spray paint, we were able to transform the counters for an inexpensive fix that lasted for many years.
But that budget friendly fix had seen better days as we neared a full decade of wear and tear, and it was time we did something a little bit nicer than spray painted laminate now that our budget allowed for an upgrade. So we turned to the enabling and peer pressuring internet friends and blog readers of ours who resoundingly said "Butcher block! Butcher block! Butcher block" (actually a comment from Michelle, a.k.a.The236, on Instagram).
If there's one thing blogging is good for, it's inspiration and good natured peer pressure from our readers, friends, and other blogs. Thanks to all of this, for roughly $400 including the wine bar surface, we now have a new counter top that is a little more fitting for our home, and we couldn't be happier.
We both think it turned out wonderfully, and we're extremely pleased with how it's looking. Walking into the kitchen this morning and seeing the new counter looking back at us gave us such a huge sense of accomplishment and pride that I can't believe we waited as long as we have to actually do this project. That being said, we know we are far from finished with this little project. With a bit of new trim to hide the leveling efforts, a subway tile backsplash, and dare I say new appliances, we think this transformation will be well on its way.
What's your impression of our decision? Is it a significant change to what we had previously, or do you think we should have spent our time and money elsewhere? You can be honest, it won't hurt our feelings. We're too high on the butcher block to take offense.