Over the last couple of weeks we've been recapping our efforts on turning an old and very outdated bathroom into our small but functional home office. After a significant amount of work to make the space a room, and then a bit of extensive work to turn our hacked apart oak floor into something refinished and beautiful, we had just one item left before we should start on our custom cherry desk. But that one remaining item has become one of the most interesting items in our home office - the exposed brick wall.
This wall was the original back wall of our house when it was built in the 1880s. Here it is before we removed the cracked and completely failed plaster.
When we had completed the extremely filthy dirty task of plaster removal, we had our first look at what would eventually be our desk wall. Overall it looked pretty good and solid. There was the HVAC register in the upper left, a little cracking and settling on the bottom left, and a open spot in chimney that was once home to a stove that is long gone. The chimney is actually cut off just above this wall and doesn't exit through the roof, so this stove has probably been out of service for 100 years or more.
Fast forward a few months from the plaster removal and we were onto the point of shoring up the wall and making it pop. The old mortar was crumbling so badly that we wanted to make sure it was cleaned up before we built our desk. We hired a local mason to repoint the wall and fix the hole in the chimney to get the whole thing back into fighting shape. I had really wanted to do this part of the project myself, but for some reason, I was totally scared. A neighbor recommended a mason that had used on their house, so we invited him over to take a look, he had a reasonable price and could knock it out in two days, and he was familiar with working in mortar of old houses. And with that, our mason got to work and actually made quite short work of the project, one day of chiseling...
...and one day of pointing and repair.
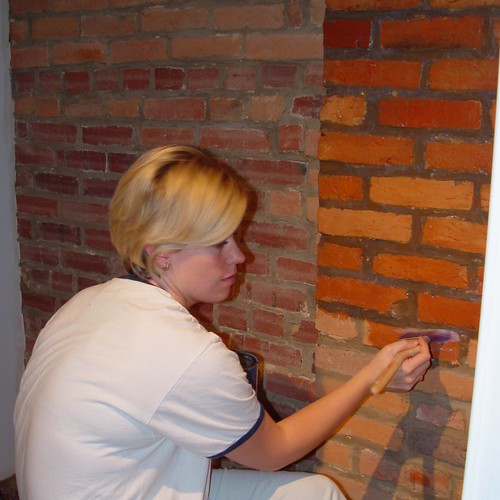
We felt he was a little too thorough in the work he did and the mortar was actually a bit too far into the brick, so before it fully cured Wendy and I scraped quite a bit of the surface of the mortar back. This gave us the look we were going for and we felt good with the end result. After we allowed the the mortar to cure, we cleaned the wall a few more times for good measure, then Wendy applied a coat of low luster, water based polyurethane to the wall to bring out the various colors. You can see just how much the poly made the reds, oranges, and yellows pop in the brick.
We're absolutely thrilled with how our wall turned out, and we still love it every day we look at it. Since this is an interior wall and there was never any intention for an exposed brick look when the masons were building our house 125 years ago, the bricks are all different colors and finishes. I actually like the way this looks and I think it adds some visual interest to the wall.
If you're thinking about doing an exposed brick wall, I absolutely recommend the use of low luster water based poly. It gives such a nice texture and color to the wall, without making it shiny and super glossy.
After we wrapped up the work on the wall and put a coat of paint on the plastered walls, our office as a room was "complete." Now it just needed a desk. But oh that desk, that's a whole other story.
In our final installment of this home office post series, we'll review the dramatic before and after photos, complete with a look at the other side of the room, opposite the exposed brick wall.
So what do you think? Did we make a good choice in exposing this brick, or if it was your home, would you have repaired the plaster? Do you have any exposed brick projects of your own that you've tackled, or an area that you've been dying to get your hands on? We'd love to hear all about it.