This week's Ask Old Town Home comes to us from Old Town resident, Kate. Kate recently moved into her 18th century home and has been having a small issue with her basement's stone foundation. Here's what Kate has to say:

We just moved into a home on Prince Street in December and one of the things that sold us on the home was the amazing stone dining room and kitchen in the basement. According to the man who renovated the house in 2004, the house was built onto the original retaining wall of the Potomac. While they look nice, the stone walls have some issues. My biggest complaint is that they shed a lot of dust. It drives my husband nuts that I have to spend a couple of hours each weekend vacuuming the walls! But we're told we can seal the walls and that we should have it done while we're on vacation with the pets since it is toxic. My husband is still on the fence about doing it. After last night's heavy downpour, we discovered another issue... the wall is "weeping" some water. It's not pouring in, but the stone is wet. What is weird is that it isn't pouring in from the top of the wall; rather it is coming from midway down the wall. We don't even know who to call about this, let alone what can be done about it. Any thoughts? Thanks!

Unfortunately, this isn't a particularly easy one to solve. No matter the "solution," there will always be some unexpected/unwanted side effects. With one exposed brick wall in our house, and a basement that has all brick walls and soft mortar, we feel your pain on both the sandy mess and the weeping walls. Hopefully, even if we don't have a magic solution for you, we at least have some information that can help.

Old Town Home's Answer:

Basement's of the 18th and 19th century were more often created as utilitarian spaces rather than the comfortable and finished areas we've begun to expect in homes. Walls were typically constructed of rubble stone or brick to support the rest of the house, and no significant attention was paid to making those areas water tight. Back in those days the mortar used to set this stone and brick wasn't the Portland cement based hard and largely waterproof mortar we are accustomed to today, but rater a lime based soft mortar. You can easily tell the difference in mortars by wiping your finger across a joint. 

Try it the next time you're out and about. If some sand comes off on your finger, the mortar is probably lime based soft mortar, if it feels gritty and hard, but it all stays in place, your looking at modern cement mortar. Color is often an indicator as well, light tan for lime and darker gray for cement, but this isn't always the case.

Lime based mortar was a very important aspect in old construction, especially with older and softer bricks. Placing the weight of a home on rocks or soft bricks that move and shift slightly over time requires a mortar that will allow this movement. If the pressure of the movement was put on the stones or brick, the end result would be a cracking and failure of the stones or brick, not the mortar.

Today, in Kate's house, the softer mortar is doing its job, allowing 200 plus year old structures in the United States, and much older around the world, to stand proudly. However, the major drawback to these types of soft mortar is the dust that it creates. This didn't use to be an issue when homes never had exposed bricks, but with the modern interest in exposed brick and rock walls, this dust isn't just a problem outside of the house.

We have the same issue in our home office. Every week we have to clean off the desk where a little bit of mortar has fallen out and collected. It's not that bad since we had the bricks repointed (old and unstable mortar removed and replaced with newer and more solid mortar), but it still occurs.

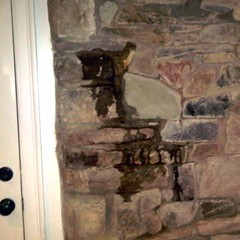
In Kate's beautiful kitchen/basement, she has a much larger surface area, which also means more dust. Take a look at her beautiful walls.

The secondary issue with this soft mortar in basement locations is the fact that the earth is just on the other side of the wall with no membrane to keep moisture away. When it rains, the mortar is porous and allows water to seep into the basement. I know some masons that call these "point weepers." They don't typical cause issues in unfinished spaces, but they are a serious headache when your basement has beautiful salvaged floors and is a livable space. Kate is having this issue when it rains heavily and the ground becomes saturated, and that leads to what we saw in the photo we showed above.

Let me be the first to say, Kate is not alone. Just look at what we were met with after the first really big rain we experienced in our house. If you were reading yesterday and saw our backyard flood and pond floating away, this was the same rain storm that caused the following in our basement.

The first reaction with something like this is to seal the wall. As you can see in our photo, the wall was previously sealed with a thick white paint sealer but has seriously failed. But in the case of Kate's basement,  the wall is gorgeous, and you don't want to hide it with some sort of thick water proofing material, especially if it isn't going to work. Your only real option is to use something clear, like an oil based polyurethane. This will both seal the dust and sand into the mortar joints, giving a good sheen to the stones, and may help to keep some of the water from coming through the joints, but this isn't a true water proofing approach. 

Here's Wendy applying some polyurethane to our office's exposed brick wall. You can see the difference in color that it makes, and it really made our office wall look much cooler.

While applying a polyurethane may help, you have to keep in mind that the water on the other side of a basement wall is still there, still trying to get out, and it might just find a more destructive location to come out if the first location is blocked.

What we can say is that, as you saw above, we've applied polyurethane of this sort indoors and the fumes really aren't that bad. With our old house being so loose from an energy standpoint, just leaving some windows open tends to solve the fume issues while it dries.

While covering your walls with polyurethane will seal in the dust and give a nice look to the stones, to truly solve the water issues usually requires a far more labor intensive and expensive approach. It makes sense that the water will come through the walls if you consider that any water sitting behind the walls during a heavy rain has no other place to go. Once it's in the ground, the water is stuck, and it will look for the path of least resistance. This path is almost always through the basement walls. When the water is minor, as it seems to be in the photo, you can often just let it dry and understand you'll have the occasional weeper.

But if this gets worse, and you have water collecting on the floor and not draining from the basement, your goal should shift to water removal, not water proofing. What I mean by this is to give the water that would otherwise come through your wall an alternate and easier place to go, like a drain to a sump pump that will then pump the water up and away from your house, or improved drainage on the ground around your house to take the water further from the foundation.

To accomplish this there are several approaches, but one is more straight forward while the others are going to have significant cost/labor associated with it. 

  1. First you can install improved drainage pipes on your downspouts and burry drain tiles in the ground anywhere that you notice water coming onto your property from your neighbor's property. This will hopefully keep excess water out of the ground around your basement walls and will result in less overall saturation and leaking. This is a first step to see if you can get yourself to a point where you are keeping enough water away that it won't find you in your house.

  2. Second, and typically the best (but most expensive) option is to install a "French drain." A French drain installs either inside of the house beneath the basement floor and around the interior perimeter of the house, or more typically it is installed outside of the house, dug down quite deep and embedded at the base of the foundation. The drain is perforated and covered in loose fill stones that allows water to enter the drain through the holes rather than collecting behind the walls. The water then runs through the drain to a sump pump, where it is eventually removed from the house.


    If you don't already have a French drain, it very well may take care of your water issues, but it's often quite pricey for the install. If you do have a French drain already installed, there's one more option.

  3. The final and most labor intensive option is to dig down around the foundation of your house, nearly to the bottom of the foundation wall, and apply a sheet of water proofing material to the outside of the wall before filling it back in. The material will then be affixed to the wall with some sort of adhesive and will extend above the surface of the ground. Where the material comes above the ground it will then lean back toward the house and will not allow water between the material and the foundation wall. In short, this means tons of digging and lots of labor, but it's still not foolproof. The material will be in contact with water almost the entire time and is bound to break down and let water in over time. So it seems like just about any solution will have a level of dependability issues.

Though I don't have the magic solution, I think the most important thing to remember. As much as we all want bone dry basements, your house is over 200 years old with a rubble stone foundation, so some issues tend to be expected. If your water seepage is only as bad as the photo shows, I think you're in pretty good shape overall, but if it gets much worse, hopefully this information will help.

Does anyone else out there have any great ideas on how to deal in the mortar dust and work towards a better sealed basement wall? What would you do in this situation? Drop us, and Kate, a line to give us your two cents on the matter.

Do you have a question? Just head on over to our "Ask" form, located in the right hand column of the site and fill out any questions you may have about our projects, your projects, a recipe you saw on our site, Alexandria, Washington, DC, or or anything you think we may be able to help you with. 

Disclaimer: Ask Old Town Home is meant simply as a friendly bit of advice and is provided free of charge. It is your responsibility to fully research any and all items related to projects or suggestions to ensure proper safety and code precautions and regulations are fully followed. In other words, any advice we provide is just our opinion, and our opinion is only worth the price we charge for it. :-)

Comments 28

Comments

6/7/2012 at 10:12 AM
Very good recommendations on actually dealing with the water and seeing if there's a way to keep it from collecting on the backside of the wall, but for sealing the bricks, I've been really happy with Behr's Low Lustre Sealer. Granted, I haven't ended up using it on an exposed surface — I ended up using it on bricks that I mostly ended up covering up, but I liked the look. Not to bright and glossy, but it definitely keeps the powder in.

A lot of the bricks in our house that have had water damage over the years inside and out were turning to powder. On one big wall of them, I brushed them to get as much loose powder off as I could with a wire brush, and then sprayed several coats of that Behr stuff on (I didn't brush it, though I think you can do that too.) Sealed em up nice without too much sheen. Vapors weren't too bad either. You might want to test on a small area first if you try that product. Note, our bricks are crappy looking, so they just got covered up with a new wall. :)

www.flickr.com/photos/whiteknuckled/5212767817/in/set-72157625356557551
Alex
6/7/2012
Given the age of your house, I think the brick you're dealing with is the harder faced brick that the sealer should work well on. Do you know? Is this the case?
Davina
6/7/2012 at 10:32 AM
I am on Royal Street and have the same dust issue in my basment from our 220 year old stone walls (they were sealed with thick white paint at one point but need a touch-up - add to the loooong list of stuff to do!). My question is about sealing brick - we have brick floors in the basement that I would like to seal. Any tips on how to clean the floors before sealing? Also, would you use an oil-based ploy, or something else for a floor vs. wall? Thanks!
Alex
6/7/2012
I like the oil based poly for its durability, especially in a floor application, and probably a low luster option. As for cleaning, I think soap and water, lots of it. You need to get as much grease and dirt off of the floor as possible before applying the poly.
6/7/2012 at 10:39 AM
Boy, do we know about basement issues. Our walls are stone that someone decided to paint years ago and we have experienced the same kind of seepage issues shown in the picture. Unfortunately, the only way to deal with it is to dig out around the foundation wall (Option #3). We pretty much did what Steve described in his post above, except we added a step in between the digging and sealing.

The stones that make up our basement walls have mortar on the inside, but on the outside they were simply stacked. If they were still doing it this way in the 1910s when our house was built, I'd bet my next paycheck that 99% of pre-1800 buildings are the same way. We pointed the spaces between the stones on our outside wall using hydraulic cement (after wire brushing, of course), then applied sealer to the outside of the wall up to just below the ground level so it wouldn't be visible. The hydraulic cement is not period appropriate, but since it's underground, no one will see it.

One last thing that is also critical to a dry basement. Make sure the downspouts are emptying as far away from the foundation as possible and that the gutters are actually doing their job. We had one gutter that had dropped slightly in the front and it wasn't catching the water as it ran off the roof. Also, when we first bought the house, some Einstein had the downspouts emptying right at the foundation walls which meant that every time we got a hard rain, there was a nice puddle in the basement.

Hope this helps some! At least it's worked for us so far!
Alex
6/7/2012
Great information, thank you for the insightful comment. I've seen and heard of the issue you described with no mortar on the exterior of stone foundations. Back in 1800 gravity was all you needed since nobody had finished basements.
Jennifer
6/7/2012 at 11:17 AM
Our house was built in 1936 so this is probably not as helpful advice for a 200 year old house. We did a similar system as to what you outlined in (2). Ours is an interior, perimeter drainage system we had installed in 2008. We also had similar problems with weeping from mostly the floor. Of course the sump pump and pit was located on the other side of the house.

We are so pleased with this. Heavy flooding in 2010 in Iowa proved that the system worked flawlessly. I will say it was eerie hearing all the water flowing around and then the sump pump firing and dumping water every 2 minutes.

It is was well worth the peace of mind. However we didn't plan on having a water pipe fitting burst in our bathroom 2 years after that we had the work done. And it flooded the house again. But that is a story for another time....
Alex
6/7/2012
I'm curious about something with the interior drain. When it was installed was a channel cut, pipe buried, and new cement put in place over top of it? Was it all done at once, or was it done one wall at a time? And while it was being installed, was there anything special that had to be done structurally to ensure the house kept standing? Just curious.
Karla (threadbndr)
6/7/2012 at 1:47 PM
Oh boy, looks familiar. I will never fully finish the basement in the bungalow since the walls are stack stone mortared inside and outside above ground, not sure about the below ground, but I have my suspicions that they are not. (Rather like Tom and Jada's above.

I second the recommendatation to look at your guttering/run off situation first. Also check if the neighbors have changed around THEIR guttering or made a landscaping change that might have re-directed run-off toward your foundations.

And another thing to check. I don't know if they used them on the east coast during your time frame, but here in the midwest at the turn of the century, cisterns were common. These are rather like in-ground rain barrels with a hand pump to get the water back out. They are usually located right next to a foundation wall and all (or most) of the downspouts drain into them. The problem is that they are usually just stacked brick (unmortared) and do collapse over time, causing sink holes and boggy spots in the yard and basement water issues.
Alex
6/8/2012
Now that you mention it, I don't think I've ever seen a cistern around here for that purpose, though we've seen a fair share of wells that each block used to use for water a long time ago.

We hope to finish our basement some day, but I think it will always be an exposed brick type of space.
Kelly
6/7/2012 at 2:57 PM
Oh boy does this sound familiar. I have an exposed stone interior wall in my dining room -- dust galore. And during the summer sometimes I see little critters like house centipedes go in and out (EW).

I had always thought we were going to just pay someone to repoint it because you first have to dig out the old mortar to replace it and wasn't comfortable DIYing that. I will definitely look into this sealer though. Do you think it will work on non-smooth surfaces like rock and not just brick?

Wet basements -- Kate you're not alone. Our basement is rubble I'm sure, but its covered in some kind of plaster and white wash (which is conveniently peeling in water prone areas). Our basement is definitely just for storage though. Although the most expensive and intensive, I think John's option #3 will completely eliminate the water problem for you. I've seen Mike Holmes do this on his show. They put hydraulic cement in all the cracks in your foundation after they dig it out, paint it with this rubber membrane and then screw in these giant rubber sheets that collect water down into a weeping tube system that is buried along the foundation. If your water seepage is just on one part of the house (just back or side wall) you might get away with just doing it on that side though to keep cost down. Let us know what you decide!
Kelly
6/7/2012 at 3:04 PM
Alex's option* Where did I get John?

Anyway PS Alex, how well did you guys clean your brick wall before applying the poly?
Alex
6/7/2012
Hah, no problem. When we applied the poly on our wall we cleaned, cleaned, and then cleaned it some more. It seemed like every time we cleaned it, more dust and dirt showed up on the wall. I think we cleaned it with sponges and water at least four times. Eventually I started treating it like you would sponge grout off of tile.
max1023
6/7/2012 at 4:26 PM
With old brick you can't just add any type of mortar between the joints. Old bricks were softer and the mortar they used was softer so if you have soft bricks and you use mortar with portland cement it will cause the bricks to fail prematurely due to the mortar being a much harder material than the brick. This one is a question. I've heard that sealing bricks from the inside is a bad choice because the water will still permeate the bricks but now it's trapped by your waterproofing thus causing the bricks to prematurely fail. Is this not right?
6/7/2012 at 9:40 PM
You're right - that's true for old brick walls (roughly pre-1930) because the bricks are soft and porous and often held together with mortar that is mostly lime and sand. Portland cement has been around since the early Industrial Revolution and it was used in some mortars, though it was uncommon in the US until the late Victorian era. The optimal method for re-pointing old mortar in a brick wall is to take a sample of the original mortar, send it out for analysis, and then try to recreate the original combination as closely as possible. All old mortar is a little different since it was usually mixed on-site in the old days.

Stone is a little more forgiving than brick, especially in a case like our walls where there was no mortar at all between the outer stones and the new mortar was simply filling the open gaps.
Alex
6/7/2012
You're right on the old brick. Our brick is that old and soft brick, so we need to make sure to use the correct mortar for any work we do. As Tom and Jada said, you don't need to worry quite as much with a stone foundation. As for premature failure due to trapped water, I've seen this first hand, but it doesn't affect all bricks equally. I've seen painted bricks fail right next to painted bricks that were still holding strong.
6/7/2012 at 7:16 PM
Sealing a brick basement wall in an old house with soft bricks can cause more problems than the sealer is intended to solve. Not only can water come through a wall like is shown in Kate's photo, but it can be soaked up from the ground and wick up through the wall ... escaping into the house as water vapor ... otherwise known as rising damp. Sealing a wall when you have this problem drives the vapor higher into the wall, potentially causing dampness in the upper levels of the house. A soft brick wall with lime mortar is supposed to breathe. We spent quite a while in our old basement removing inappropriate wall treatments (gypsum plaster, vinyl wallpaper, and imitation wood paneling) to allow free movement of vapor. A good dehumidifier takes care of inside humidity problems.

The advice to get as much water away from the house mechanically is sound. Gutters, drains, grading, etc., will greatly lessen the amount of ground water that can potentially enter the basement, as vapor or as actual seeping water.

The dust thing makes me nuts, too. Because some of the bricks in our basement are damaged, we get brick dust along with our mortar dust. I vacuum a lot downstairs.
Alex
6/7/2012
Over the years if I've learned anything it's that water will go where you least expect it, including uphill and up walls. It's crazy. If you have wood in your house, and it is sitting on a surface that can wick water, the wood will act like a tree and will suck the water into the wood structure. In many old brick foundations you can see slate laid every couple of rows of brick. The purpose of the slate was to stop the moisture from wicking up and into the structure. It's sort of cool to see this stuff and how resourceful builders have been through the years.
Jennifer
6/8/2012 at 12:16 AM
I'm curious about something with the interior drain. When it was installed was a channel cut, pipe buried, and new cement put in place over top of it?

Yep - it is all sloped and runs into our existing sump pit.

Was it all done at once, or was it done one wall at a time?

We did it all at one time. We hired it out and it took several guys about 2 days to haul out all the rubble. Then another 2 or so days to lay the new pipe and cement over it. We already had most of our big stuff moved out to the garage. Things that couldn't be moved easily (washer/dryer) we just moved towards an interior wall and covered with plastic.

And while it was being installed, was there anything special that had to be done structurally to ensure the house kept standing?

There was nothing structurally wrong with our house. Water just would weep up from the floor and puddle all over. This was an issue with a finished basement and carpet as you can imagine! We kept up with the water invasion with lots of vacuuming so it wouldn't affect our expensive stuff (tv, computers, nice furniture, etc).

Here's a link to our photo album describing what we did. picasaweb.google.com/118202727384391399121/BasementRenovationProject#

Of course after the massive waterfall in 2010, the 'finished product' at the end of the album looks nothing like it does now.
Alex
6/8/2012
Thanks for the response. Not sure if you can tell by my line of questions, but I'm pretty sure we're going to be doing this work in the next several years. The photo album is very helpful in illustrating just how it was done. My question on the structure was more any stability issues that arose when the guys doing the work cut out a portion of the basement floor, and if that required any temporary bracing while the drain was being put in and new cement poured.

Our basement, in addition to the water that comes in through the wall, has been known to have water come up through the cracks in the floor, so it seems similar to your issue.

Thanks again.
Jennifer
6/8/2012 at 11:10 AM
They only cut about 6 inches away from the wall and maybe 4-5 inches deep along the foundation wall. The only exception was the run they made through the laundry room floor. They originally weren't planning on doing that, but the laundry room actually sits lower than where the sump pit is. Because of their warranty, they didn't want to have to come back and redo it if water ever got into the laundry room. They trenched that about a foot deep and connected it back to the media room.

Our contractors never mentioned needed to brace the walls. My guess is that since they were in good condition and cinder block. Most houses here aren't much older than 100 years old and if anything they are poured concrete or block.

We did visit an open house with my brother when he was house hunting, and they had to do the entire bracing system + waterproofing. It looked really scary.

I guess my husband removed the good pictures of the removal from that album I shared. Here's my facebook album that has more pictures of what they actually did.

We still need to replace the sump pump as they couldn't do it when they were here (permit reasons with city). Our pump also dumps out to our backyard which is also a no-no, but I couldn't bare the idea of trenching and spending double the money to tear up our front yard to do that too.

www.facebook.com/media/set/?set=a.120666251651.111744.612776651&type=3&l=2d85860379

Our
contractors (they were great btw)
www.midwestbasementsystems.com/

I
love your server rack setup by the way. I'm still trying to get our NAS/media box set up next to our puny patch panel and switch. One of these days....
Katyavp
6/8/2012 at 1:20 PM
Thanks all! This is great information and I am so glad to hear I am not the only one driven insane by the constant dust. We have an appointment with a drainage company and will also look into sealing the stone.... Much easier to go down that road knowing that the fumes aren't so bad that we would have to vacate for a week!

I did fail to mention that we do suspect the water issue may have a little to do with the fact that we were forced to relocate our downspout by the City ( the owners of the vacant lot next door complained to the city that our downspout was discharging water onto their property). We have added an extension pipe to the end of the downspout to carry the water further away from the foundation and into our small brick backyard,, but still had a tiny bit of water seepage during the last heavy storm. I'll keep everyone posted since this seems to be a fairly common problem readers have had!

Kate
JC
6/9/2012 at 12:03 AM
My 2 cents:

I haven't read any information about this, but from experiences with finishes in general, I would think that sealing interior brick walls (especially if they are prone to dampness or water issues) would be a big mistake. I would think that in no time the moisture would cause the finish to peel off, flake, or become blotchy. I think it would also help trap moisture in the wall, and cause other problems (like a rotting sill plate or support beams due to increased moisture).

That said, if you can find info to the contrary, I would suggest using a sealer designed for stone (like the stuff that I used to seal my slate bathroom tiles), and to get it in a low gloss or flat finish (mine was flat and it looks great).

I'll also add that my 1920's poured concrete foundation had several bad leaks in it when I first moved in, and I was able to patch a few of them. In most places, simply getting water away from the edges of the house has largely solved the problem. One of the worst places was caused by the neighbour's down spout that would occasionally get knocked crooked and cause all the water to go against the house, rather than down into the driveway. That was an easy fix.

My foundation has also been painted and parged on the inside and 80% of the paint is flaking and peeling off in small flakes.
10/30/2012 at 3:37 PM
Great post! Glad to hear I am not alone in my old basement woes!

We have a 100 year old storefront with a brick basement that was painted prior to our purchase of the home. We had some unfortunate major water seepage into the basement about a year ago due to some drainage issues outside from a neighbors roof. The walls went from a nice white painted brick to exactly what you've pictured above, and of course we have the brick dust as well. At first I thought it was termites in my fir floor joists!(so I was happy for it to be just brick dust) Our basement has no windows, and we will never finish it completely, but I would like to have a nice laundry/workroom. We cant do exterior waterproofing as we are attached on one side, and have a 6" space between buildings on the other. We have a basement floor drain that is attached to our main stack. So I plan on fixing the slope of the concrete floor so that it actually leads to the drain, then adding dricore flooring panels. The walls are a much harder fish to fry. As they have already been painted, I think my best bet is a thorough cleaning then something like Behr's Basement Sealer & Waterproofer. I also had a hair brained idea about building a wall out of wood that would sit a few inches away from the brick wall allowing air to move around, and hopefully expel moisture, while looking nice. A dehumidifier is also in our future. Oh the joys of home ownership
1818Federal
1/29/2017 at 10:13 AM

This article is soooo helpful! Ive written mutiple sites to get responsible solutions to several areas of my early 19th century home. One area is: the BASEMENT.

Issues (Opportunities in disguise):

1) WATER WHERE WALLS MEET FOUNDATION.
This became standing water when we had weeks of rain. Efflorescence, concrete overlayer, and crumbly mortar among huge orangey bricks were the signs of the house's history with the ground inches below.

Solution: gutter maintenance, low point downspouts rerouted/buried. (high point downspouts had alread been done.) and the big one : over 100ft of perimeter wall interior drain and sump pump. THE DRILLING DUST WAS ENORMOUS! (and the cost)

2) INSIDE WALLS "WEEP" MOISTURE

Solution: this brick is being repointed at the bottom , using "newer" brick and current (cement) mortar. Interior perimeter drain has worked well to relieve/redirect subsurface pressure on the interior walls facing outside.

3) LOW CEILINGS & EXPOSED INSULATION

It is 6.5 feet from concrete floor to insulation. Currently seeking solutions for safe mancave/recreation room. To be cliche, "1000 sf is a terrible thing to waste "

Solution: need Ideas! Fire retardant fabric in between the joists?

4) KEEPING DUST DOWN
Dust from the concrete, dust from the old mortar, dust from the fiberglass insulation... DUST!

Solution: anything else besides hosing down the concrete , sealing brick, and covering insulation?

John K
5/5/2017 at 1:14 PM

I have an issue that is touched on , but not the issue I have. I have a solid concrete 3'5" foundation wall in the garage which is dusting for about 12' feet in length and it's only dusting on the bottom for 4"s from the garage floor. I have tried sealing it with rubberized cement paint which of course is pealing. Now the amount of dust that has eaten away at the wall is almost 1/2" in depth. Do you think a polyurethane coating or spray will stop the dust enough so that I can apply hydraulic patch to the area and then finally repaint? Thank you in advance!
PS: I have Zero Water or Moisture coming through the wall !!!

Katherine Montgomery
9/13/2019 at 8:11 AM

Water was pouring into our basement just where the gas pipes came through the wall. The gas company had installed the pipes then filled the pit with gravel! I dug the gravel out and filled the hole with good soil, then channeled the surface over to the driveway which runs down to the street gutter. Inside we filled the washed out joints with spray foam. Ours is just an unfinished basement, with a dirt floor but it stays fairly dry if we open the window s in summer.

MarkHenry
2/4/2021 at 11:36 AM

Very good recommendations on actually dealing with the water and seeing if there's a way to keep it from collecting on the backside of the wall, but for sealing the bricks, I would recommend professionals do it.

Since you've not signed in yet, you will need to fill in your name and email below. If you have a Facebook account, save yourself a step and use Connect to login.

Denotes a required field.

Please enter full URL, including http://

You can use Markdown syntax in your comment. And you can also use lots of Emoji!
  • Search

  • Login
  • Follow
  • Advertising

If you're looking for information on advertising and sponsorships, head on over to our sponsorships page. You can purchase site sponsorships in a few easy clicks. 

Toolbox Tuesday
Open Housing
  • We're Featured!

Old Town Home has been featured in the following places and publications:

The Washington Post
 
Washingtonian Magazine
 
Domino
 
Old House Journal
 
 
Apartment Therapy House Tour
 
Washington Post Express Feature
 
Home & Garden Blogs
 
© 2024 OldTownHome.com. - Privacy Policy
Login Below
or
Sign in with Facebook
Connect

Unexpected Error

Your submission caused an unexpected error. You can try your request again, but if you continue to experience problems, please contact the administrator.

Working...

Working...