Tuesday, September 13, 2011
Yesterday's post about the door hanging work we completed over the weekend revolved largely around the jig I used to place and properly size the hinge mortises in both the door and door jamb.
As I mentioned, in our years of home renovation, there are few tasks more difficult than hanging a door in an opening that hasn't already had mortises cut for the hinges. Getting the hinges to line up properly, getting the door to fit in the opening, proper depth and reveal on the hinges are all tedious items that will quickly derail your project if done carelessly or incorrectly.
As with almost any home project, using a tool or template that can aide in the completion of a repetitive or delicate task can only help the chances for a positive outcome when all is said and done. For this reason, a couple years ago, I looked into hinge mortising jigs that might be able to help out with our projects. I knew I'd be doing quite a bit of mortising of hinges and hanging of doors, so I figured a jig was worth it.
When I started looking around, I came across every option imaginable. Anything from a pocket template to help you set your chisel for mortising, to large several hundred dollar metal jigs that could affix themselves inside of the jamb or clamped to the door that could cut all locations without need for adjustment.
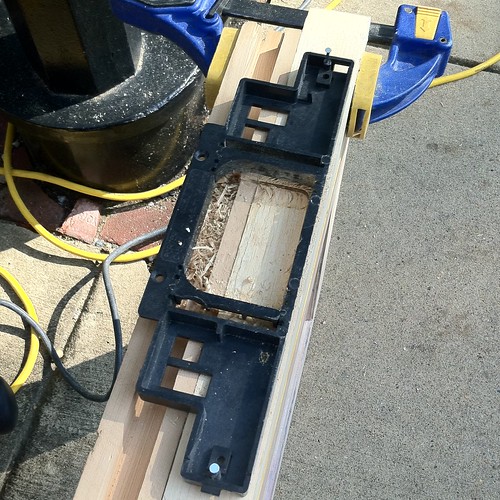
Ultimately I settled on an inexpensive but very effective solution from Porter Cable. The jig I purchased came with a hinge mortising router bit that fits any router that accommodates 1/4" bits and a black plastic template with movable stops. The stops could be set for anything from a 2 1/2" hinge to a 5" hinge. The newer version is even far more configurable than the one I bought a few years ago. There are two small holes in either end that let me secure the jig to the work with small nails, and several points of reference for properly lining up the jig for the correct thickness door (though I find I rarely use this with all of the odd sized doors and jambs in our house).
The included router bit has a collar bearing that acts as a guide for the template. Set to the proper depth, the bit uses the inside edge of the jig to cut a consistent depth and even line around the hinge location. When done, i just pulls the nails, remove the template, and clean up the rounded corners of the mortise with a chisel. Each cut usually only takes a few minutes. The final step is to fill the small nail holes with your standard wood filler and sand.
Note: When I set the nails to secure the jig, I don't drive them all of the way in, this way I can easily remove them with the claw side of the hammer.
Overall this jig has been extremely useful. It has worked reliably and accurately each time I've used it. I was even able to cut my own set of stops for the jig that allowed me to make a small 2" hinge mortise for some storage doors in our master bedroom.
I've had a problem from time to time with accuracy and letting the router touch the jig (and taking small chunks out of it), but that is my fault, not the jig's. In all, I've been pleased with it's performance and my use of it. I also would like that router bit to have a thicker shank to stabilize the whole cut, rather than its small 1/4" shaft, but that isn't the most critical component.
If you're thinking of hanging doors in your house, it is well worth your nickle to pick one up. It let's you set up quickly and knock difficult projects out before you know it. Best of all, it's less than $20...a deal compared to many other useful tools.
What do you think? Do you have a preferred hinge jig or approach for mortising hinges? Maybe a homemade one? Leave a comment and let us know.
Did you enjoy reading this post? Want to learn more about our first-hand experiences with other tools, devices or items used throughout our renovation? If so, check out our complete list of product reviews in our Toolbox Tuesday section.
Note: We weren't compensated for this review. We simply want to share good products when we see them, and hope that learning from our mistakes can help save you time, money and frustration.