We're getting down to the nitty gritty with the work on the new front door. It feels really good to be making some serious headway and it almost feels like we might actually get the project finished! :-)
We still have a lot left to accomplish, but we're finally to a point where we are knocking the items out fast and furiously as we approach the finish line. Now is as good of a time as ever to bring you up to speed on a few of the smaller items that has us humming right along on the door. Let's get you all up to speed.
Hinge Install and Hanging
A little while back we worked to get the front door installed and hung on the salvaged hinges. Previously we purchased several sets of 3 1/2" salvaged decorative Victorian hinges with steeple tips that we are using throughout the first floor of the house.
The new front door we purchased ended up needing 4" hinges because of the size and weight of the door. This was a bit frustrating since we already had the other hinges, but we lucked into a very rare situation. One of my favorite online architectural antique stores, Mowery Antiques, actually had a set of the very same style hinges of hinges we already owned in the 4" style. It was a great and lucky find, so I snapped them up pretty quickly.
Once we had the hinges in hand, I started working on mortising the hinges on the door jamb. The door already had mortised locations for the hinges, so we just had to concentrate on the door jamb. I decided to go the old school route and use a chisel to mortise these hinges.
As you can see from the photos, the new hinge location on the top is slightly below the old hinge location for the double doors. We'll have to fill that in with wood epoxy and paint it, but that will be an easy task. Once the hinges were mortised into the jamb, I marked the screw locations, drilled pilot holes, and attached the hinges to the jamb. A few minutes later, the door was hanging in its soon to be permanent home.
It's hard to see from the photo, but the door was a little bit too narrow for the opening, especially at the top right, the door jambs are a little bit bowed and required the door to be shaved slightly on the left hand side, and we already had to do a lot of work on the top and bottom to scribe it to the opening, but this was absolutely a significant step in the process.
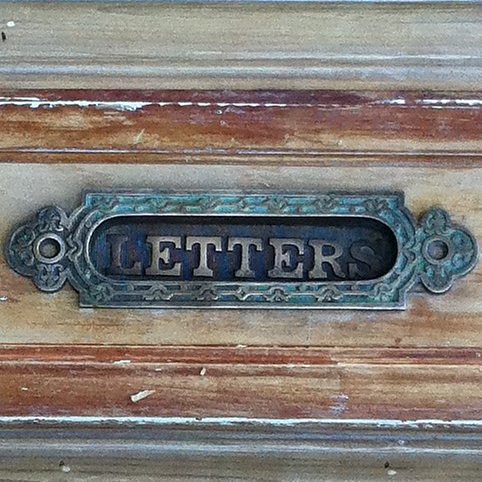
Mail Slot Fitting
Over the weekend, while we were taking care of the door width issue, I had the door outside set up on saw horses. I figured that I would take advantage of the door being set up on a nice and level surface, and it was as good a time as ever to cut the hole for the mail slot.
Since the panels are floating and are not really held in place without the molding, I had to install the molding on just the middle panel to ensure I would be cutting true center.
This is where my convenient labeling of the pieces came in very handy. I went to the basement, looked through the stack of molding for the ones labelled Outside Middle (Left, Right, Top, and Bottom), located them after about one minute and then placed them on the door to get the fit right.
And no, I didn't recently make a stop at Ann Taylor Loft. The bag seen in the photo is where I keep all of my air nailer nails. Reduce, reuse, recycle, right?
I fired up the air compressor and determined which size nail to use to make sure they wouldn't end up poking through the other side. (I used a 1" brad nail.)
And about three minutes and 12 brad nails later, the first pieces of molding were installed on the door. Progress!
Since the panel was no longer floating, I could be a little bit more confident in the placement of the mail slot. We marked the center point of the two pieces of wood above and below this slot, then established the ideal location for the mail slot based on this center point.
Once we had the spots marked, I drilled a few pilot holes and started cutting out the material with our awesome jigsaw.
About ten minutes later, we had an actual mail slot that was about the perfect size for the salvaged one we purchased.
Unfortunately, it was about this time that I realized that the mail slot door, which is somewhat soft brass, was actually broken. The flap has a tendency to come off when you push in on it. This isn't something that will work for us, so I will either need to figure out a fix for it, or we will need to buy a new one. Two steps forward, one step back...
Also,with the thickness of the door, and the way the mail slot is constructed, the flap doesn't easily open. The material of the door actual gets in the way of it actually opening. This is also something we will need to deal with before we get to actually say the project is "done."
Trimming the Door
After we completed the major effort of adding width to the door with tons of glue and clamps, we had one final step before we could test the door in a proper hanging fashion. We had to trim the excess wood from the right of the door.
The door jamb on the right of the opening is actually slightly bowed into the door in the middle of the jamb. Because of this, I knew that cutting the door wouldn't be the easiest thing in the world, so I prepared for it before we took the door off of the hinges.
I made pencil marks on the door every six inches or so. These marks denoted a point on the door that was 4" away form the door jamb. My thought was that once the new piece of wood had been added to the door, I would be able to take these measurements and trace them on the new piece of wood to remove the proper amount. So I used the ruler and the square the accurately mark the new piece of wood for the location where I would attach a guide that we would use to cut the excess.
With the marks in place, I used a piece of wood as a guide and clamped the wood to the door. I then bent the wood slightly to mimic the bow of the door jamb, and then clamped it to the door to make sure it would stay.
Using the circular saw, I cut the excess material away. Once I got near the clamp in the middle of the door I stopped the saw, moved the clamp, and started it back up again. It was surprisingly a smooth process, especially considering the rest of the project.
With our work to expand the width of the door complete, and the excess trimmed, we faced the moment of truth to hang the door in the opening.
At first, when we hung the door, it didn't even come close to fitting. I didn't know what the issue was and just thought I screwed up. A few minutes later Wendy pointed out the large gap on the left of the door. It seems I forgot to tighten the hinges and the door was actually sagging quite a bit. A quick tightening of the screws and the new salvaged door fit like a glove!
With the door trimmed and in place, both Wendy and I were very excited. (I think we did a happy dance of sorts and a few high-fives.) There is still quite a bit to accomplish before painting, and the punch-list includes: install the rest of the molding, fill old holes with epoxy, drill peephole, drill and install new knob and lock, sand the old and new pieces to remove any lines, get the mail slot totally working, and then sand all of the wood filler.
As you can see, still a lot to do, but these are all relatively small tasks compared to the overall project.
This may be the project that would never end, and we still have plenty to go my friend. But we're on our way and happy with the progress. At least we always seem to have an audience in Lulu when we are working on this project.
Let's take a look at our overall checklist to see where we stand. I've broken the main door step into sub items. That always make me feel like I'm doing more and getting a lot accomplished.
- Renovate the space, walls, ceiling, molding, strip, patch, paint
- Install new tile floor
- Make interior transom window operational
- Purchase salvaged french doors and new front door
- Purchase antique mail slot
- Select color for front door (Benjamin Moore Florida Keys Blue!)
- Strip doors and replace glass panes
- Build up, size, and install french doors
- Build up, size, and install front door
- Install molding
- Fill nail holes
- Fill old holes and gaps
- Fill old hinge locations on door jamb
- Transfer peephole
- Transfer knocker
- Transfer rim lock
- Install deadbolt
- Complete/fix mail slot
- Final sanding
- Prime
- Paint (possibly multiple coats with wet sanding for high gloss)
- Replace exterior transom window with either leaded glass or painted house numbers (we're not sure on this step yet)
Have you been working on little punch list items around your house? I think the most satisfying point of a project is approaching the finish line and knocking out the little tasks along the way. Sadly, the closer you get to the end, it seems like the little tasks tend to multiply.