Even though this post is pretty old, we still get a lot of people looking at how to spray paint their counters. It's true, we did it, and we loved how it looked for many years. However, after about nine years we decided it was time to retire the spray painted counters and put a little money into butcher block. For about $300 (the cost for 2 pieces of butcher block from IKEA) we were able to change out our counters completely. If you're interested in our whole kitchen update process, and how it quickly went from a simple paint update to a whole kitchen overhaul, be sure to check out the series of posts.

Lately we've been seeing a lot of talk about "quick and inexpensive updates" meant to temporarily dress up an area on a very tight budget. One that we see over and over are people asking questions or providing tips on improving their outdated and ugly counter tops without dropping a few thousand on granite.

Now, we'll be the first to tell someone that "anything worth doin' is worth doin' right..." but sometimes it isn't the best first step. (By the way, I love that quote from "A League of Their Own.")

When we moved into our house back in 2003, were working on an extremely tight budget...I'm talking ramen noodles budget here, no joke. We knew we planned to eventually replace the kitchen counters as part of a complete renovation, so we didn't want to put any more money than we needed to into their rehab. We also didn't want to sink a lot of time into searching for some remnant pieces, tearing off the old counters, and putting in all of that effort if we were eventually going to be getting rid of it at some point down the road. But the thing is, when we moved into the house, we were faced with these hideous counter tops, now scratched and worn since their installation back in the 1980s.

To the naysayers out there, I know we could have done so many different things, including living with the green laminate, but that just isn't our style.

Rather than do anything significant, Wendy decided we should try to spray paint the counter tops. She had seen the approach on various websites and home decorating shows, so we figured what was the harm in trying?

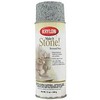
Back when we did it, the product was called "Stone-It," but they've since changed the name to "Make It Stone." It's a textured spray paint that is an all in one application, not a two part system or epoxy product. There are several other products out there now that do about the same thing. We found the coverage amounts on the can to be just about right, so I think we bought about five or six cans when we did our project.

In true Old Town Home fashion, our timelines have been greatly adjusted over the years. And what once was considered a "short term fix" has morphed into a counter top solution spanning nearly a decade. Despite living with them for much longer than we intended, we haven't replaced the counter tops (but we surely still will...I promise) and the paint still looks great. Here are our steps if you are interested in doing the same.

1. Surface Prep

Clean and lightly sand your counters with a 120 grit paper to give the paint something to stick to. You don't have to sand really hard, just rough it up enough to take any shine or gloss off of the counters.
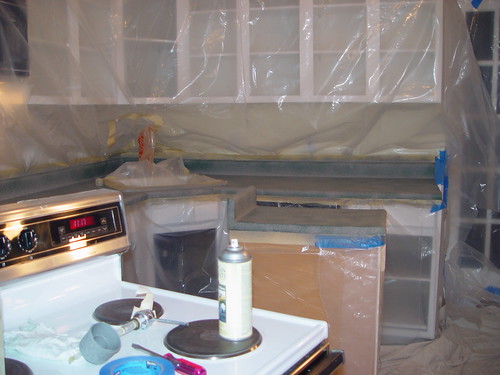
2. Mask & Paint

Mask off the rest of the room and spray paint all of the surfaces in thin and even coats. If you do it right, it should take you three or even four coats to really get a good coverage. If you don't do even coats, the textured paint will tend to sort of glop up (technical term), and will look lumpy and patchy.

3. Polyurethane

Once the spray paint dries, apply many many many coats of water based polyurethane. I think we did eight or nine coats. The paint really looked great right away, and I wanted it to stay textured and colored the way it was, but we knew this would be a very high traffic area, so we had to put lots of poly on it. It has held up so well over the years that I'm very glad we did all of the poly.

4. Caulk (optional)

The edges to our sink and area between the wall and back splash were very uneven. Rather than trying to get the paint right up against the sink and wall, we left a small gap. Once the poly dried, we used a white silicone caulk to bridge the gap and dress up the area a little bit. You will only need to do this if you want to, but it did make it look far more finished and less spray painted.

5. Enjoy

Allow at least 48 hours dry time then enjoy your "new", "stone" counter.

Our project took about two days total, plus dry time, and ran us around $50. It was a great way to spruce up the kitchen for very little money. We've had a few chips here and there over the years, but we've glued them back into place or touched them up. 

One note of warning: My parents were in town helping us move and put a cup on the counter top that was wet on the bottom. This happened about one week after we had finished the project, but the cup left a milky white ring. I sort of freaked out at the sight, but after about 20 minutes it dried and disappeared. We noticed this several other times over the first few months when we would leave a wet towel or something on the counter top, each time it faded away as the water dried. It seems like the poly just needed several months to fully cure. I can't remember the last time we've seen a splotch (again, technical term), so it seems to have taken care of itself. So this warning is more of a "don't freak out if there's a white splotch on your project" type of warning.

When we tell people the counters are spray paint, they are usually very surprised. We think it was a great way to really brighten up the kitchen with a $50 temporary fix and a little bit of effort. It's especially great if you are doing it as a way to bridge the gap between something horribly fugly and when you want to really renovate.

Do you have any experience in this department? I know others must have done similar type approaches. Please share and let us know.

Comments 61

Comments

Katie
11/2/2011 at 10:12 PM
Did you use one of the stone textured sprays, or just a regular spray paint? I'd love more details!
Alex
11/14/2011
We used the textured "stone like" paint. There is a link in the post to the specific paint we used. It is available at various places, both online and in-store.
Heather
7/28/2015 at 1:59 AM

I just did this to my countertops! I LOVE the way it looks for a more budget friendly, temp fix until I can remodel the kitchen. However, I'm HATING the texture! I only did 2 coats of polyacrylic, and I'll tell you I can't wipe this counters down because it's too rough! I'm going to try to do many more coats on top, but I'm hoping you'll relieve me some and let me know that will smooth it out to where I can wipe and clean them down without ripping up my rags!
PS Does anybody know about how safe this is for food prep? I mostly use cutting boards but just to lay fruits or veggies on, will it be a concern??

11/13/2011 at 1:39 AM
OMGOSH....LOVE IT! They Look AMAZING now!!!! WOW!

www.iheartmygluegun.com
1/4/2012 at 10:56 AM
I just popped over here after seeing your link on YHL. You kitchen looks amazing! Like a totally different room! Congrats! You guys did a great job.
-Diana
Wendy
1/4/2012
Thanks so much Diana! It's amazing what a little paint and a lot of elbow grease can do for an ugly kitchen. :-)
Sarah
1/4/2012 at 12:16 PM
Another YHLer here. I have yellow countertops (and faux wood laminate cabinets) and have been debating on what to do with them. I might give this a try. They couldn't look any worse than they already do, right?
Wendy
1/4/2012
Welcome Sarah! Exactly what we thought too. What do you have to lose? It's a really affordable way to makeover, and I can attest that they've held up really well over time.
1/4/2012 at 4:38 PM
WOW! What amazing results! I have seen painted laminate before with not so nice results. Yours look great! ANd your kitchen is beautiful!
Wendy
1/4/2012
Thanks so much Teresa! We were thrilled with the results, especially given our shoestring budget. So glad to hear you like it too. :-)
LauraCinIndy
1/6/2012 at 12:25 AM
Hi,another YHLer. I'd love to try this on our countertops. How did you handle the fume situtation? I'm a little concerned about the smells. Your kitchen looks great!
Alex
1/6/2012
Hi Laura, thank you, and welcome to our house blog! I'm far less sensitive to fumes than Wendy (probably just means I have fewer brain cells overall) but it didn't bother me. It was January when we did it, but we opened a window or two while spraying and then left the area while the paint dried between coats. Overall it was pretty tolerable. We've used various other paint strippers, paints, and chemicals that were far worse than this paint. If you get yourself a decent mask you should smell almost nothing. Good luck, and if it works for you (or for some reason doesn't) be sure to let us know.
Amy
1/10/2012 at 3:00 PM
Please excuse my crassness, but looking at the after picture I can't help but think "Holy Crap!" Seriously, your kitchen looks fantastic, and utterly changed from the before picture. Amazing.
Wendy
1/10/2012
Thanks so much Amy! We couldn't believe the transformation either, given how little money we invested in the project. It was well worth the effort!
JennW-M
1/17/2012 at 12:56 PM
Another YHLer here. I love your kitchen and the spray paint counters. Our laminate situation goes all the way up our backsplash -ugh. This could be a perfect solution. One question after all the coats of poly is the counter smooth, smoother, or still textured feeling?
Alex
1/17/2012
Great, glad you found us. I'd say the counter went from very textured to somewhat smooth. The surface is slick and smooth with some mild bumpiness. I actually liked it better more textured, but the smoothness works better as a prep surface and counter top.
LauraCinIndyc
3/4/2012 at 12:25 AM
Hi Alex,
I wrote to you back on Jan 6th inquiring on the odor of spray painting. To give you an update...we did our counters and while they look good, we've already had issues with chips and spots coming up. We put roughly 7 to 8 coats of poly on them. Should I do more? Our microwave legs pulled the spray paint right up when we moved it once and that was after letting the counters dry 2 days. Any advice will be apprectiated!
Laura
Alex
3/6/2012
Hi Laura,

That's bad news on the paint peeling up. If you sanded the counters a bit before painting, it sounds like you need to just allow more cure time before putting heavy things on them. When you say you applied 7 to 8 coats of poly, did you allow a half or a day dry time between coats? I think we also waited several weeks before placing our toaster or other heavier items on the counters. We were paranoid a bit but I think that helped a lot.

When we've had chips, such as when we dropped a can from a cabinet, we've been able to repair them either by glueing the chips back in place and applying more poly, spraying the paint into a small dish and applying it with a brush just to that area, or through creative use of Wendy's nail polish.

I hope this helps and that you're not having any more pull up issues. Unfortunately we didn't have a similar experience so I can't relate specifically.

Good luck.
LauraCinIndy
3/6/2012 at 8:30 PM
Thanks for the info..I realize now I may have made a big boo boo. I totally forgot to do any sanding before starting. (insert bad words here!) I did usually let lots of time go by in between coats of poly but not every time and we put our items back on counter within 2 days of drying. So give me the brutal, honest truth...since I didn't sand do you think I need to sand it all up and start over???
Laura
Bobbi Reader
5/12/2020 at 1:40 AM

Did you end up starting over?

gia
6/25/2012 at 6:57 AM
How many cans of spray paint did you need? My kitchen counters are a bit smaller than yours so I'm just trying to get an idea. They look great.
Wendy
6/25/2012
I think we ultimately used four or five cans if memory serves me correctly. (But I also remember we had to make another trip to the store when we ran out mid-project!) I would buy more than you think you'll need to get a solid coat. It's always easier to return them then run out and realize the store is out of the color you need! :-) Good luck, Gia.
Tina
8/14/2012 at 11:17 PM
I really can't believe how amzing your counter tops look. Do you remember what type of sealer you used? Was it another spray paint poly or was it liquid?
Wendy
8/15/2012
Thanks, Tina. We used liquid poly as the sealer, that we brushed on. I think we applied something like seven coats to ensure we had a nice, sealed finish. It's starting to see some wear and tear now nine years later, but looked pristine for a very long time. :-)
8/18/2012 at 1:54 AM
Great transformation. I'm wondering how food safe it is
Kathie
9/18/2012 at 8:57 AM
What a great job you did!! I love it!! I have heard other people using a Automotive Clear Topcoat as their sealer. It makes sense to me...look at what our vehicles go through during each season and holds up for years!! Just a suggestion though.
Meagan
10/7/2012 at 3:30 PM
Hey Wendy. I LOVE your counter tops. i am in the Process of doing my kitchen (hopefully you get back to me soon) I painted my Cabinets in the Sandy colored 'stone' spray paint and i was wondering if there was a specific reason you used Water based Polyurethane rather than oil. I purchased Oil Poly before researching but still cant find any info on it. would oil based be ok or Do i have to use water based?
Alex
10/7/2012
Hi Meagan,

Wendy's out at the store, but I think I can answer it for you.

Oil based poly should be fine, but there are a few reasons why we used water over oil.

Oil based poly:

1. Takes much longer to dry.
2. Has far more odor over water based.
3. It will yellow/amber over time, changing the look slightly.
4. Is much harder to clean up (must use denatured alcohol or mineral spirits on your applicators).

If these things don't bother you, oil may actually be better. Oil tends to dry "harder" and will often stand up to more abuse.

Good luck, and let us know how it all turns out.
brian
10/15/2012 at 1:39 AM
what type of poly did you use specifically? or will any of them work
Helen
1/27/2013 at 5:28 PM
Hello! First of all, your kitchen looks great! I am moving into my grandfather's 60 year old house and am anxious to make some inexpensive updates to the kitchen. I love the look of your spray painted counters. Does the texture bother you at all? Realistically, how many days should I plan for this project (prep, paint, poly, and dry time) ? Thanks in advance for any tips and tricks!
Darryl
3/31/2013 at 1:29 AM
So you didn't prime it first? I've read elsewhere they recommend putting a coat of primer on before the texture paint.
Alex
6/22/2013
We felt that sanding the surface was sufficient, but primer wouldn't hurt. We'd just need to make sure to apply it as smoothly as possible to eliminate the any brush or drip marks. Possibly by using spray on primer.
Mandy
4/5/2013 at 11:02 AM
Did you sand between coats of poly?
Alex
6/22/2013
We didn't sand between coats of poly, but we should have. We would have used 400 grit sandpaper between coats just to rough it up a little bit.
YR
6/21/2013 at 6:30 PM
Hi I love your countertop, I recently started working in mine, and I have a piece of wood that will be my kitchen island countertop, and I want to leave it just the way it is not, stains, but I really want to seal it to be water resistant. Some people have suggested mineral oil or wax, but that requires a lot maintenance afterwards. So my questions: Can I use the same poly you used for yours? Do you have any suggestions?
Many Thanks
Alex
6/22/2013
I wouldn't use poly on your counter top due to the potential for food safety issues and the fact the poly can flake off if scratched.

You might want to see our post on mineral oil and wax that we use to treat our butcher block counters. www.oldtownhome.com/2013/1/11/Wax-On-Wax-Off---Butcher-Block-Oil-Treatment-Update/ It's not an overwhelming amount of maintenance.
Alex
6/22/2013
You should also check out Waterlox. We've not used it but have heard good things from the people who have.
YR
6/23/2013 at 3:45 AM
Hi Alex,

Thank you for your reply, I am so happy I didnt use the poly yet, I will try this. You know to paint my kitchen island I followed all your advices about the polycrylic. I am very happy I came across to your website. Plus the blog is very pleasant and funny to read.
Many Thanks again.
YR
6/27/2013 at 12:27 AM
Hi Alex,

I am freaking out right now, I painted my kitchen island, I primed, painted and then sealed with polycrylic and everything was great until just now. I have some baskets to organize my utensils, it looks like where the basket, rubs when we take it in or out, is making the paint come off, but not peeling just like a little scratch that remove the blue paint and i can see the white primer. Please Help!!!!! What should I do?
Wendy
6/29/2013
Hi YR,

I'm sorry to hear the paint is rubbing off. How many coats of paint did you use, and how long did you let the paint dry before applying the poly? It could be that it wasn't fully cured before you loaded in the basket. Also, how many coats of poly did you apply over the paint, and did you allow it to cure between coats?

In order to correct this, we'd recommend you lightly sand the scratched area. Apply a spot touch up of paint. After allowing the paint to fully dry (24 hours or the recommended time from the manufacturer), apply several more coats of poly to build up a protective surface over the paint. Essentially allowing for full cure time between coats, and allowing for several days of cure time before placing items back on the painted surfaces should do the trick.

Lastly, you may want to add projective felt feet to the bottom of your basket. You can find adhesive strips at Home Depot or on Amazon, and they'll provide a soft barrier between the rough edges of the basket and your painted surface.

Good luck!
karen
10/6/2013 at 8:41 AM
Hi Wendy and Alex,

May I know which color of paint did you use on your countertop. Is it a grayish color? I saw the cap in one of the picture and seems like you used the color of "Mediterranean Reef", is that correct?

Thanks for your time.
Alex
10/6/2013
It looks like they don't make the color that we used, but it was definitely a gray. They have a Black Granite and Charcoal Sand that look to be the extreme on either end of the color we used. The rest definitely are not ones that would look at all like our counters.
Jasmine
2/23/2014 at 3:01 PM

Hi Alex and Wendy!

Nice job on your counters they look fantastic. I have been considering refinishing the kitchen table in my home for a while. It's a rather retro table with laminate top and the plastic sides. I think the laminate will be great with the process you both used on your counters, but I am more than a little stumped on how to do the sides of the table and chairs. Any suggestions would be great!

Thanks!

Tammi
7/23/2014 at 11:22 PM

The kids and I are planning a surprise countertop temp fix. (while hubby is at work!) Our countertops are actually lifting. So the plan is to actually take the laminate off and then use the base which looks to be plywood. Prime it first then spray a hammered silver, says to recoat within an hour or after 48. So I plan to do 2 -4 coats of it within the hour after each application. I bought spray polyurethane. Do you think the spray will be fine or should I use a brush on?? Should I wait 48 hrs before applying the poly?? A other tips?? I am nervous about 1 not getting all laminate to remove from base smoothly and 2- the product not adhering 3- making it worse than it already is!

Lynne
7/26/2014 at 10:19 PM

I did my bathroom counter, it looks good. The spray poly may have been a good coating but it doesn't harden and shine.

I'm going to HomeDepo tomorrow to get poly in the can for my top coating.

Kathryn
7/18/2015 at 12:49 AM

Hi Alex - I went ahead with a lot more confidence after reading your webpage and using Make it Stone black granite for my bathroom countertop. It looks so much better (it was peach before!). I have put many, many coats of polyurethane on top and I want to know if I should have sanded it between coats as it is very rough and I would like it to feel much smoother. What do you think? Will I be able to get a smoother finish if I sand it, or will it never have that feel? Or is it too late?

Carla
2/8/2016 at 11:08 AM

Hi,

My husband and I are planning to do this to our kitchen countertops, and I am just wondering how food safe the counters are at the end of this. While we do use a cutting board for most chopping and food prep, my 9 and 11 year old boys don't ever bother. Sandwiches left right on the counter, mini pizzas, cutting apples etc. Will this be an issue?

Wendy
2/8/2016

Hi Carla - It all depends on the product you use to seal the paint. You'll want to check the label or contact the manufacturer directly. Food safety aside though, I wouldn't recommend cutting/placing hot items/etc. directly on the surface as it can damage the finish.

Jaime
3/11/2016 at 12:02 PM

Did you sand in between your poly coats? Did the poly make the surface smooth or can you still feel the texture through the poly?

Thanks!

Alex
3/11/2016

Hi Jaime,

We did sand between coats, but only hand sanding with 400 grit paper to rough it up a little. The poly did make it a bit smoother, but there was still texture. It just feel sort of like rounded off texture.

Jo
3/29/2016 at 9:48 PM

I redid my countertops about 3 years ago with the stone spray. I love them but have not been able to find a good sealer.The first one I used was Behlen Rockhard Table Top Urethane. Any time water got on it, it would turn white. I have just resealed the top with Reclaim multipurpose sealer - 3 coats and let it cure for 3 days (can says 24 hrs). This sealer is made for countertops. Again, watermarks turn white. Do you know of ANY sealer that I can use that will not turn white when wet? We are in the process of selling our house, and I would hate to have the white spots occur for the new owners. NOTE: Our countertops are very large and extend over into the living area as a bar.

RosaQ
9/22/2016 at 1:05 PM

I tried this, using Rustoleum Stone effects as suggested in a different article. I used the water-based Polycrylic over top of that (I allowed a day for the spray to dry), and have so far put 3 coats on, waiting a day between each coat. The counter is nice and smooth; however, it is soft and easily scratching. any suggestions would be appreciated. I have thought about going over it with a polyeurathane or another type of seal coating to harden/toughen it up, but I’m really stumped here. Please help.

Ashbobash
11/2/2016 at 4:53 PM

I primed my laminate countertop first with a brush and then spray painted over the top. I can see the brush marks through the spray paint and am wondering if I should sand it all down to get rid of the brush marks? Prime again? or just apply another couple of coats of spray paint to fill in the brush strokes? Thoughts? Opinions?

CD
3/7/2017 at 2:50 PM

3.7.17 - Regretfully did this in September of 2015. I would NOT recommend this to anyone. We set aside an entire week, buying all the supplies, textured rust-o-leum spray paint for all surfaces, spending just under $200.00,just to make sure that this would last until we could afford to get counters replaced. We sanded the counter top, applied 2 coats of Kilz allowing the recommended drying time and then an additional 24 hours to dry, applied 2 coats of spray paint ((for all surfaces) allowing 1 day between coats to apply) then with great patience applied 8 coats (allowing 3 -6 hours between coats) of the polyacrylic. End result was beautiful. Took pictures, showed it off, received a lot of complements.
Issues as follows: There is no warning in any of the instructions on the web to keep/not use alcohol based products (like rubbing alcohol) away, alcohol took the finish right off in the spot that the alcohol touched. Then within 6 months the chipping started, the edges turned to a brownish color and where the water pot over flowed, the paint bubbled up and is now peeling away. We took care not to put anything like the coffee maker, toaster over or toaster onto the counter top until it had cured for 2 weeks.

TamiP
6/11/2017 at 10:36 AM

Painted my countertop with oil-base paint and used poly-acrylic sealant. Looked great, but over the years it has started to chip. Probably needed more than 4 coats of Poly. Mine also turned white when a wet glass or rag sat on it for awhile, but dried and looked fine. I've had mine for almost 10 yrs, with only mild chipping. Its a very inexpensive way to change up your kitchen cabinet.

Kohime
1/22/2018 at 11:21 AM

What lights did you use under the cabinets. It just adds so much!

Dee
9/30/2018 at 7:50 PM

Did you use brush on or spray on poly?

Luke
1/16/2019 at 4:25 PM

What kind of brush did you apply the poly?

Alex
4/3/2019

We used both a foam brush and a small smooth roller.

Rich
4/2/2019 at 11:36 PM

I live in an apartment where the painted the counter tops and even the tubs. They did a very poor job. I suspect they did not prepare the surface correctly, as the paint comes off. They will not do anything about it. So I would like to redo the counter tops myself.

I am having trouble locating a paint that looks like stone and has little to no texture. So far everything I have found is way to rough to use on a counter top.

Do you have any suggestion on a source?

Alex
4/3/2019

Hi Rich,

Keep in mind, even the textured stuff that is too rough will smooth out when you apply several coats of polyurethane on the counter. We had the same reaction with ours. At first it was very rough, like sand paper. After about 8 coats of poly it was smooth with a texture almost like leather. Good luck!

Since you've not signed in yet, you will need to fill in your name and email below. If you have a Facebook account, save yourself a step and use Connect to login.

Denotes a required field.

Please enter full URL, including http://

You can use Markdown syntax in your comment. And you can also use lots of Emoji!
  • Search

  • Login
  • Follow
  • Advertising

If you're looking for information on advertising and sponsorships, head on over to our sponsorships page. You can purchase site sponsorships in a few easy clicks. 

Toolbox Tuesday
Open Housing
  • We're Featured!

Old Town Home has been featured in the following places and publications:

The Washington Post
 
Washingtonian Magazine
 
Domino
 
Old House Journal
 
 
Apartment Therapy House Tour
 
Washington Post Express Feature
 
Home & Garden Blogs
 
© 2024 OldTownHome.com. - Privacy Policy
Login Below
or
Sign in with Facebook
Connect

Unexpected Error

Your submission caused an unexpected error. You can try your request again, but if you continue to experience problems, please contact the administrator.

Working...

Working...