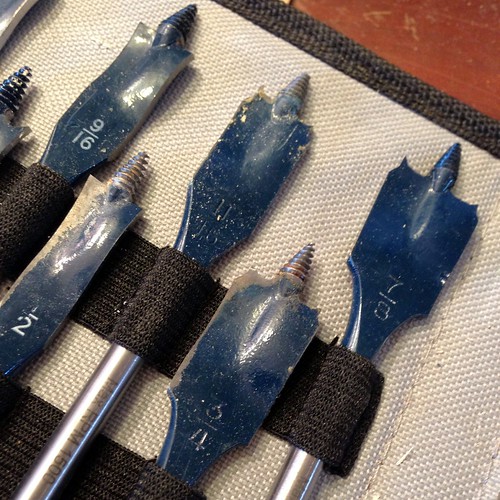
I've heard the subject of today's Toolbox Tuesday post referred to as paddle bits, hole bits, flat bits, spade bits, speed bits, wing bits, and even boring bits, but that last one can't possibly be referring to the level of interest these drill bits should generate. Regardless of what you want to call them, the drill bits im talking about today have one purpose, to cut large holes in stuff.
For a very long time, I used a set of Irwin "Speedbor" flat bits when I needed to cut holes larger than the typical 1/2" or 5/8" that my standard drill bits cover.
These simple and no nonsense bits worked well for my needs over the years, but their use wasn't without some level of effort and patience. I'd chuck them up in my old low powered drill and work my way through the material where I needed a hole, exercising some level of patience, especially when I hit a knot or otherwise dense area in the wood. Eventually, I'd end up with the hole I needed, and a bead of sweat or two on my brow.
It wasn't until recently that I discovered a set of spade bits (that's what I've always called them) that are an improvement in almost every way, only with a very minor design change.
Shortly after I received my new higher powered hammer drill this past Christmas, I needed a new 1-1/4" spade bit. I had burnt up my last one and it was no longer cutting adequately. Rather than purchase a single bit in an attempt to add on to my band of misfit spade bits, I opted to instead go with a full set, ensuring I wouldn't be stuck looking for a size I didn't yet own. I began looking through various reviews and tool sites searching for a good quality set of bits that would not only last, but also do the job in a more efficient way. After much searching, I found myself this set of Bosch Daredevil bits, complete with fancy carry case.
 Continue Reading Full Post
Last week we filled you in on a little project we decided to undertake involving the repointing of the interior exposed brick on one of our chimneys. The mortar of the chimney has long since seen its best days, leaving much of the old limestone and sand mortar crumbling and at a point of deterioration.
Last week's post covered the painstaking task (ok, it's wasn't that hard) of lime based mortar selection, but that was only the first step of many in a task I have long dreaded. Though the materials selection was arduous, the real work on the project was clearly the actual repointing of our brick.
The section of brick we are dealing with is along one of our three interior chimneys. Our ultimate goal is to eventually make the fireplace below this chimney a functional fireplace, though it is currently used for our furnace and water heater vent. The area I'm repointing will be covered in the future, so now seems like the best possible time to resolve the issues we have with mortar failure as a result of leak issues that were corrected long ago. The next step, sometime down the road, will be to re-line the chimney after replacing the water heater and furnace. Hey, it's a multi-year plan and this is step one of...well, a lot.
Before we started on our repointing project I gathered up all of my tools and supplies. There are more or less three categories of tools for this project, the set for chiseling the old mortar, the set for mixing the mortar, and the set for applying the new mortar.
The first set for chiseling the existing and failed mortar consists of a brick hammer (or mason's hammer) and plugging chisel. These are pretty basic masonry tools, and are always good to have on hand. I didn't own a plugging chisel so I picked up this new three chisel set for this particular project. This holds true to my mantra of "buy one new tool for every project." Just look at how new and clean they were. I also grabbed my respirator and safety glasses to protect me from any flying debris, and my work gloves.
 Continue Reading Full Post
While our last two Open Housing posts dealt with two very large and expensive homes in the Rosemont area, you don't have to worry about us, we're not straying too far from our roots. We're still venturing through the homes available in the friendly and familiar confines of Old Town. One house, in particular, really stood out to use as a true Open Housing candidate, and I think you'll agree, it's far more "us" than the Rosemont behemoths we talked about last week.
The home we toured is located in a very unique block in Old Town. Situated along Wilkes Street in south east Old Town, this home sits overlooking the historic O&A railroad tunnel.
The house is a classic wood frame clapboard sided mid 19th century row house -- the sort of place you imagine when you think of an early to mid 1800's modest townhouse. Since the home was built around 1840, it actually predates the railroad tunnel it overlooks, which was built around 1850. Given the view from the front windows of the house, this massive construction project must have been a sight to see back in the day.
The home has two bedrooms, one bathroom, and is just over 1,100 square feet. Entering the home you are welcomed right into the main living area. I immediately noticed the wide plank random width and old growth pine floors, which are just spectacular in all of their depth and beauty.
 Continue Reading Full Post
Full disclosure: Not only doesn't this post qualify as "cooking," but I'd hardly even classify it as a recipe. Yet this astonishingly simple assembly of ingredients combines simple foods into a breakfast staple that's truly divine.
Since my move from sugary breakfast cereals into adulthood I've invested a tremendous amount of time and effort into educating myself about what is good, healthy, and appropriate when it comes to a well balanced diet. This includes understanding the ingredients of foods I consume on a regular basis.
My quest for a healthier breakfast started when innocently reading the side of the box of my go-to high fiber breakfast cereal. Not only was I shocked by the number of unpronounceable ingredients, but I couldn't believe that it contained artificial sweeteners! I was appalled, and knew that I could, and should, be starting my day on a better foot, fueling my body with healthier ingredients. After all, I need to at least start the day off right when my will is strong, in order to balance my end of day indulgence in desserts and...ahem...happy hour specials.
After a bit of reconnaissance, I discovered this recipe a couple weeks ago, and (embarrassingly enough), have consumed it each morning since. Behold the power of maple banana greek yogurt.
Chop and toast walnuts in a dry pan. In order to plan ahead for several breakfasts during the work week, I pre-toast 3-5 servings at one time, popping the excess in a container in the fridge. When toasting the walnuts, keep your eye on them as they can quickly go from pleasantly toasted to horribly burnt (and smelly). Typically the toasting only takes a few minutes in a dry pan over medium heat.
While your nuts are toasting, start prepping the remaining ingredients. Start by thinly slicing a whole banana.
 Continue Reading Full Post