Before I jump into today's post, I want to touch on Wendy's announcement yesterday that she's becoming a real estate agent. I really can't express just how happy I am that she made this decision for herself. I've long felt real estate would ideally suit her skills and interests and have often said, "If we had our 20s to do all over again, I would love for Wendy to start her career as an Old Town Alexandria real estate agent." I know a major change like this can be uncertain with a lot of stresses and pressure, but I'm very proud of her for taking the leap. 

However hectic and crazy our lives have been through this trasformation, no matter how many things change along the way, the tasks around the house we've needed to take care of haven't magically taken care of themselves. Case in point: Wendy decides to make a career altering decision to pursue a passion in real estate that hopefully results in an ultra fulfilling and enjoyable period of her life. Meanwhile, I still haven't finished the storm windows I've been "working on" for five years. I'm so lame.

We left off in my first window build rundown with the storm frame assembled, but that's really only about 1/2 of the build process. If you'll recall, I want to be able to change out our storm's glass during the nicer months for screens. This will hopefully promote a more comfortable and bug free spring and fall, while also allowing for a more energy efficient and quiet winter and summer. Good plan? Yep, I think so too.

I decided to start the replaceable frame efforts with the true divided light glass panels. Though I'm relatively sure the screens will be an overall easier undertaking, I want to both make sure the glass panels work and put myself into a position where I have actual storm windows. You know, if I don't get around to the screen inserts all that soon. (Preposterous idea that I wouldn't be timely, I know!)

For the front windows I wanted to do something that felt a little bit more authentic with these storms. Since the front of our home retains its original character, I've opted to do a 2 over 2 storm window to mimic the antique and original sash. I'm not sure I'll do this on the back windows, but for the front, it's worth the extra work and effort.


Continue Reading Full Post
Comments 9

As some of you may (or may not) have noticed, I've been a bit absent on the blog the last six months. Not necessarily gone per say, but Alex has been holding down the blog fort so to speak. While in the past, the split of our posts has been roughly 60/40, Alex coming in with an average of three posts per week for my two, but since January I've been lucky to make a weekly appearance. I have a good reason though, and today I'm finally ready to share some news that I've been keeping on the down low.

While many of our readers know that Alex is a computer programmer by trade, it's rare that I've spoken about my day job more than saying I'm "in marketing." And after nearly a decade and a half of non-profit B2B professional services and event marketing, conference and event planning, as well as brand management (are you sleeping yet?), I've decided to make a major change.

It's no secret that I love homes, and my passions lie in interior design, historic restoration, and entertaining. However, the question has always been, "How do I make a living doing what I love?" 

Don't get me wrong. I've had amazing professional experiences along the way, including business trips to exotic destinations.


Continue Reading Full Post
Comments 67

Today we're going to cover something that's very DIY in nature, but it falls well outside of the realm of "home improvement." Instead, it deals with a decidedly DIY approach to a medical issue. More specifically, one involving our beloved canine daughter, Lulu.

The homeopathic remedy I'm covering today deals with a very common genetic issue in dogs called "cherry eye." Let me warn you, some of the photos that are in this post can be unsettling. But allow me to assure you, even if they look gross, as long as the animals afflicted with this condition are treated in a timely manner, the animals are in no way in pain.

Cherry eye is actually a very simple issue involving the weakening, stretching, or detachment of anchoring tissue on an ocular gland that's sometimes referred to as a "third eyelid." In dogs this third eyelid plays a role that promotes oxygen supply and tear production to the eye. When working correctly, the third eyelid stays tucked away and out of sight. However, when anchoring tissue is not fully doing its job, this third eyelid can protrude from behind the eye and will be visible as a red or pink mass that partially obscures the corner of the eye.


Example of Cherry Eye in a Bulldog

Our story of cherry eye actually starts several years ago, in fact the very week we adopted Lulu. As new pet parents of Lulu, and having just lost Oliver after a long medical fight against cancer, Wendy and I were fragile yet optimistic about adopting our new girl. She seemed quite happy and healthy, albeit a little neurotic at times. One day, shortly after our adoption, we decided to head to PetSmart to have Lulu's nails trimmed and pick up a few supplies. Little did we know just how much Lulu hated, and I mean HATED, having her nails trimmed.


Continue Reading Full Post
Comments 261

As much as I love to entertain, and don't mind spending time preparing for large parties, intimate gatherings, or even the impromptu drop bys (I've overheard friends say "if you just randomly show up at Wendy and Alex's house, you still get a spread of cheese, appetizers, and wine!), I'm always looking for new recipes to try out when I'm pinched for time. It's great to have an arsenal of ideas that are delicious, crowd pleasing, and ready in a snap. That's why when I discovered bite sized brie and fruit preserves in phyllo cups, I could barely contain my excitement.

I'll use the term "recipe" loosely in this instance, as it's more of an assembly of ingredients. But this bite sized morsel is elegant enough for fancy occasions, and has even served me well on a Friday night with a few friends. I was first introduced to it by my baby shower co-hostess, and have been in love ever since.

Get started by opening the boxes of phyllo cups, removing the plastic packaging. How's that for a super easy first step? Place the phyllo cups on a baking sheet. If desired, you can line the baking sheet with parchment paper, but this is an optional step.

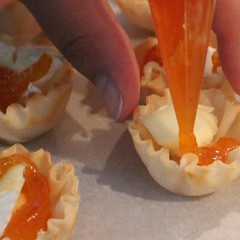
Cut your wedge of brie into small bite sized pieces, just small enough to fit inside the phyllo cups. It's easiest to use the sides of the brie as a guide and cut diamond shapes, like you're making a harlequin pattern in the brie.

Next we work on the filling. Using either a disposable pastry bag, ziplock bag with the corner cut off, or the super simple technique of a small spoon, squeeze or dollop roughly one teaspoon of fruit preserves into the phyllo cups, on and around the cheese. In this case apricot preserves were used, but strawberry, raspberry, or fig would also be a lovely option. I could even see using something like apple butter. So many delicious options.

After each cup is filled, bake the brie bites according to package directions until the shells are golden brown, and the cheese just begins to melt. Roughly 10 minutes tends to work well for me. 

Presentation is quite simple as well. Just arrange these appetizers on a serving platter...that is if you can exercise enough self control to not eat them directly off the baking sheet. 

These one-bite bits of heaven were a huge hit at last month's big baby shower. Not only were they gone in a flash, but as the party was wrapping up, guests were asking if we had another tray stashed somewhere. I can't think of a more flattering question.

Do you have a simple and easy go-to recipe when you entertain? Maybe something that takes just a few minutes to make, or has just a few ingredients? I was so happy to discover this appetizer, and am always looking for new ways to make entertaining a fun, yet simple endeavor.


Continue Reading Full Post
Comments 25

Last week a photo of a speed square was posted on the Instagram feed of Charles & Hudson, the well known home improvement, DIY, and tool website. I saw the photo and left a comment that a good speed square is easily in my list of "Top 10 Must Have Tools." It's one of those items that I've become so dependent on that I just can't see doing what I typically do on our home without it. It's versatile, multi-purpose, and easy to carry around.

Photo Credit: Charles & Hudson

This got me to thinking about my full "Top 10," and what the list might look like. So I went ahead and put the whole thing together. You'll notice this list isn't high on the "fancy" scale, doesn't typically cost a lot, but includes a whole lot of utility. I hope it's helpful in finding a tool or two that you need to round out your must haves.

It's hard to do a significant project without a tape measure, and a 25' tape leaves you with a small enough device while allowing you to measure out the longer lengths. Getting a wider tape that can stand out on its own, and one that can withstand a bit of abuse is a must. The tape I've been using since our very first day of renovation has withstood the test of time. It's developed a few battle scars, or "bits of character" as I like to call it, but it's kept on ticking. What's most amazing, there's not even any visible rust or damage since the rather unfortunate event that occurred when it fell from a ladder directly into a bucket full of water. Now that's saying something.

I lived my life with a normal cordless drill for quite some time, often wondering what life might be like with a hammer drill. I waffled between the idea that "the grass is always greener" and that I was simply "settling with what I had." Oh the difficulties of a tool relationship. After I recently received a hammer drill for Christmas I realized just what a massive gap in my life had been filled, and boy was I previously missing out. This new drill is simply awesome, long lasting on battery life, has enough torque to handle some really tough stuff, and the various settings it has for all of the necessary jobs are great. I can't believe it took me so long to own one of these babies, but I ain't never looking back now that this drill sits in my tool bucket. Use it as a drill, a screwdriver, or a way to mix up paint or thinset, this drill doesn't care.


Continue Reading Full Post
Comments 4
  • Search

  • Login
  • Follow
  • Advertising

If you're looking for information on advertising and sponsorships, head on over to our sponsorships page. You can purchase site sponsorships in a few easy clicks. 

Toolbox Tuesday
Open Housing
  • We're Featured!

Old Town Home has been featured in the following places and publications:

The Washington Post
 
Washingtonian Magazine
 
Domino
 
Old House Journal
 
 
Apartment Therapy House Tour
 
Washington Post Express Feature
 
Home & Garden Blogs
 
© 2026 OldTownHome.com. - Privacy Policy

Unexpected Error

Your submission caused an unexpected error. You can try your request again, but if you continue to experience problems, please contact the administrator.

Working...

Working...