We're in the midst of a "quick office makeover" which has now stretched into weekend four of work.
At this point I believe we have about one or two more weekends of work left until we reach the finish line, and I'm absolutely thrilled with the progress. If you ask us, the true challenge when it comes to "quick" makeovers is actually twofold. First, you need to resign yourself to the fact that you're going to sink time and money into a project that may not be permanent. But for me, the bigger difficulty comes from a seemingly simple question, "Where do you stop?"
The closet door in this room was one of those discussion items for us, specifically when it came to the hardware. Alex and I both like to do things the "right" way. We don't like cutting corners and we love original details. But at the same time, it's a slippery slope when it comes to small architectural details that need restoration. Before you know it you're spending more time than you want on a "quick" project while leaving your "not-so-quick" projects abandoned just a room or two away.
In our office, we believe the the closet door and its hardware are original to the home dating back to 1908. Previous work to the room resulted in layer upon layer of paint being applied right over those beautiful cast iron strap hinges, leaving us with cracked, bumpy, chipped, and generally worse for the wear hardware on this door.
Alex and I discussed whether or not we wanted to go the faster and easier route of just applying another coat of paint to the hardware to match our new trim color (Benjamin Moore's White Dove). But almost as soon as we started weighing the pros and cons of the work, we quickly realized that while we're trying to keep this makeover simple, taking a shortcut on this feature wasn't something we could live with. After all, we buy old houses because we love and appreciate the old and original details, and we wanted to bring these little details back into the decor, even if it took an extra few hours to get it looking right rather than spending even more time staring at paint covered hinges for years to come.
With our decision made, after a few minutes of removing the door and hardware, we laid them out on our makeshift workbench and I got to work stripping them. For this project I used a product called SmartStrip. We've gone in many directions over the years when it comes to stripping period moulding and hardware, and we've liked this product since we used it on some window casings several years ago. It's non-caustic (safe if you get it on your hands), Earth friendly, doesn't have a strong odor, and really does a great job. This is pretty amazing when comparing it to the harsh chemical strippers we once had to rely on.
I will say, if we had an extra crock pot that could have fit these hinges, we almost certainly would have used it instead. You really can't beat a simmer soak in soapy hot water to make the layers of paint almost fall off.
After putting on a pair of disposable latex gloves, I applied a coat of the product to each of the pieces of hardware using a small disposable foam brush.
Once fully covered in the stripper, I then wrapped the hardware in waxed paper creating a protective layer that allows the product to stay wet and work its magic overnight. As long as it doesn't dry out, it's still actively stripping paint and the waxed paper takes over the role of Peel Away paper in keeping the stripper wet. The color bleed in the next photo showed me that the stripper was already starting to loosen the many layers of paint.
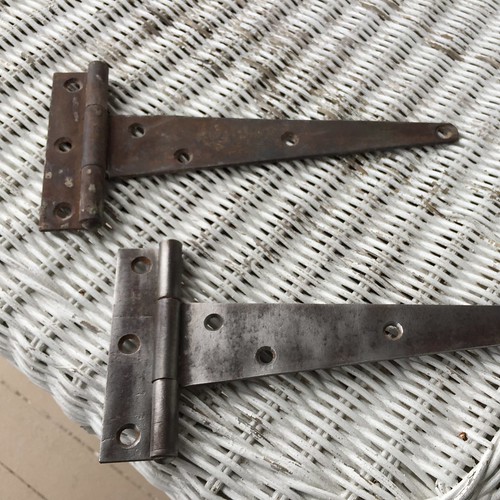
The next morning I resumed painting work in the office while Alex stepped in to take over the stripping work. After giving the hardware a thorough scraping to remove the sludgy paint and a wipe down with several clean rags, the hardware already looked 90% better! You could see that it was likely originally painted black.
While it may have originally been black, we want to go with the raw cast iron look. We've always liked the look of the raw cast iron on hardware in our Alexandria row house, so we'll stick with what we like. In this case, the final step to restoring the finish was to remove any rust and leftover paint by giving it a once over with a wire wheel or a whole lot of steel wool. Since we own a wire wheel, that's the route we went.
It took Alex roughly 30 minutes to clean up the two hinges and two components of the slide lock. While he worked, I supervised. And by that, I mean I took photos and enjoyed a cup of tea while appreciating the view.
Here's a look at the difference between the stripped hardware before and after cleaning it with the wire wheel.
Reinstalling the door was pretty straight forward since we were using the old screws and holes, but it was only easy because we had two people working on it. Initially we had no idea just how heavy that door was, but when we removed the hinges it turned out to be between 50 and 60 pounds. It's made of very dense and heavy old growth pine, so it was really helpful that Alex could hold it in place while I tightened one screw on each of the hinges to stabilize it. From there, he put the remaining screws back in.
While it's easy for "quick" makeovers to become a slippery slope of add ons, thus dragging out timelines, in this case going the few extra steps to bring this hardware back to life is something I'm really glad we decided to do.
The original closet door and hardware are one of the most interesting elements of the room, and now they really shine (in a non-shiny cast iron way). The dark metal hinges and slide bolt on the white trim paint really looks great.
While our quick fix is moving right along, we still have a few more items to knock out before we can call this project "done." And in pretty typical form, we're still debating whether we want to keep the ceiling fan in the room after painting it white, or to add some light and interest to the room by installing a light fixture. I can tell you one thing for sure, this room is quickly becoming my favorite in the whole house, one little detail at a time.