We've already reached a point in our new house where our over zealous preservationist ways have begun to impact our projects.

It's no real surprise in a house that's over 100 years old, but by the time we started the removal of the weird partial wall in the living room we already knew we had an issue on our hands. The walls of the room appeared to be in decent shape, appeared to be drywall, but also appeared to hold a secret.

At first glance you probably wouldn't think twice about the walls, assuming someone has simply pulled down the old plaster and put up drywall. Such as life in an old house. It's sad, but it happens more than it should.

But upon closer inspection we noticed something odd. The door and window casings throughout the room seemed to be very thin. These are 100 year old mouldings that should be at least 3/4 if not one inch thick, but we could only see 1/4 to 1/2 inch in front of the drywall.

You could also see the walls seemed to overlap the baseboard cap wherever you could see the original moulding, or a new base cap was put on the old baseboard and it ended up sticking out in front of the profile. It was one of those things that didn't bother me until I really noticed it, but then it was all I could see.

I had a hypothesis that the original plaster walls of the room had been covered over with this layer of drywall, and I wanted so badly to uncover the original fabric of the house and do our best to restore it. The problem, I had no idea what kind of shape it was in. And if it was in bad shape, I might have to end up ripping the whole thing down just to put drywall back up on the lath.

When the wall was removed we could see the original plaster walls and ceiling beneath the layer of drywall on the areas that had been demolished. As much as I also wanted to restore the ceiling, I conceded that we should simply focus on the walls and leave the ceiling drywall intact.

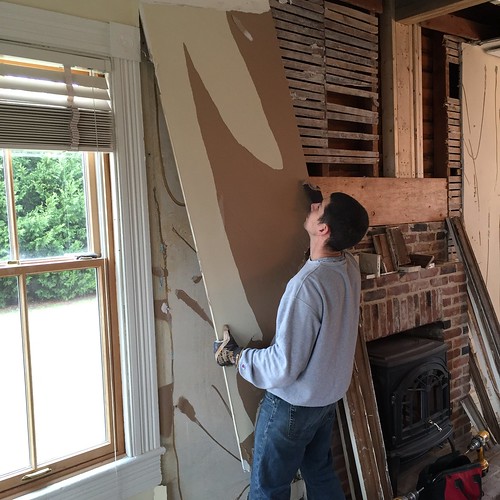
Working with Wendy's Dad, we started to the right of the fireplace to get an idea of what we were dealing with. I started by scoring all of the caulk around any of the moulding areas to ensure I wouldn't end up taking down the window casings too. 

Lucky for us (I guess?), it seems the work was done poorly. The first piece of drywall came down rather easy. We ultimately had to more or less break it out piece by piece, but only a handful of 1-1/4" drywall screws were really holding it in place.

These screws were haphazardly placed all over the sheet of drywall and through the plaster, so none of them really held onto anything. There was no care given to ensure the screws has been put into studs, or even lath for that matter.

Instead, it seemed the installed had applied random beads of liquid nails all over the walls in hopes that it would actually hold the drywall in place. In most cases, the irregular dips and peaks of the wall meant the drywall never even touched the liquid nails.

We slowly worked our way around the room removing about 10 four by eight sheets of drywall and exposing the original plaster. In actuality, we were exposing the original wallpaper that had been papered over and painted over several times.

The blue color you see is the scratch coat of the plaster. No top or finish coat was ever applied since they were applying wallpaper. But the wallpaper has begun failing due to water, time, damage, or any other number of issues. But still, you could see the faint wallpaper pattern and some of the flower borders that had been applied over the years.

We even found a bird's nest inside one of the walls. Talk about random and unexpected!

Some drywall came off in small bits and pieces no more than an few inches in size. Other chunks came off in nearly full sheets (but this happened less frequently than we'd hoped).

At the end of the day we were left with plaster walls that were in relatively good shape, tons of wallpaper that has to be removed, a whole lot of liquid nails all over the place, lots of screw holes, a few sections with damage in need of significant repair, and a giant mess to clean up.

Though going this route to renovating the living room in our house is definitely much harder than patching in the holes from the wall removal worn new drywall, it will be well worth it in the end for the charm and character it brings back to the room. We have a long road ahead of us before we're to a point where we can even start applying the finish coat of plaster that was never applied, but it's going to look great when all is said and done. And the best part, all of the original mouldings will once again look like they're supposed to look, rather than flimsy pieces of 1/2" stock barely peeking out from behind the wall.

What do you think? Is the old plaster worth saving and restoring in your book, or are you of the "rip it out and drywall it" mindset? Overall it's in such good shape that we won't even need to use a lot of plaster buttons. We'll need to patch a few holes here and there, and apply some drywall above the doors and fireplace where the plaster was totally removed. We're squarely in the "it looks worse before it looks better" phase, but I'm feeling really good about this project and how it will restore a period look to the room. 

Comments 24

Comments

Kim
2/18/2015 at 3:27 PM

I was so happy to see this post I can't even explain.

We bought a 1930's craftsman this fall. At some point going up and down the stairs with boxes, I noticed the baseboards were like weirdly recessed, practically even with the wall. I began to take a closer look at the moldings in the foyer, stairwell and upstairs hallway—all the same! Moldings in corners are cut off, the woodwork sticks out half an inch max from the wall, I was fascinated. Cutting a hole in the wall while working on some electrical, it was confirmed that, in addition to several patterns of wallpaper, there was drywall over the original plaster.

I'm all about my plaster walls but I was afraid this would be a huge can of worms so I've put it off. I'm now so pumped up to start taking down the drywall! Hopefully ours comes down without a fight.

Alex
3/7/2015

Good luck! I'd love to hear how it all turns out. I'm so glad we've gone this route. It's definitely harder, but it will look so much better.

Sarah
2/18/2015 at 4:14 PM

Oh my lord. In the same boat as you, minus the drywall part. The living room, dining room, and a nook off the living room in our 1917 house all have paint over at least three layers of wallpaper, which was applied directly to the plaster. The wallpaper is coming off fine (since it seems to have been applied with a water-based paste that just dissolves when you get it wet), but the plaster under it in somewhat rough shape. Plus, we did a lead test and discovered that at least the first layer of paint has lead in it, so we have to wear masks when stripping everything off. It's a friggin pain but what else are you going to do? It looks awful otherwise. Good luck in your, ah, adventures!

Alex
3/7/2015

Some good news for you is that using a steamer to steam off the paper shouldn't raise lead dust while removing it. I think you'll like our future progress as we repair the walls.

Little Red
2/18/2015 at 9:12 PM

Definitely restore the plaster, please. I can't wait to see how it will all look once you start work on it.

2/18/2015 at 9:41 PM

oooh, plaster! Absolutely fix it, it's so worth it!
We live in an 1896 Brownstone, and just spent the past few weeks working on our dining room walls. It's slow and tedious work, but will be awesome when done.

2/19/2015 at 7:03 AM

I think it is always worth it to repair the original plaster. That said, it can be hard to be patient enough to do so, especially when the house has so many issues to attend to.

I am starting to think of all of our old wallpaper as "plaster glue." It can stay until I have the time to fix the walls since it is keeping everything in place.Alt smile

Donna
2/19/2015 at 10:19 AM

Great blog, BTW. First time commenter, long time reader.

With old houses, I'm usually more concerned about heating and cooling costs than I am with the pristine restoration of old plaster. I suppose I'm a Philistine in that regard. I wasn't always this way. A few years of extraordinary utility bills convinced me that energy efficiency was much more important than strict restoration work.

On the outer walls, I would be more concerned with insulating those walls and sealing any electrical runs properly for energy efficiency. So I would completely remove the lath, rewire, insulate and then drywall floated with a thin layer of plaster.

Again, I'm a Philistine in this regard.

threadbndr
2/19/2015 at 11:29 AM

You know that my son and I are all about the plaster. There's only one room in my house that is totally drywall - the upstairs bedroom that was originally a sleeping porch. It never had plaster to start out with, just some strange heavy drywallish stuff with patterns on it - applied face down! And I laughed re the bird's nest. Imagine that mess from the fireblocking all the way up to the top plate and stud to stud due an uncovered vent from a room sized gas stove up at the eaves (in that same upstairs bedroom). It was a MESS that we still laugh about to this day.

In my son's house, there's a couple of non-original walls that we would like to drywall, then skim coat.

As always, looking forward to the results of your adventure.

Rondina
2/19/2015 at 2:50 PM

I think if you go the drywall route that you will regret it. No one else will think about it, but you will know and it will bother you that you didn't slow down and do it the way you prefer.

I'm dealing with sort of the same type of problem. No plaster. No lath. Solid tongue and groove walls covered with cheesecloth and wallpaper onto which was screwed drywall. Most of the drywall stops at the baseboard leaving that 1/4 in. depth. I have two choices. Remove all the baseboard as I refinish door trim and place drywall under it to bring it out to a reasonable depth or find 1/4 in. wood that I can rip down and nail on top of the existing baseboard. Buying wood is more expensive, but this builder's finish nails are really long and I see a very long process. I would welcome any suggestions on how others handled this.

2/20/2015 at 8:18 AM

Sometimes it's nice to find that previous renovators were lazy.

Restore the plaster. It'll look a lot better than drywall.

Alex
5/14/2018

Exactly! I kept saying "I'm so glad they didn't tear it all out!" It would have been a real shame to pull down the drywall just to find lath.

Whitney Kerr
2/20/2015 at 9:49 AM

I'm so glad this house has you for its owners!!!

Alex
5/14/2018

Thanks, Whitney! Alt smile

rue
2/20/2015 at 8:52 PM

I noticed the exact same thing in my 1930s bathroom. Sure enough, when I took off the plug covers, I could see drywall on top of wallpaper on top of plaster. Eventually one day, I'll do what you did, but I'm waiting until other more necessary things get done.

I think you guys are doing the house justice instead of what the last people did. Great job!

Alex
5/14/2018

Thank you! We hope the house appreciates the effort we're putting in and maybe rewards us with no major disasters and years of fun! Alt smile

2/21/2015 at 10:45 PM

restore, definitely. You really have no choice otherwise why did you remove that drywall?

Alex
3/8/2015

You're exactly right. Alt smile

Rai Land
4/1/2015 at 1:30 PM

We pulled paneling of our walls that were largely glued in place with a few nails. The glue mostly stayed on the walls. To minimize damage we scored around the glue with a utility knife (cutting at a small angle inward) before using a metal scraper to remove.

We had to do this with plaster and drywall. With both it meant less patching (seriously, way less). It was particularly helpful with drywall because it kept the paper layer from continuing to tear, which when not cleanly cut wanted to bubble under the new wet plaster.

Alex
5/14/2018

That makes sense, and does seem like it would significantly minimize the damage. I mean, it needs to be repaired on that spot anyhow, so why not limit it just to what's necessary, right?

11/30/2016 at 7:27 PM

I have a 1917 house with plaster walls and ceilings. The dining room and kitchen ceilings have drywall on top of the plaster. I love the smooth look and am okay with the layers because they are 10' ceilings. The master bedroom plaster ceiling is 3" shorter in the middle of the room. I believe the plaster and screen have come loose from the lath, so is drooping. I saw the button method on your site. Do you think this will work for my situation? I prefer not to pull out and replace the bedroom ceiling due to the mess. Plus the ceiling is only 7.5' high. The house has a steeply sloped roof in the front where the bedroom is located. I would love your suggestions.

Alex
5/14/2018

I think you may want to look into something like Plaster Magic https://amzn.to/2rGr5Nk to fix your ceiling, possibly along with the buttons. This would probably help to pull the plaster back up and to stay secure against the lath, working against the gravity that's going to keep pulling it down.

Sean
5/14/2018 at 6:20 AM

I think your blog is great. Your attention to detail and process descriptions are fantastic. My wife and I just purchased our first hom on Wolfe Street and see many projects ahead of us! Thanks!

Alex
5/14/2018

Congrats, and welcome to the neighborhood, Sean! I hope our posts come in handy as you work through your projects!

Since you've not signed in yet, you will need to fill in your name and email below. If you have a Facebook account, save yourself a step and use Connect to login.

Denotes a required field.

Please enter full URL, including http://

You can use Markdown syntax in your comment. And you can also use lots of Emoji!
  • Search

  • Login
  • Follow
  • Advertising

If you're looking for information on advertising and sponsorships, head on over to our sponsorships page. You can purchase site sponsorships in a few easy clicks. 

Toolbox Tuesday
Open Housing
  • We're Featured!

Old Town Home has been featured in the following places and publications:

The Washington Post
 
Washingtonian Magazine
 
Domino
 
Old House Journal
 
 
Apartment Therapy House Tour
 
Washington Post Express Feature
 
Home & Garden Blogs
 
© 2024 OldTownHome.com. - Privacy Policy

Unexpected Error

Your submission caused an unexpected error. You can try your request again, but if you continue to experience problems, please contact the administrator.

Working...

Working...