We had a bit much going on this week for a Toolbox Tuesday, so I figured I'd make it a Toolbox Thursday. It still has the alliteration I'm looking for, so we'll go for it and see how it feels as a more permanent toolbox day.
In our post about our adventures in tiling, we covered the difficulties associated with the tile spacers we ended up working with. As we outlined, the troubles we encountered were handled with a tremendous amount of swearing and a tiny bit of patience that we somehow miraculously mustered. However, in retrospect, this really didn’t have to be the case.
Sure, spacers are often optional for the professional that can typically eyeball a joint space and ensure a consistent and even look across an install, but that’s the benefit that comes with having years and thousands of hours of tiling experience. But what about us, the beginner tile setters of the world that just want to DIY a few tile jobs? The good news is, we have a few options, but some are decidedly better than others.
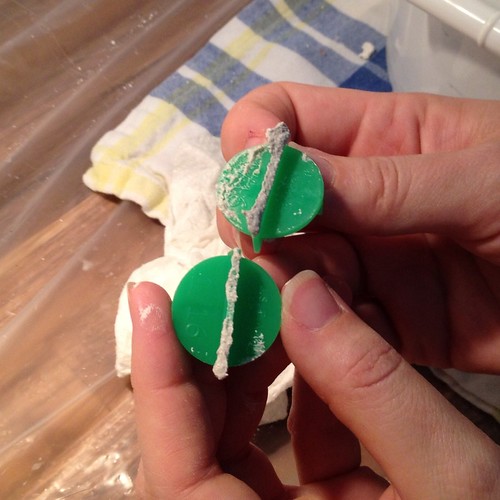
While installing our kitchen backsplash we ended up using a 1/16” grout joint and very consistent machine made tiles that we purchased from Lowes. The thing about machine made tiles is that they are all exactly the same size with essentially no variation whatsoever. When working with this type of tile, I’ve often heard that the good old tile spacers that you can pick up at any big box store are the best to use. They are a consistent size and give you the same spacing everywhere.
In the past we’ve worked with stone and handmade tile. In the case of stone and handmade tile, the sizes have irregularities that you often need to make slight changes in layout to accommodate. In these cases, I’ve been told to use spacers that allow for some adjustment.
After doing our backsplash using the disc style spacers with a cross on one side and a single line on the other, I now have a greater appreciation for the second type of spacers that allow more adjustments (the blue ones in the photo above). Without a doubt I can now tell you, if you’re tiling a wall (either full or small section), you can save yourself the trouble and just use the second type of spacers everywhere. Think blue, not green.
The experience of tiling our backsplash and having two spacers fall out for every three we put in was possibly one of the most infuriating things we’ve ever had happen while DIYing. It got to a point where it was purely comical, and both Wendy and I would end up laughing in amazement when the spacers would essentially jump from their placement, almost as if they were taunting us.
At one point Wendy even started to put a bit of thinset on the backs of the spacers so they would come in contact with the thinset behind the tile and create a bit of a bond. This worked really well but also made it near impossible to take some of the spacers out once the thinset had setup. A decent solution in a pinch, but far too time consuming if you don’t absolutely have to do it this way.
Through our use of these spacers I realized that they were all too short. It was probably by only 1/16”-1/8” short, but the areas that sit back behind the tile really should have been a little bit deeper. This added depth would have allowed the spacers to get a better foothold in the joint. But alas, this is how they were made, so there’s no changing this aspect of this sad spacer.
I also had a bag of the little cross spacers on hand and decided to try those instead. Unfortunately, those were worse. They were the same depth and had far less surface area, so they fell out much more easily.
Rather than the difficult workaround of applying thinset to the spacers, it’s probably best to just pick up some tile spacers that work, and work well.
I mentioned that we installed some handmade tile and natural stone a while back in our guest bathroom. This tiles' irregularities required some tile spacers that allowed us to maneuver them just a bit to adjust each joint. For this job, we used both the cross spacer inserted sideways to get additional depth, as well as a product that has since been discontinued called “Tile Spikes.”
Tile spikes are tapered tile spacers that started at a point and gradually increased in thickness, like little plastic shims. These spacers worked beautifully for our install because they reach a depth behind the tile that the other spacers can’t reach. Best of all, you can use these little spikes to slightly adjust based on depth, or slide two in on top of each other to make very minor adjustments, just like shimming a cabinet or door frame.
Unfortunately, as I mentioned, these spikes are no longer being made and we have just a single partial bag that is left from the projects we’ve used them before. I learned they are not being made when I tried to buy more of them before we started the backsplash. I was dejected, to say the least.
Now that we’ve completed our backsplash, and we have the bruised egos from our tile spacers to show for it, I decided I wanted to try to find an adequate replacement for Tile Spikes. This way we won't be left in the lurch on our next tiling job, whenever that may happen to be.
My research started on the forums where I first learned of the Tile Spikes, the John Bridge community. The pros there were the ones that highly touted the flexibility of the spikes, so I figured they’d have a good lead on a source. No luck, they mostly lament the death of the spikes and want them to come back.
After quite a bit of searching I do believe I’ve found a suitable replacement. A different company has started to create a product they’re referring to as “Tile Wedges.” They have a similar benefit to the spikes, but are much wider. You can actually order them from several places online, or you can pick them up in person at The Tile Shop.
These tile wedges come in bags of 500 and can be cut and trimmed as necessary. They are made from a type of hard plastic, so they’re a bit flexible, but they hold their position well. I’ll tell you one thing for sure, I really wish we had a few bags of these while working on the backsplash, it would have saved a whole lot of time and also limited our ridiculous levels of frustration. I'd think you can use these in conjunction with longer style cross spacers or leave in spacers (that you actually remove, I hate the idea of leave-in).
I hope this post is helpful and someone searching for “How to keep tile spacers from falling out” stumbles across this page and finds it useful. Sadly, it’s probably already too late for that person, they’re already in the midst of the horror.
Do you have any tips, tricks, or types of spacers you’d like to share with us? Perhaps something that has worked particularly well for you? Or how about your own spacer horror story? I think our next step will be to create a support group so we can all get together and lament the difficulties encountered in working with tile spacers.
Did you enjoy reading this post? Want to learn more about our first-hand experiences with other tools, devices or items used throughout our renovation? If so, check out our complete list of product reviews in our Toolbox Tuesday section.
Note: We weren't compensated for this review. We simply want to share good products when we see them, and hope that learning from our mistakes can help save you time, money and frustration.