Our kitchen renovation journey has taken us from within the bustling walls of IKEA to the sales floor of our local h.h. gregg, all in the name of a budget friendly but long overdue kitchen update. We should probably stop calling this kitchen update “temporary.” The level of effort, cost, and extent of the various changes we’ve been making tend to suggest this is far more of an “act 1,” or perhaps a “forward.” As temporary as it may ultimately prove to be, the changes we’re making have been thorough, detailed, and done to the best of our ability, and there’s nothing too temporary about that approach.
Following our butcher block counter top install, we had two very important tasks related to the backsplash. The first was to give ourselves a solid surface to which we could apply the tile. The second was to actually settle the debate between the style of tile application we wanted to use -- herringbone, running bond, or mini running bond (yes, the mini was back on the table).
After we completed our removal of the old counter tops, we saw something somewhat unexpected behind the old green laminate’s low backsplash. The small area of counter backsplash that rises above the counter seems to have been skim coated (or should I say “thick” coated) into place. This left a rather large and noticeable gap of 1/8” to 1/4” ridge in the plaster that differentiated the upper portion of the wall to the area immediately behind the old lower backsplash.
We had planned on doing some sort of a tile backsplash all along, but this, and the fact that the walls were very uneven, sealed the deal on our next step in the process -- we needed to install a backer board.
When installing tile on a floor, a suitable backer board or isolation membrane is always absolutely necessary. The same goes for tiling in a shower -- you should use either backer board or an appropriate waterproofing membrane over your surface (even drywall is appropriate if you use the right waterproofing). But for a tile backsplash, if your wall is good and plumb, without any major ridges or problems, you don’t always need to use a backer board, often you can just apply thinset to the walls and put your tiles in place.
Though we had hoped to be able to put our tiles right on the wall, the wall had other ideas. We headed out to Lowes and picked up three sheets of 3’ x 5’ Hardibacker in 1/4” thickness. This thickness would allow us to apply the backer board directly to the wall, providing an even and predictable surface for us to apply the tile, and would do so without adding significant thickness to the wall and thus sacrificing counter space.
Our wall area beneath the cabinets and above the counters is just a hair shy of 18” tall. This height, along with the roughly 7'-8’ lengths, lends itself quite nicely to the 3’ x 5’ sizing of the Hardibacker. We were able to more or less cut the sheets in half to provide us with nearly perfect sizing to apply the sheets to the wall.
We also picked up a box of cement board screws along with mesh seam tape to bridge the seams.
Along the wall to the right of the sink, we started by working with the longest sheet. To cut the Hardibacker, you need only deeply score your board along a cut line with a utility knife, then gradually apply pressure to the back (and it takes a fair amount of pressure) to break the board along the deep score. Once broken, you need only quickly cut the backside of the board with your knife, and you’ve successfully cut your backer board. If the edge isn’t totally clean, and you’ve got a tight fit or need an accurate cut, it’s best to use something like a drywall rasp to grind the area down until it looks the way you’d like. Though it's not really drywall, it sort of acts like it is really tough drywall.
Our first wall, the one to the right of the sink, has a switch and an outlet that we needed to account for prior to installation. To measure accurately, we leaned the cut piece into place and marked a straight vertical line on the wall that denoted the right most extent of this piece. Then we recorded the measurements from the counter surface to the box locations' height, as well as the distance from this right line to the sides of the boxes. You can just see the line in the very right of this photo.
Taking the Hardibacker back down into the basement, where I was doing all of my cutting, I would cut the box locations using a drill bit in the four corners, followed by a small but thick toothed hand saw to cut the straight lines (drywall hand saw). It took a few minutes for each box, but we were able to get them cut, and cut accurately, without tremendous effort.
On the wall to the right of the sink, we had to drill pilot holes into the brick wall using a masonry bit in order to get a good bite with the screws. The cement board screws we purchased are actually very similar to masonry screws, so they worked quite well in holding the backer board against the wall.
The remainder of the backer board install was just a series of:
- measure the area for the board
- cut the board to fit
- trim areas if needed
- measure for outlet and switch locations
- check the accuracy of measurements
- drill the four corners of the outlet or switch locations
- cut hole
- check for accuracy and fit
- drill pilot holes for backer board screws
- screw backer board into place using cement board screws
- repeat
Ok, I have to be completely honest here, this is one of those instances where the project is “temporary.” If this were a permanent install or final solution, I would have performed one additional step during this backer board install. Ideally, when installing backer board over drywall or plywood, either on the floor or the wall, you should apply a layer of thinset on the wall between the backer board and the wall. This eliminates any gaps or areas that would otherwise allow the backer board to flex. You typically do this because flexing board means cracked tile or grout, and ultimately failed installations. In this case, I felt that the backer board alone was good enough for our small backsplash purposes, and would be sufficient on its own without any thinset layer. Long term, I hope I'm right.
We had one small area behind the stove that required a slightly larger sheet, but that area was simplified a bit by the fact there were no outlets or switches to deal with.
The backsplash install took the majority of a day, and that was longer than both Wendy and I expected. Had I been cutting it in the kitchen, I do think it would have taken less time, but having to run up and down the stairs to make all cuts, definitely extended the duration of this step of the project. But cutting in the kitchen would have meant that gross cement dust floating all around our plates, and neither of us wanted that. We also took a little while extra to be very careful not to damage or gouge our new counters.
The final step on our backer board install was to tape the seams with fiberglass mesh, then apply a coat of thinset over top of it, really getting it into the joint of the seams. This step is another critical piece for making all of the individual pieces of backer board solidly act as one.
Wendy was instrumental in the measuring, fitting, securing, and taping phases of the backer board install, but I did all of the cutting in the basement. While I worked on the cutting, often spending 10 or more minutes at a time in the basement, Wendy was working on her vision for the room. More specifically, she was working on her vision for what the tile backsplash would ultimately look like. As you may remember, we’ve had this running debate going to determine the style of tile install we wanted to pursue.
It began during our dinner conversations, and ultimately spilled onto the floor of Lowes, which was spread via Instagram, Facebook, and Twitter. Eventually, this debate even garnered a partial blog post.
We had many votes cast for each layout style, and many justifications or preferences reflected through each Internet medium, but there was no clear winner. We were torn between each of the styles, primarily because each had its positives and negatives.
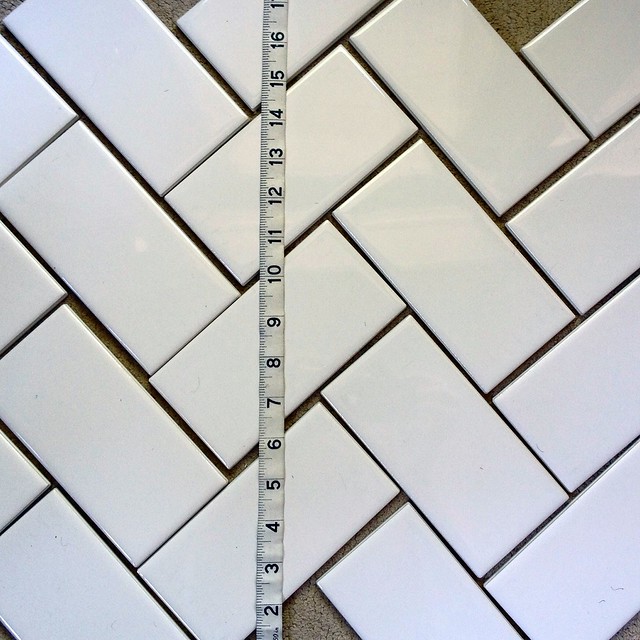
While I was in the basement, Wendy was doing her due diligence on tile layout. The main thing we were concerned with was the difficulty in layout given our limited space. As I mentioned, we only had about 18” of backsplash tile area to work with.
Several people expressed concern regarding the height of the available tiling space limiting our ability to do a herringbone layout. After laying out the tile and measuring, we could see just how much we would have visible.
I think our preference would have been to do the herringbone layout, but all of the naysayers were correct in their assessment. The herringbone would have been far too limited by the available space between the counter and upper cabinets. That downside, coupled with the fact that this pattern would create a ton of waste due to the number of cuts (and therefore require more money spent on extra tile) as well as would take a lot of extra time due to the complexity of the pattern and extra cutting, made the decision for us to rule out the herringbone.
Now having decided on a running bond pattern, we needed to finalize the size of the tiles. We had looked at the smaller running bond tiles, sold in sheets of 12” x 12”, but had already purchased two boxes of the individual 3” x 6” tiles. Given the somewhat classic style of running bond, and the classic size of 3” x 6” subway tile, Wendy (and I, but mostly Wendy) decided that we’d go with the running bond in 3” x 6” tile, though the smaller tiles in the mats would have probably been a little easier. (The smaller tiles also happened to be 50% more expensive.)
With that, our decision was made. We've opted to go with 3” x 6” running bond, and are happy to move forward. We just need to let the joints on the backer board cure for the evening, then we’ll be able to begin tile installation. We're both super excited that we're closing in on the finish line.
What do you think of our decision to go with the larger, more traditional, subway tile in running bond? Do you have any tips for tile installation that you'd like to share?