When we moved into our house, our gutter situation was far less than desirable. The white aluminum gutter that adorned the back wall of our home may have been just 10 feet wide, but its modern shape looked out of place on the rear of our little historic home. The situation was further conplicated by the fact the gutter emptied into some PVC elbows, and ultimately a 3" PVC pipe, rather than a normal downspout.
This insufficient setup often resulted in severe clogs due to ice and debris. The clogs then led to gutter overflow issues, ice damning, and ultimately, the massive termite damage we uncovered in the back kitchen wall that led to near disaster.
I mean, we had to have known there were issues when the previous owner pointed out that he placed a plastic rubbermaid container with a 10lb weight in it to catch overflowing water from the downspout. He was apparently "sick of how the water sounded when it kept hitting the window." Hrm, not sure why he didn't unclog the gutter an install some screen, but hey, if he'd been more proactive we couldn't have afforded the house.
After we fixed up the interior issues in the kitchen, we turned our attention to the outside issues that long plagued the house. One of those issues included replacement of the white aluminum gutters with a half round copper gutter that was much more appropriate to the age of our home.
I can fill you all in on the details of our copper gutter purchase and install during a later post, but after a fair amount of effort, it turned out very nicely. We ordered everything from Classic Gutter Systems, and they were quite helpful with advice on the install. All was good with the world for several years. The oversized gutter and downspout easily handled all of the water shed from our roof, something of a tall task for our previous gutters. Best of all, no more backups, ice damning, or clog issues. That is until we noticed a problem last winter - it looked as if the main downspout had a sort of dent or bulge in the side of it.
When we bought our gutters, our budget was tight, and copper was expensive. We made a compromise and bought the downspout with the crimped seam rather than the crimped and soldered seam. It made financial sense at the time, since it was a few dollars cheaper per foot, and we were ordering 40 feet. Fast forward several years and a many freezing nights, and our downspout had popped open.
The seam had given way and each time it rained the water was hugging the inside perimeter of the downspout and coming out of the side.
You can see the discoloration where the water was exiting the downspout for many months. Luckily, thanks to the laws of physics, the water was still staying on the downspout and not spraying wildly all over the place. Also very lucky, due to the laws of my compulsive behavior and tendency to over order, we had an extra 10 foot length of 4" copper downspout that was sitting in the basement for the last seven years. (Ask Wendy what she thinks of my basement hoard now. Um, yeah, she still hates it.)
Last weekend, while I was doing some work to save our bay window from certain death, I also opted to replace the damaged downspout. The old and new piece were the same size, so it should have been a quick and easy swap. Should have been...
After taking the securing springs off of the old downspout and removing it from its home, I laid the old piece down next to the new piece.
Apparently, "same size" is a relative, or at least, a very inaccurate term. They must have used one of those variable length measuring devices when cutting this downspout, because the newer one was actually several inches longer than the old one. Unfortunately, due to the tight fit and established lengths, I had to trim this new one down to size.
I grabbed my right turn snips, determined the proper length, and went to town cutting. I'm glad I used the right turn snips for this rather then the straight ones. The straight snips would have made a mess of the cut, and I only had one shot at doing it right.
After the cut was complete, I used my reducing crimpers to shrink the bottom of the downspout so it could fit inside of the other piece it was connecting to. It's just a simple slip fit, no soldering or anything required. It may not be 100% water tight, but I figure if I'm having an issue where the downspout backs all of the way up, I'd rather see the water coming out of the middle of the spout than overflowing the gutter and possibly getting into the house.
Once I had the new piece cut to size and ready to install, it was as easy as leaning it into the lower piece...
...Then crawling up on the ladder to connect the two elbows where the gutter exits. I hate being 25' above the ground. I'm not afraid of heights, I'm just afraid of falling.
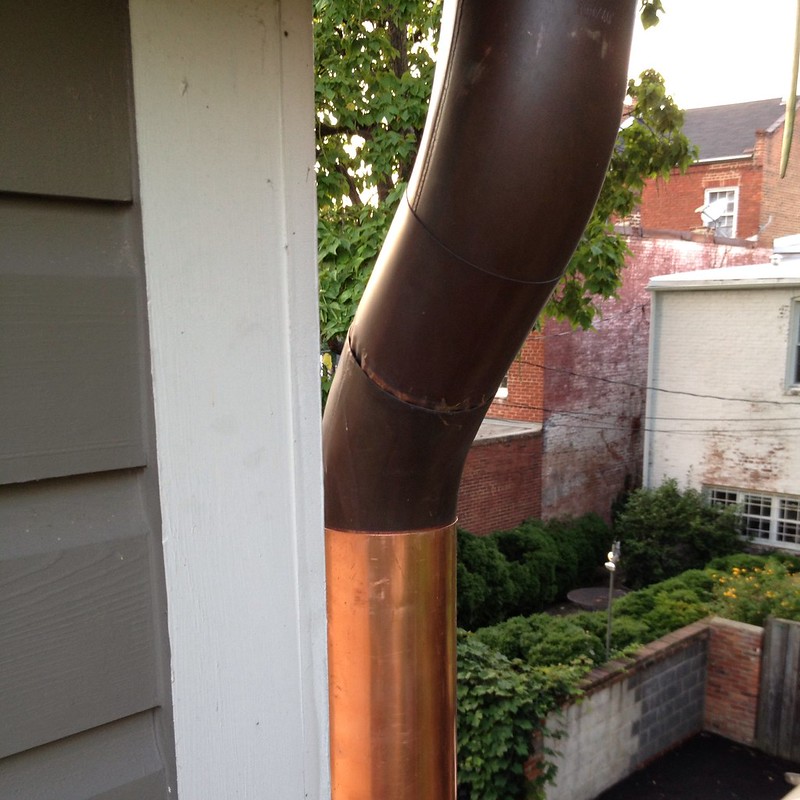
So simple, so easy, I can't believe it took me about six months to do it, even when I had the supplies all on hand. We've been knocking out little tasks like this all over the house lately, so I figured it was about time. Total effort = about one hour. Here's a closer look at the gutter to downspout connection.
The new downspout is so shiny compared to the weathered copper. It should take just a few weeks for the shine to wear off, then about a year to really match the color of the roof and gutter. It's weird to think the copper gutter and roof all used to be this shiny. I kind of miss it. Here's a look that includes the nicer paint on our bay window.
The new piece is a little bit dented on account of it hanging out in our basement and getting mildly abused for seven years, but the seam is in good shape and all is fully functional again. I'll need to keep my eye on it over the coming winters to see if we have another blow out. If we do, I think I'll be forced to order a few lengths of the downspout with soldered/welded seams. I hope it doesn't come to that.
Have you been working on any tasks that are more the bite sized kind, or are you tackling the much larger stuff on your to do list? I guess we're actually in a "no man's land" of tasks, as we're trying to do all of the big stuff, small stuff, and start new stuff. This is not a recipe for relaxing evenings, I assure you.
In case you're wondering if we've made any painting progress in our sun porch, head on over to our Facebook page for a sneak peek.