Last week we gave you all a little glimpse into the first several steps of our home office renovation project, as well as the injury I suffered that threw a major wrench into our plans. But once I healed up and jumped back on the DIY horse, we still had a TON of work to get cracking on to give us a home office. I'll tell you one thing for sure, when you're sitting around in a sling while the house has work to be done, it gets old really fast.
Though we had completed the walls and ceiling, we had some serious issues facing us with the wood floor. The old oak flooring had been covered for many years by tile applied over plywood. But besides a little water damage in a spot or two, the flooring that was still there looked to be in pretty decent shape. Unfortunately, there was a large strip that had been cut out at some point, and we're still not sure why. You can see the large section of missing flooring on the right side of this photo.
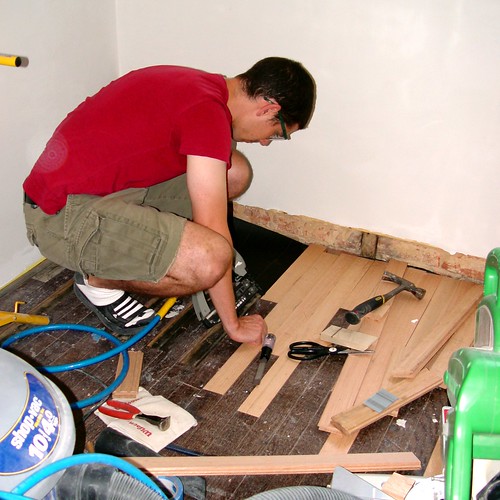
In the above photo, I had already started removing boards near the cut so that we could properly patch the area in a way that would fix the floor without drawing attention to the fact it had been fixed. After all, as bad luck would have it, the strip of flooring was missing across the boards, so this required us to take the time and effort to remove end boards individually in order to weave in new flooring.
To accomplish a seamless patch, I removed boards from the cut back to their natural ends in a more or less random manner. This would allow us to cut individual boards that would go all of the way to the wall, giving the appearance that the floor had never had sections removed.
Apparently I always wear sandals when working on the house. This is quite poor form.
Sure, anyone you hire to do this would probably take out the whole floor in that room and just replace it, but we don't like the idea of tearing something old out just to put the same something new in its place. Instead, we bought a bundle of select oak and began fitting it all back together.
It was my first foray into flooring repair and I think I did a pretty decent job. There are things I'd do a little differently now, like use spacers to create a little gap between the new boards in order to better mimic the look of the old floor, but otherwise, we're pretty happy with the results.
It took just a few hours to weave in the new flooring with the old. Once it was all in, I noticed the new flooring was roughly 1/8" higher than the old. I didn't think of it before installing, but it makes sense. The old floor was about 100 years old, and it had probably been refinished several times prior to having the bathroom floor laid over it. The refinishing had taken the surface down a bit, so the new floor would obviously be higher. If I were doing this again, I'd probably take about 1/8" off of the bottom of the new floor on the table saw. Had I done that, it would have saved me a lot of time sanding to get the height to match.
Once the floor had all been laid we decided to try our hand at refinishing the floor. We had seen a very DIY friendly random orbit sander on an episode of This Old House and a local Home Depot had this sander available for rent. This is actually the same type of sander we used when we refinished the floor in the major kitchen project. One weekend morning we drove out to the Home Depot and rented it for the day. I must say, if you're interested in refinishing your own floors, this is the way to go.
The sander is heavy and does most of the work -- you just need to keep changing the Velcro discs as needed. The best part is that the random orbit movement makes the job easy.
You can get right into corners without any special tools, and you don't need to go with the grain of the wood like you'd need to with the large drum sander. But one thing is for sure, the sander is LOUD. I ended up wearing the headphones I typically use when going to NASCAR races, which did the trick quite nicely.
Once the floors were sanded we applied several coats of stain to match the flooring color of the rest of the house. Our stain of choice is the Minwax "Early American."
As we completed the first coat of stain we started to notice the new flooring was coming up much lighter than the old. It seemed like the old flooring was accepting the stain far more readily.
Before we applied the polyurethane, but after allowing the first coats of stain to dry, we devised a little plan to correct the color issues we had noticed. Using blue painters tape we taped off the perimeter of the boards that appeared a bit lighter.
We then applied a few more coats of stain to the lighter boards. After quite a bit of careful taping and staining the end result was a repaired floor that could almost pass for always being there. We were quite happy with our efforts and were looking forward to what the office could become.
Though the office wasn't quite "complete," we had gotten over one of the biggest hurdles in its renovation, and were quite happy with how it had turned out. The only real "blemish" throughout the floor are the two dark spots in the bottom of the photo above. Those were from two nails that let water down into the wood floor. We just figure they add "character," and luckily the rug in this room hides this area.
Have you ever had to make major repairs to wood flooring during any of your projects? Are you a tear out and replace it type of person, or did you weave it in like we did? And what did you think about the refinishing process? I'd love to hear some other peoples' take on this task.